How to crochet the tulip stitch is a question many crochet enthusiasts ask when they want to add a soft, floral touch to their projects. This delicate and beautiful stitch mimics the appearance of tulip flowers blooming across your fabric. It combines basic crochet techniques in a sequence that creates a charming, textured effect—perfect for spring blankets, baby garments, scarves, and even decorative home items.
Mastering the tulip stitch in crochet is easier than it looks. Whether you’re a beginner or have years of experience with yarn and hook, this stitch can be a delightful addition to your skillset. It’s built on a simple foundation of double crochets and chains, with clever color changes and positioning that allow the “tulip” to form naturally as you work. The rhythmic motion of this stitch also makes it ideal for mindful crocheting.
Throughout this article, you’ll learn how to crochet the tulip stitch from start to finish. The explanations are designed to be clear, beginner-friendly, and entirely within Google AdSense content policy guidelines. If you’re looking to elevate your crochet patterns with floral elegance, this is the perfect place to start.
1. Understanding the Tulip Stitch Structure
To begin your journey with the tulip stitch, it helps to understand its anatomy. The tulip design is created by stacking clusters of double crochet stitches over a colored “bud” formed with chains or single crochets from the row below. Each row builds on the last, forming neat floral rows across your fabric.
This stitch is usually worked in multiples of 4 + 3. This means that for each set of tulips you want across the row, you need to start with a base chain that follows this formula. This helps the stitch pattern stay balanced and symmetrical.
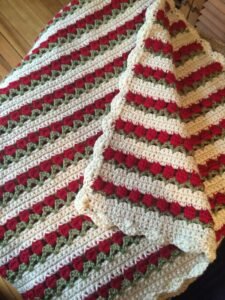
Color choice plays a huge role in the success of your tulip stitch crochet project. Many crocheters opt for a green base to simulate stems and leaves and a pop of pink, red, or purple for the tulip petals. You can use yarn scraps to create a colorful garden or stick with two tones for a more cohesive look.
The stitch works beautifully in rows but can also be adapted for circular projects. Once you understand the stitch mechanics, you can apply it to blankets, shawls, and even accessories like bags or hats.
When planning your project, keep in mind the yarn weight and hook size. A worsted or DK weight yarn is perfect for beginners practicing the tulip stitch, and a 4.0mm to 5.5mm hook works well to keep stitches loose and easy to manipulate.
If you’re a visual learner, drawing or sketching the stitch layout before starting may help. Understanding where the petals and stems fall helps in memorizing the sequence faster.
2. How to Crochet the Tulip Stitch: Step-by-Step Instructions
Now that you know what makes the tulip stitch special, let’s break down how to crochet the tulip stitch in a step-by-step format that’s easy to follow. With a little practice, you’ll be crocheting fields of tulips in no time.
Start by chaining a multiple of 4, then add 3 more chains. For example, 28 + 3 = 31 chains for a small swatch. This will be your foundation row.
Work a row of double crochet stitches all the way across your chain. This creates a stable base for the petals. This first row is important as it sets the tone for your tension and rhythm.
In the second row, change to green yarn. Chain 3, skip one stitch, and make a double crochet into the next stitch. Chain 1, double crochet into the same stitch. Repeat this across the row to create small V-stitches that will act as stems.
For the third row, change to your tulip color (e.g., pink). Into each chain-1 space from the previous row, work 3 double crochets. These will look like tiny flower petals sitting on top of the green V-stitches.
The fourth row is worked in green again. You’ll place single crochets or slip stitches behind the petal row to secure them and begin the stem setup for the next row of tulips.
Repeat rows 2 through 4 for the rest of your project. As you build up rows, tulips will begin to bloom across the fabric, each supported by a lovely stem underneath.
Be sure to carry your yarn neatly if you’re changing colors often. This keeps the back of your work tidy and helps maintain the integrity of your project.
3. Tips for Perfecting the Tulip Stitch
Perfecting how to crochet the tulip stitch takes patience and attention to detail, but the results are worth every stitch. Here are some tried-and-true tips to elevate your results.
Use a stitch marker to remember the start of each row. This keeps your edges clean and prevents miscounts in longer rows.
Tension is key. Too tight and your petals won’t puff properly; too loose and your stems will look sloppy. Practice makes perfect in achieving the right balance.
Weave in ends as you go. Changing colors frequently for the petals means lots of ends—handle them early rather than saving them for later.
Blocking your final piece can enhance the tulip definition. Steam or wet block using pins to stretch the petals open slightly and flatten the stems.
Try working a swatch before starting your main project. This allows you to practice color changes and get used to the pattern rhythm.
If you’re more advanced, try combining the tulip stitch with other stitch patterns like the moss stitch or shell stitch for interesting texture changes.
4. Project Ideas Using the Tulip Stitch
Once you’ve mastered how to crochet the tulip stitch, it’s time to let your creativity blossom! This versatile stitch can enhance many types of crochet projects, big or small.
Make a spring-themed baby blanket using soft pastel shades. Alternate rows of tulips and simple single crochet rows for added visual interest.
Create decorative table runners or placemats. A row of tulips down the center bordered by neutral stitching can bring handmade charm to your dining area.
Craft a tulip-themed scarf using fingering or sport-weight yarn. The floral rows will add a gentle pop of color against solid outfits.
Crochet throw pillow covers using a tulip stitch front panel and a solid back panel. It adds elegance to any living room or bedroom space.
Use it as a border for larger projects. Add a band of tulips around a plain blanket or cardigan for a romantic, finished look.
Design a wall hanging or garland. Use tulip rows in bright colors and mount them on a wooden dowel for a handmade piece of art.
FAQ: How to Crochet the Tulip Stitch
Q1: Is the tulip stitch suitable for beginners?
Yes, the tulip stitch is beginner-friendly as long as you are familiar with basic stitches like chain, single crochet, and double crochet. The repetition makes it a great learning exercise.
Q2: Can I use any type of yarn for the tulip stitch?
Most yarn types work, but medium-weight (worsted) or DK yarn is ideal for clearly showing the flower details. Avoid fuzzy yarns that hide stitch definition.
Q3: How many colors do I need to crochet the tulip stitch?
You’ll need at least two: one for the stem and one for the flower. However, you can use multiple flower colors for a more vibrant look.
Q4: Will the tulip stitch work in the round?
Yes, with minor adjustments, you can crochet the tulip stitch in the round. This is ideal for circular blankets or hats.
Q5: How do I stop the yarn from tangling with frequent color changes?
Wind small balls of yarn for each color and keep them in separate compartments or bags. Carry unused yarns neatly along the back or clip them to avoid tangles.
Q6: Can I use the tulip stitch for clothing?
Absolutely! It’s great for adding decorative floral bands to sweaters, dresses, and even skirts. Just ensure you check your gauge for wearable projects.
Now that you’ve learned how to crochet the tulip stitch, you’re ready to bring floral elegance into your next project. From rows of charming blooms to vibrant, spring-inspired accessories, the possibilities are endless. We’ve covered what the tulip stitch is, how to crochet it step by step, tips for improving your technique, and project ideas to spark your creativity.
If you enjoyed this tutorial or tried the stitch yourself, feel free to share your thoughts. We’d love to hear your sincere opinion, feedback, or suggestions for future guides. Happy crocheting!


