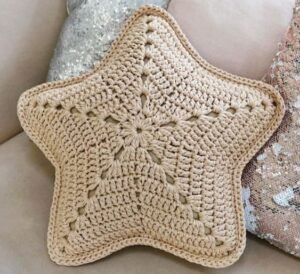
Crocheting a star-shaped pillow can be a fantastic project for both beginners and seasoned crochet enthusiasts.
This blog post will walk you through a simple, easy-to-follow star-shaped pillow crochet pattern, including exact stitch counts and tips for achieving a beautiful finish.
Let’s get started with all you need to know to create your own crochet star pillow!
Getting Started with Star-Shaped Crochet Patterns
Crocheting a star-shaped pillow requires a few basic materials and a love for crochet. For this project, you’ll need yarn, a crochet hook, and some filling to make the pillow plush and comfortable. For a beginner-friendly version, consider using chunky yarn, which helps make the star shape more pronounced and the pattern easier to follow.
Star-shaped crochet patterns are a bit unique compared to square or rectangular shapes. The shape requires increases and decreases at precise points, which gives the star its characteristic points and symmetry. Understanding these basics will help you follow along as we go step-by-step through each row of this pattern.
The star-shaped crochet pillow is versatile—it can be made in any color to match your decor and even customized in size depending on your stitch counts and yarn thickness. By following this guide, you’ll have a beautiful handmade star pillow in no time.
Materials You’ll Need to Crochet a Star-Shaped Pillow
To begin this star crochet pillow pattern, gather your materials. You’ll need a medium-weight yarn for a standard-size pillow; cotton or acrylic yarn works well as they’re soft and durable. The color choice is up to you, but soft pastels and neutrals tend to work well for home decor items.
You’ll also need a crochet hook in a size that matches your yarn; typically, a 5mm hook works well with medium-weight yarn. Check the yarn label for guidance, as this can help you choose the most appropriate hook size for your project. Other tools include a yarn needle for sewing the pieces together and scissors for cutting the yarn as you work.
Lastly, for the filling, choose a soft polyester fiberfill. This type of filling is easy to work with and will give your star-shaped pillow a soft, cozy feel. Make sure to have enough filling to stuff each point of the star evenly.
Understanding the Basics: Crochet Stitches for a Star Pattern
To crochet this star-shaped pillow, it’s helpful to be familiar with a few basic stitches. The main stitches we’ll use are chain (ch), single crochet (sc), and double crochet (dc). Each stitch will contribute to the shape of the star by adding or reducing rows at specific points.
Start by creating a magic ring; this technique helps create a circular shape with no gaps in the center, perfect for beginning star or round shapes. Next, we’ll use single crochet and double crochet stitches to form each point of the star. These stitches, combined with increases and decreases, will shape the star’s five points.
If you’re unfamiliar with any of these stitches, you may want to practice a few sample rows first. Having a solid understanding of the basics will make following the pattern much easier, especially when creating the star’s points and filling out the center.
Step-by-Step Guide: Star-Shaped Pillow Crochet Pattern
- Create the Magic Ring
Begin with a magic ring, ch 1. Work 10 single crochets (sc) into the ring. Pull the ring tight and join with a slip stitch (sl st) into the first sc. (10 stitches in total) - Row 1: Forming the First Round
Chain 1, then increase by working 2 sc in each stitch around the ring. Join with a sl st into the first stitch of the round. You should have 20 stitches now. - Row 2: Beginning the Points of the Star
Chain 3, skip the next stitch, work 2 dc in the next stitch, and chain 3. Repeat this pattern around until you have five “points” forming. Join with a sl st to complete the row.
Adding Definition: Building the Star’s Points
Now that we have a rough outline of the star’s shape, it’s time to add rows to the points to give the star its full shape. Each point will require increases to create height and shape, but remember to keep the stitch count consistent across each row to maintain symmetry.
Start each point by chaining 3, which counts as your first dc. Work 2 more dc into the next stitch, then 1 sc in each stitch up the point until you reach the end. Turn and work back down with 1 sc in each stitch, ending with a slip stitch to complete each row.
Each row adds to the star’s shape, so keep an even tension throughout. Repeat this process for each point to ensure that they are even and symmetrical.
Closing the Pillow and Adding Filling
Once both sides of the star pillow are completed, it’s time to assemble. Place the two star pieces together with the wrong sides facing each other. Using a yarn needle or your crochet hook, sew the edges together, leaving a small gap for stuffing.
Gently fill the pillow with polyester fiberfill, ensuring each point is evenly stuffed. This will give your star pillow its plush shape. After filling, sew up the remaining gap to close the pillow securely.
Make sure to secure the ends of the yarn by weaving them into the pillow to avoid unraveling. Your star-shaped crochet pillow is now ready to be used or gifted!
Tips for Customizing Your Star-Shaped Pillow
One of the great things about a crochet star pillow is its versatility. For a larger pillow, you can use thicker yarn and a larger hook size. Alternatively, if you want a smaller star, use thinner yarn and a smaller hook, adjusting the pattern as needed.
Consider experimenting with color changes, such as creating a two-tone star with different colors on each side. You can also add decorative edging with a contrasting color for an extra pop. Personalizing with a small embroidered initial or design in the center can also give it a unique touch.
Finally, if you’re feeling adventurous, try adding small embellishments like tassels or beads to each point for a fun twist. This can add a whimsical look, especially if the pillow is meant for a child’s room or playful space.
Maintaining Your Crochet Star Pillow
To keep your crochet pillow looking fresh, it’s important to care for it properly. If made with machine-washable yarn, it can often be washed on a gentle cycle, but hand-washing is preferred to maintain the integrity of the stitches.
Dry your star pillow flat to prevent stretching, and avoid wringing it out. Once dry, you may want to give it a gentle reshaping by hand to ensure the points are intact and even. With proper care, your crochet star pillow will remain a charming addition to your home for years.
If the pillow needs spot cleaning, use a mild detergent and water solution and dab gently. This will help maintain the vibrancy of the yarn color without causing any fraying or loosening of stitches.
Final Thoughts
Creating a star-shaped pillow is a delightful project that combines creativity and practical crochet skills. It’s a versatile, charming addition to any room, making it an ideal project whether you’re crocheting for yourself, a friend, or family. With the simple steps above, you’ll find that making this unique crochet pillow is achievable, enjoyable, and rewarding.
We hope this pattern and guide inspire you to start crocheting your own star-shaped pillow. Feel free to share your finished creations on social media or with other crochet enthusiasts—there’s nothing quite like showing off a handmade piece that’s as practical as it is beautiful. Enjoy your crocheting journey!


