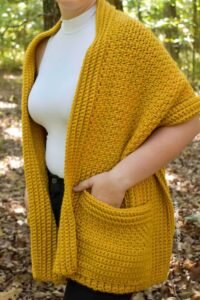
How to crochet a shawl scarf is one of the most delightful and rewarding projects for both beginners and experienced crocheters. This elegant accessory is not only functional—keeping you warm during chilly days—but also adds a handmade touch of charm and sophistication to any outfit. Whether you’re gifting it to a loved one or making it for yourself, crocheting a shawl scarf is a relaxing and fulfilling experience.
Learning how to crochet a shawl scarf gives you the freedom to choose your favorite yarn textures, colors, and stitch patterns. The creative possibilities are endless. You can opt for a lightweight piece perfect for spring and fall, or a thick and cozy version ideal for winter. Best of all, it’s a project that can be customized to reflect your personal style, making it a beloved part of your handmade wardrobe.
In this article, we’ll guide you step by step on how to crochet a shawl scarf, including choosing the right materials, selecting stitches, shaping the scarf, and finishing techniques. We’ll also cover important tips to ensure your project is beautiful, well-made, and enjoyable to complete.
1. Choosing the Right Yarn and Hook for Your Shawl Scarf
The first step in learning how to crochet a shawl scarf is selecting the appropriate materials. The yarn and hook size you choose will determine the texture, drape, and warmth of your finished project.
Lightweight yarns like fingering or sport weight create delicate, airy scarves perfect for layering. On the other hand, worsted or bulky yarns give you a thicker and cozier result, ideal for colder months.
When it comes to hook size, always refer to the yarn label’s recommendations, but feel free to go up or down in size depending on how loose or tight you want your stitches. A larger hook can provide more drape, which is often desirable in shawls.
Natural fibers like cotton and wool are popular choices. Wool blends offer warmth and elasticity, while cotton gives a smooth and breathable finish. Acrylic yarn is a great affordable alternative and is easy to care for, especially for gift items.
Color also plays a vital role. Solid colors highlight intricate stitch patterns, while variegated yarn can give a beautiful gradient effect without changing skeins.
Ultimately, choose a yarn and hook combination that feels good in your hands and matches the style of the scarf you envision. This sets the tone for the entire project.
2. Selecting Stitch Patterns and Shawl Shapes
Now that you’ve gathered your materials, it’s time to think about the shape and stitch pattern. There are many styles to explore when learning how to crochet a shawl scarf, from traditional triangles to contemporary rectangles and crescent shapes.
Triangle shawls are a popular beginner choice. They are easy to increase from the center or top down and naturally drape around the shoulders. Rectangular scarves offer a modern silhouette and are often the simplest to construct.
Shell stitches, v-stitches, granny clusters, and mesh designs are commonly used in shawl patterns. These stitches provide texture and interest without making the piece too heavy.
You can also combine multiple stitch types to add complexity and personality. For example, alternating rows of lace and solid stitches can create a visually striking result.
If you’re new to stitch design, start with a simple two-row repeat pattern. This will help you focus on building confidence with your tension and counting while still producing a beautiful result.
As you grow more comfortable with your crochet skills, try experimenting with more intricate lace patterns and edgings. These touches can elevate your shawl into a work of art.
3. Working the Foundation and Increasing Rows
To start your shawl scarf, you’ll usually begin with a chain foundation, especially for triangle and rectangular designs. This step is essential in understanding how to crochet a shawl scarf correctly from the base.
Make sure your starting chain is loose. Using a hook one size larger for the foundation row can help prevent puckering or tightness along the bottom edge.
For triangle shawls, you’ll often begin with just a few stitches and gradually increase on both sides or just one edge. Stitch markers are extremely helpful to track where increases occur each row.
Rectangular scarves usually start with a longer chain that represents the entire width of the scarf. From there, you build row by row until reaching the desired length.
It’s important to count your stitches consistently and keep an eye on your edges. Uneven increases or skipped stitches can alter the shape of your shawl and affect the final drape.
As your shawl begins to grow, you’ll see the pattern take shape. Watching your work unfold row by row is one of the most satisfying parts of crocheting.
Take your time on these foundation rows. A strong and even start makes finishing your project much more enjoyable and polished.
4. Finishing, Blocking, and Styling Your Shawl Scarf
Once your final row is complete, you’re almost finished learning how to crochet a shawl scarf. But before wearing or gifting it, there are a few important final steps to complete the look.
Fasten off your yarn securely and weave in all loose ends using a yarn needle. Take care to hide them in similar-colored areas to keep your work clean and invisible.
Blocking your shawl is essential, especially for lace patterns. Wet blocking or steam blocking helps even out stitches, open up the design, and improve the overall shape. Pin it into place on a foam board or towel and let it dry completely.
If your yarn is acrylic, steam blocking is usually best. For natural fibers like wool, soaking in lukewarm water with a bit of gentle soap is effective—just be careful not to agitate it, or it may felt.
Adding decorative elements like fringes, tassels, or even beadwork can give your shawl a custom, finished look. These details enhance both texture and style.
Finally, style your shawl however you like! Drape it around your shoulders, wrap it like a scarf, or tie it at the front for a cozy, modern accessory. The versatility of a handmade shawl scarf is one of its biggest strengths.
Wearing a shawl that you crocheted with your own hands is deeply rewarding. Not only is it practical and stylish, but it also tells a story of creativity and craftsmanship.
– Frequently Asked Questions About How to Crochet a Shawl Scarf
Q1: Is crocheting a shawl scarf good for beginners?
Yes, how to crochet a shawl scarf is a perfect project for beginners. Simple patterns with basic stitches can still look elegant and are a great way to build skills and confidence.
Q2: How long does it take to crochet a shawl scarf?
The time varies depending on your experience, pattern complexity, and how much time you dedicate. A basic shawl might take 8–12 hours, while more detailed projects can take several days or weeks.
Q3: What is the best yarn for a shawl scarf?
It depends on the intended use. Use soft wool blends for warmth, or cotton and bamboo for breathable, lightweight options. Acrylic yarn is also beginner-friendly and widely available.
Q4: How do I block my finished shawl?
Lay your finished piece on a flat surface like a towel or foam board. Pin it to your desired shape, then either mist it with water or use steam to relax the fibers. Let it dry completely before unpinning.
Q5: Can I use any stitch for a shawl scarf?
Most stitches work well in shawls, but openwork or lace stitches are particularly popular for their light and drapey texture. Shells, v-stitches, and mesh patterns are great beginner options.
Q6: What shape is easiest to start with?
A triangle shawl is often considered the easiest shape for beginners. It starts small and grows gradually, making it easy to manage and adjust as you go.
In this comprehensive guide, we explored how to crochet a shawl scarf from start to finish. You’ve learned how to choose the right yarn and hook, select a pattern and shape, build your shawl with thoughtful stitches, and finish it off with polish and style.
Crocheting your own shawl scarf is more than just a crafting project—it’s a chance to express your creativity and enjoy the satisfaction of making something beautiful with your own hands. Whether you’re a beginner or seasoned crocheter, this versatile project fits all skill levels.
We hope this tutorial has helped you understand the basics and inspired you to start your own shawl. If you enjoyed this guide on how to crochet a shawl scarf, please leave your honest opinion below. We’d love to hear your feedback and suggestions for future topics!


