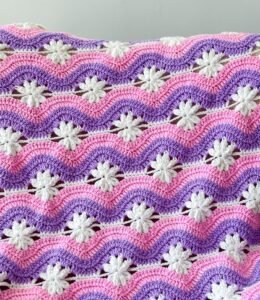
How to Crochet a Ripple Blanket with Daisies is a joyful and relaxing way to bring texture, color, and charm into your handmade creations. This style combines the iconic ripple or chevron design with delicate, cheerful daisy motifs, making it a favorite project for crochet lovers of all levels. Whether you’re crafting a gift, decorating your own space, or exploring new stitches, this tutorial will walk you through everything you need.
The ripple pattern is loved for its rhythmic waves and soothing symmetry, while the daisy flowers add an adorable, nature-inspired detail. Together, they create a blanket that feels vintage yet modern, cozy yet vibrant. This project also allows for great flexibility with yarn color choices, making it perfect for both bold color-blocked blankets or soft pastel combinations.
In this article, you’ll learn how to crochet a ripple blanket with daisies, from choosing your materials and learning the basic stitches, to creating the ripples and attaching the flowers seamlessly. Along the way, we’ll also cover tips for keeping your stitches even, choosing the best yarn, and making your blanket last for years.

1. Choosing the Right Yarn and Tools
To begin your crochet ripple blanket with daisies, it’s important to select the correct materials for comfort, durability, and stitch clarity.
Choose a medium-weight yarn (worsted or DK) to give the blanket body without making it too bulky. Cotton or acrylic yarns are ideal for beginners as they are easy to handle, washable, and widely available.
For the crochet hook, a size 4.5mm to 5.5mm is commonly used for ripple stitch patterns, depending on your tension and yarn type. Be sure to make a swatch first to check your stitch size and how the yarn behaves with your hook.
Color selection is also key in a project like this. Pick at least three colors: one for the main ripple stripes, one for the daisy petals, and one for the flower centers. Soft yellows, creams, and greens work beautifully with a daisy theme.
You’ll also need a yarn needle for weaving in ends, stitch markers (optional but helpful), and scissors. Having a good pair of embroidery scissors makes trimming ends more precise and tidy.
Lastly, consider printing or writing down your color pattern if you’re planning multiple stripe colors to maintain consistency and avoid confusion.
2. Learning the Ripple Stitch
Understanding how to crochet a ripple blanket with daisies starts with mastering the base ripple stitch.
The ripple pattern consists of a series of increases and decreases that create the classic “wave” look. It’s built by skipping stitches in some places and adding multiple stitches in others.
To begin, chain a multiple of 14 plus 3. This helps align the ripples evenly across the row. The extra 3 chains count as your first double crochet.
In the first row, start your first ripple by making double crochets in the next 6 chains. To create the peak of the wave, make 3 double crochets in the same stitch. Continue the row by making 6 double crochets and then skipping 2 chains to form the valley.
Repeat this ripple pattern across the row. End with 6 double crochets to maintain symmetry. This forms your base row and sets the stage for the rest of the pattern.
Once you’re comfortable with the rhythm of increases and decreases, the following rows simply build upon that foundation. Turn your work, chain 3, and repeat the ripple pattern to keep the blanket growing.
Be sure to count your stitches often to keep the ripples aligned. Mistakes can throw off the wave pattern and affect the look of your blanket.
3. Crocheting and Attaching the Daisies
The daisies are what make this blanket extra special. These little floral motifs bring a splash of joy and handmade charm to the ripple background.
Start by crocheting simple daisy motifs. Chain 4 and join with a slip stitch to form a ring. Into the ring, make 12 single crochets and join with a slip stitch to complete the flower center.
For the petals, chain 6, then work 1 double crochet, 2 treble crochets, 1 double crochet, and slip stitch back into the next stitch. Repeat this sequence around to form 6–8 petals per daisy.
Use a contrasting color for the flower center and petal color for that classic daisy look. You can make all daisies in advance or add them as you go, depending on your preference.
Attaching the daisies to the ripple blanket can be done by sewing them on using a yarn needle and the same yarn used for the petals. Place them strategically—at the peaks of the ripples, in alternating rows, or clustered for a bouquet effect.
Make sure to weave the ends securely to avoid any unraveling during use or wash. A few back-and-forth stitches through the ripple rows will help anchor each daisy well.
Spacing is key. Use a ruler or fabric marker to maintain uniform distance between daisies and ensure your finished blanket has a polished, balanced look.
4. Finishing Your Ripple Blanket with Daisies
Once your desired length is reached, it’s time to finish your crochet ripple blanket with daisies with clean edges and thoughtful final touches.
Start by fastening off your yarn at the end of the final row. Weave in all ends using a yarn needle, being careful not to pull too tightly or distort the ripple shape.
Blocking is an optional but recommended step. Lightly dampen the blanket and pin it to a soft surface like a bed or foam mat to stretch and shape the ripples evenly. Let it dry completely for a smoother, neater finish.
To create a border, consider a simple single crochet around the edges in a neutral or accent color. This helps unify the look and prevents the edges from curling. Avoid adding scallops or frills that may clash with the ripple lines.
Store your blanket folded gently or rolled up to avoid flattening the daisies. If gifting, consider wrapping with a handmade label and care instructions.
This blanket makes a wonderful baby shower gift, cozy lap throw, or seasonal decor piece. The playful flowers and soothing ripple lines appeal to all ages and styles.
Most importantly, take a moment to admire your work. You’ve combined structure and creativity to make something both beautiful and functional.
FAQ: How to Crochet a Ripple Blanket with Daisies
How many stitches do I need for a ripple blanket?
Start with a multiple of 14 stitches plus 3 extra for the turning chain. Adjust based on the desired width of your blanket.
Can I make the daisies in different colors?
Yes! While white petals with yellow centers are classic, you can use any color palette to match your home or mood.
Is this project suitable for beginners?
Yes, as long as you’re familiar with basic stitches like chain, double crochet, and treble crochet. Take your time and use stitch markers if needed.
How do I attach the daisies securely?
Use a yarn needle and sew them onto the blanket after it’s completed, or crochet them directly onto certain rows if preferred.
Can I use a different stitch instead of the ripple pattern?
The ripple is traditional for this style, but you can use a granny stripe or V-stitch for variety—just adapt your daisy placement accordingly.
How do I keep my edges from becoming uneven?
Always count your stitches in each row and ensure you start and end with the same pattern segment. This keeps the ripples symmetrical and the edges tidy.
In this guide, you learned exactly how to crochet a ripple blanket with daisies—from selecting your yarn and tools, mastering the ripple stitch, crocheting lovely daisy flowers, and finishing everything off with care and creativity. The fusion of soft waves and playful daisies creates a crochet piece that brings happiness, color, and love into any space.
We hope you enjoyed this tutorial and feel inspired to begin your own ripple daisy project. If you try it, please share your honest opinion and let us know how it went. We’d love to hear your suggestions, see your creations, and help you grow your passion for crochet even more!


