If you’re looking for a fun, creative, and beginner-friendly DIY project, making a FROG KEYCHAIN is a perfect choice. Whether you love crafting small items or want a unique gift idea, a handmade frog keychain adds a playful touch to any keyring, bag, or backpack. With minimal materials and a bit of imagination, you can bring a cheerful frog to life, right in the palm of your hand.
The charm of a FROG KEYCHAIN lies not just in its adorable appearance but also in its versatility. You can crochet it, sew it from felt, or even mold it from clay or beads. It’s a project that suits all ages and skill levels. With just a few simple tools and supplies, you can create a keepsake that reflects your personality or becomes a meaningful handmade gift for someone you love.
In this detailed tutorial, we’ll explore how to make a soft, fabric-based FROG KEYCHAIN, including the steps to cut, stitch, stuff, and assemble your mini frog friend. You’ll also discover how to personalize your design, care for it, and make sure it stands out wherever you go. Get ready to dive into this delightful DIY experience!
1. Materials and Preparation for Your Frog Keychain
Before starting your FROG KEYCHAIN, it’s important to gather the right materials. This ensures your crafting process is smooth, enjoyable, and productive.
Start by choosing your fabric or felt in shades of green. Felt is a great option because it doesn’t fray and is easy to sew, especially for small projects like a frog keychain. You’ll need small amounts of fabric, so it’s a great scrap-busting project.
You’ll also need embroidery thread or regular sewing thread in colors like black (for the eyes), white (for highlights), and green (to match the body). Use a small embroidery needle or sewing needle that suits your material choice.
Stuffing material such as polyester fiberfill or cotton scraps will help shape the frog and give it a plush feel. For keychain hardware, you can use a split ring or lobster clasp—both are widely available at craft stores or online.
A pair of sharp scissors, a fabric marker or chalk, pins or clips, and a glue gun (optional for embellishments) will also come in handy. Create a paper pattern first, sketching a frog shape about 2 to 3 inches wide—big enough to show details, but small enough to be lightweight.
Once you’ve prepared your workspace, cut out all pattern pieces carefully and lay them out. This helps you visualize the next steps and ensures you don’t miss any parts while assembling your FROG KEYCHAIN.
2. Sewing and Assembling the Frog’s Body
Once your materials are prepared, it’s time to begin stitching the frog body. This step brings your FROG KEYCHAIN to life and is both fun and satisfying.
Begin by placing two frog-shaped fabric pieces right sides together. Pin them carefully, aligning all the edges. This helps you maintain the correct shape while sewing.
Sew around the edge using a small, even backstitch or running stitch, leaving a small gap (about one inch) at the bottom. If you’re using a sewing machine, set it to a short stitch length for more precise control.
Turn the frog right side out through the gap. Use a blunt tool like a pencil or chopstick to gently push out the edges and give the frog a nice, rounded shape.
Stuff the frog evenly with fiberfill. Use small amounts at a time to avoid lumps. Focus on filling the arms, legs, and head firmly, while keeping the body soft enough to squish.
After stuffing, close the gap with an invisible ladder stitch or whip stitch. Try to keep your stitches neat, especially if they’re visible at the bottom edge of the frog.
If desired, topstitch around the edge of the frog with a contrasting thread. This decorative stitch adds character and reinforces the seams of your FROG KEYCHAIN for long-term use.
3. Adding Eyes, Smile, and Personality
With the body of your FROG KEYCHAIN completed, the next step is to add facial features and details that give your frog its unique charm.
For the eyes, you can sew on small white felt circles with black centers or use safety eyes if available. Another cute option is to embroider simple eyes using satin stitch or French knots.
Position the eyes slightly apart on the upper part of the head for a friendly and cute look. Make sure they’re symmetrical, as uneven placement can change the entire expression.
Use black embroidery thread to stitch a small curved smile below the eyes. You can make the frog look happy, surprised, or sleepy—depending on the curve of the line and any extra features like a tongue or dimples.
Add cheeks with pink felt circles, fabric paint, or a few embroidered stitches in soft pink or red thread. These details give your frog a blushing, cheerful appearance.
If you want to add legs or tiny arms, cut small felt pieces and sew or glue them to the body. You can also stitch lines onto the body to mimic a frog’s natural textures.
To finish, you might add accessories like a mini bowtie, flower, or tiny crown. These whimsical additions elevate your FROG KEYCHAIN from simple to spectacular, and each choice reflects your creative flair.
4. Finishing Touches and Keychain Assembly
The final stage of your FROG KEYCHAIN project is all about securing the keychain attachment and preparing it for daily use or gift-giving.
Choose the type of keyring attachment you prefer. A split ring is classic and sturdy, while a lobster clasp allows easy removal from bags or belt loops. Both options work well.
Use a small loop of ribbon, cord, or sewn fabric to attach the frog to the ring. Stitch this loop securely to the top of the frog’s head, making sure it’s reinforced to handle regular tugging.
If you prefer a hidden loop, sew it between the two frog body layers before assembling. This gives a cleaner look and minimizes visible stitches on the outside.
Make sure all parts are securely fastened. Tug gently on the keyring to test the strength of the attachment. Add a dab of glue for extra durability if needed.
Your frog is now ready to hop onto keys, bags, zippers, or even become a charm on a pencil case. These adorable accessories are great conversation starters and thoughtful gifts.
You’ve now completed your FROG KEYCHAIN and can proudly display or gift your handmade creation. Each stitch tells a story of care, creativity, and the joy of making something from scratch.
FAQ: FROG KEYCHAIN
What materials do I need to make a frog keychain?
You’ll need green felt or fabric, thread, stuffing, embroidery floss, scissors, a sewing needle, keyring hardware, and optional embellishments like eyes or ribbons.
Is the frog keychain beginner-friendly?
Yes! This is a perfect project for beginners. It involves basic sewing skills and allows for lots of creativity with decoration and design.
How big should my frog keychain be?
A typical size is around 2–3 inches wide and tall. This is big enough to show detail while still being lightweight and portable.
Can I make a frog keychain without sewing?
Yes. You can use fabric glue or hot glue for no-sew versions, especially with felt. Just be sure all parts are firmly secured if it will be used regularly.
What are some variations of the frog keychain?
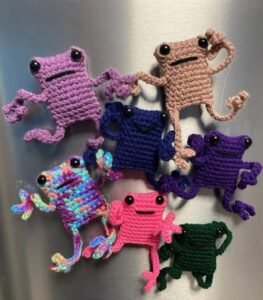
You can create frog keychains from beads, clay, crochet yarn (amigurumi), or even using plastic canvas. Each technique offers a unique style.
How do I care for my frog keychain?
Spot-clean with a damp cloth. Avoid soaking it in water, especially if you’ve used glue. Store in a dry place to keep it looking fresh.
Now that you’ve learned how to create a FROG KEYCHAIN from start to finish, you can enjoy the satisfaction of crafting something both cute and practical. From preparing materials and stitching the body to decorating the face and attaching the keyring, every step of this project offers a chance to express your creativity.
This DIY project is more than just a craft—it’s an opportunity to slow down, engage your hands and imagination, and produce a handmade item that can brighten someone’s day. Whether you make just one or a dozen frog keychains, each one will carry a bit of your unique personality.
Thank you for joining this tutorial! If you made your own FROG KEYCHAIN, please leave a sincere opinion about your experience and share any creative suggestions you have. We’d love to hear how your frog turned out!


