If you’re looking for a way to add a touch of elegance to your crochet projects, a Free Crochet Rose Pattern is a great place to start! Roses have always been a symbol of beauty, love, and nature, and now you can create your own crocheted version with this free tutorial. This easy-to-follow guide will help you master the steps to make stunning crochet roses, whether you’re a beginner or have some experience with crocheting.
Crocheting roses can be a fantastic way to practice your skills while creating something beautiful and practical. Not only can you use these roses for decoration, but you can also incorporate them into other projects like scarves, hats, blankets, and even jewelry. In this tutorial, you’ll find all the information you need to create the perfect crochet rose, from the materials required to the techniques used.
The Free Crochet Rose Pattern tutorial is designed to help you understand the basics of crocheting flowers. Each step is broken down clearly, making it easy to follow even for those new to crocheting. The best part? It’s absolutely free! All you need are some basic crochet supplies, and you’re ready to get started. Now, let’s dive into the steps to create your very own crochet rose.

1. Materials Needed for Your Crochet Rose
To begin your journey into crocheting beautiful roses, you’ll need a few basic materials. First, choose the yarn that best suits the look you want for your rose. Cotton yarn works well for delicate, detailed petals, while acrylic yarn provides a soft and durable finish. Choose a color that reflects the classic beauty of a rose, such as red, pink, or white. You can also get creative with unique color combinations to make your crochet rose stand out.
You will also need a crochet hook that matches the thickness of your yarn. For standard worsted weight yarn, a 4mm or 5mm hook will work perfectly. If you’re working with a lighter yarn, consider using a smaller hook, like 3mm or 3.5mm, for a finer finish.
Additionally, a yarn needle is useful for weaving in any loose ends after you’ve completed your rose. You might also want some scissors to trim the yarn and shape your rose petals more effectively. With these tools in hand, you’ll be ready to start creating your crochet rose.
The Free Crochet Rose Pattern requires a few basic stitches, including chain stitches, slip stitches, and double crochet. These are fundamental stitches that every crocheter should be familiar with. If you’re not yet comfortable with them, don’t worry! We’ll explain how to use each one during the tutorial.
2. Starting Your Crochet Rose: The Base
The first step in creating your crochet rose is making the foundation or base of the flower. To do this, start by creating a small chain loop. This will be the starting point of your petals. Begin by making a slip knot and then chaining around 6 to 8 stitches, depending on the size you want for your rose.
Once your chain is complete, join the last chain stitch with the first using a slip stitch to form a ring. This ring will act as the center of the rose. In the following steps, you’ll crochet into this ring to create the first layer of petals.
Next, work a few double crochet stitches into the ring to form the first layer of petals. These stitches will give the base of the rose its structure and help create the fullness of the flower. Continue adding stitches evenly around the ring until you’ve formed a solid base.
Once you’ve completed this base layer, it’s time to move on to the next step and create the individual petals. This will involve a few more intricate stitches and techniques to shape the rose properly.
3. Shaping the Petals: Creating Layers
To give your rose its natural shape, you’ll need to create layers of petals. Start by crocheting a few chain stitches to form the first petal. As you work your way around, use double crochet stitches to increase the size of the petal. This will create the effect of the petal curving upward.
Each petal should be crocheted in a way that allows it to curl naturally, giving it that lifelike look. You may need to adjust the number of stitches or the type of stitches used to get the desired shape. As you add more petals, ensure that they are evenly spaced around the base of the flower for a balanced look.
Don’t worry about making each petal perfect; part of the charm of crochet flowers is their handmade, organic appearance. You’ll see that as you work, the flower starts to take shape and resemble a beautiful, full rose.
After completing the first layer of petals, you can create additional layers by working into the gaps between the petals. These extra layers will give your rose a more dimensional and realistic appearance. Be sure to crochet a few more double crochet and chain stitches as you go.
4. Finishing Touches: Assembling Your Crochet Rose
Once your crochet rose is fully shaped, it’s time to finish the project. First, carefully trim any excess yarn using your scissors. Then, take your yarn needle and weave in any loose ends from the petals. This step will give your rose a clean, professional look.
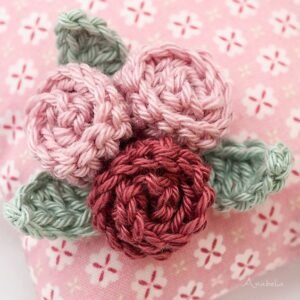
If you want to add extra flair to your crochet rose, consider attaching leaves or a stem. You can crochet simple leaves by making a few more basic stitches, like chain stitches and single crochet, and attaching them to the base of the rose. The addition of leaves will help enhance the natural beauty of the flower.
Lastly, you can use your crochet rose in various projects. They make great additions to headbands, brooches, scarves, and even home décor items like pillows or blankets. You could also use them as embellishments for bags, hats, and other accessories.
Once everything is assembled, step back and admire your beautiful, handmade crochet rose! With practice, you’ll become more skilled at shaping the petals and creating more complex designs.
FAQ
1. What yarn is best for crocheting roses?
For crocheting roses, cotton yarn is ideal because of its smooth texture and ability to hold the shape. Acrylic yarn is also a good choice, especially if you’re looking for a more affordable option.
2. Can I crochet a rose without a pattern?
Yes, you can create your own rose design by experimenting with different stitch techniques and petal shapes. However, using a pattern like the Free Crochet Rose Pattern can make the process easier, especially for beginners.
3. How can I make my crochet roses more durable?
To ensure your crochet roses hold their shape and last longer, consider using a more durable yarn like acrylic or wool. You can also lightly starch the finished rose to stiffen the petals.
4. Can I make a crochet rose into a brooch?
Absolutely! After completing your crochet rose, simply attach a brooch pin to the back using a needle and some yarn. This creates a beautiful, wearable accessory.
5. What other projects can I use crochet roses for?
Crochet roses can be used for a variety of projects such as headbands, scarves, jewelry, home décor, and even wedding bouquets.
6. How do I add leaves to my crochet rose?
To add leaves, crochet a simple shape using chain stitches and single crochet. Attach them around the base of the rose for a more natural look.
In this Free Crochet Rose Pattern tutorial, you’ve learned how to create a stunning crochet rose from scratch. We covered everything from choosing the right materials to shaping the petals and adding finishing touches like leaves. With a bit of practice, you’ll be able to create beautiful, intricate roses that can be used in a wide variety of projects.
We’d love to hear your thoughts on this tutorial! Please leave a comment below with your feedback, and don’t hesitate to share any suggestions for future crochet tutorials. Happy crocheting!


