The Eastern Dragon Crochet Tutorial is a step-by-step guide for anyone who loves crochet and wants to create something both stunning and meaningful. Eastern dragons symbolize wisdom, power, and protection in many cultures, making them a perfect inspiration for crochet enthusiasts looking for a unique project. In this article, we’ll explore how to bring an elegant dragon to life using yarn, hooks, and your own creativity. By following this detailed Eastern Dragon Crochet Tutorial, even beginners can build confidence and advanced crafters can refine their skills while producing an eye-catching decorative piece.
Learning how to crochet an Eastern dragon isn’t just about making a toy or ornament; it’s about creating art with a story. Each stitch carries intention, and with the guidance of this Eastern Dragon Crochet Tutorial, you’ll understand how to blend colors, textures, and shapes to capture the flowing movement of a dragon. Whether you’re making it as a gift, a collector’s item, or simply for your own enjoyment, this tutorial provides everything you need to know in a structured, friendly, and easy-to-follow way. The result is a majestic crochet dragon that represents your dedication and craftsmanship.
What sets this Eastern Dragon Crochet Tutorial apart is its balance of simplicity and depth. We break down complex sections into smaller, manageable parts so that crafters of all skill levels can succeed. You’ll learn the basics, such as choosing the right yarn and hook, before moving into shaping, assembly, and decorative details like whiskers, claws, and scales. This guide is also optimized with helpful keywords so you can easily revisit each section and know exactly what to expect as you work through your project.
Materials and Preparation for the Eastern Dragon Crochet Tutorial
Before you begin the actual crocheting, it’s important to gather the right materials and prepare your workspace. The success of any project depends on starting with good tools, and the Eastern Dragon Crochet Tutorial emphasizes this right from the start. A well-organized setup will make the process smoother and far more enjoyable.
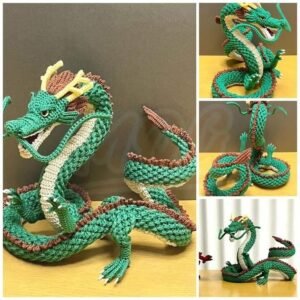
First, choose a high-quality yarn. Soft acrylic or cotton yarn is ideal for beginners because it’s easy to handle and doesn’t split as easily as other fibers. For the Eastern Dragon Crochet Tutorial, select at least three colors: a primary color for the dragon’s body, a contrasting color for the underbelly, and a bright accent for the horns, whiskers, or scales. This color contrast brings out the flowing shape of the dragon and highlights the traditional Eastern aesthetic.
Second, pick a crochet hook that matches the yarn weight. Most Eastern dragon patterns work well with a 3.5mm to 4.5mm hook, but check your yarn label for guidance. Using the right hook size ensures your stitches are tight enough to hold the dragon’s shape while still being flexible enough to manipulate. This is one of the key details covered in the Eastern Dragon Crochet Tutorial.
Third, prepare additional items like stitch markers, stuffing for the body, embroidery thread for facial details, and a tapestry needle for sewing pieces together. Having everything ready before you start will save time and frustration. The Eastern Dragon Crochet Tutorial also recommends keeping a small notebook or printout of the pattern nearby to track your progress.
Lastly, create a comfortable workspace with good lighting. Because Eastern dragons are long and detailed, you’ll need a clear view of your stitches. A well-lit area and a supportive chair will keep you comfortable during longer crochet sessions. By following these preparatory steps from the Eastern Dragon Crochet Tutorial, you’ll set yourself up for success.
Step-by-Step Guide to Crocheting the Eastern Dragon
Now that you’re ready, let’s move into the actual crocheting phase. This section of the Eastern Dragon Crochet Tutorial focuses on creating the dragon’s main body and shaping its unique features. The key to success is patience and following each step carefully.
Begin by crocheting the dragon’s head. This usually starts with a magic ring to create a tight, seamless base. Work single crochets in the round, gradually increasing stitches to shape the snout and skull. The Eastern Dragon Crochet Tutorial explains exactly how many stitches to add in each round for a balanced, symmetrical look.
Next, move on to the neck and body. Eastern dragons are known for their long, serpentine shape, which means crocheting a long tube that can be stuffed as you go. Adjust your tension to keep the body firm but not overly stiff. This is where color changes can add dimension — the Eastern Dragon Crochet Tutorial shows how to transition yarn colors smoothly so there are no visible knots.
Once the body is complete, create the underbelly by crocheting a flat strip in a contrasting color. This strip will be sewn onto the bottom of the dragon to mimic the layered scales seen in traditional Eastern dragon art. Adding this detail not only enhances the look but also gives the dragon more structure. The Eastern Dragon Crochet Tutorial provides tips on aligning this strip perfectly with the body.
After the body and underbelly are ready, it’s time to crochet the limbs, claws, and horns. These smaller parts can be tricky, but they’re also what give your dragon its personality. Follow the stitch counts in the Eastern Dragon Crochet Tutorial carefully, and use stitch markers to keep track of rounds. Make extra claws or horns if you’d like a more dramatic effect.
Finally, assemble all the pieces together. Use a tapestry needle to sew the limbs, horns, and underbelly onto the body securely. Stuff the dragon gradually as you sew to ensure even filling and a smooth shape. The Eastern Dragon Crochet Tutorial walks you through this assembly process in detail, with notes on how to hide seams and create a polished finish.
Adding Decorative Details and Personal Touches
Once your dragon’s main structure is complete, you can move on to the fun part — adding decorations and personal touches. The Eastern Dragon Crochet Tutorial encourages crafters to customize their dragons so that each one is truly unique.
Start with the face. Embroider the eyes using black or gold thread for a dramatic look. Add small tufts of yarn to create whiskers or eyebrows. These details capture the noble expression of an Eastern dragon and bring your creation to life. The Eastern Dragon Crochet Tutorial explains simple embroidery techniques that even beginners can master.
Next, consider adding scales. You can use a crochet stitch called the crocodile stitch to create textured scales along the dragon’s back. This adds dimension and makes your dragon look more realistic. If the crocodile stitch feels too advanced, you can simply sew on small crocheted circles as scales — the Eastern Dragon Crochet Tutorial provides both options.
Another way to personalize your dragon is by playing with colors. Traditional Eastern dragons are often red, gold, and green, but you can use any palette you like. Perhaps a pastel dragon for a baby gift or a dark, metallic one for a more mystical appearance. The Eastern Dragon Crochet Tutorial offers suggestions for color combinations that maintain the dragon’s signature elegance.
You can also add accessories. Some crafters like to crochet a small pearl or orb for the dragon to hold, symbolizing wisdom and power. Others make wings or decorative tassels to enhance the movement of the piece. Because the Eastern Dragon Crochet Tutorial is flexible, you can incorporate these extras without altering the main structure too much.
Finally, take time to block your finished dragon. This involves lightly wetting it and shaping it so that it dries in the perfect position. Blocking helps smooth out stitches and makes the dragon look professionally made. The Eastern Dragon Crochet Tutorial gives step-by-step instructions on blocking so your dragon holds its pose beautifully.
Tips, Tricks, and Troubleshooting
Even with a detailed guide like the Eastern Dragon Crochet Tutorial, challenges can arise. This section covers tips and solutions to common problems so your project stays on track.
If your stitches are too loose and the stuffing shows through, switch to a smaller hook or tighten your tension. This will create a denser fabric that holds its shape better. The Eastern Dragon Crochet Tutorial explains how to adjust your tension without making your hands tired.
If your color changes look messy, weave in your ends carefully as you go rather than leaving them for later. This prevents bulk and creates a cleaner finish. The Eastern Dragon Crochet Tutorial demonstrates neat methods for weaving in ends invisibly.
For those struggling with symmetry — for example, one horn looking bigger than the other — always count your stitches and rounds. Using a row counter or a simple piece of paper to tally can save you hours of frustration. The Eastern Dragon Crochet Tutorial emphasizes this habit for consistent results.
If you’re a beginner feeling overwhelmed, break the project into small milestones. Finish the head first, then the body, and so on. Celebrate each section as an accomplishment. The Eastern Dragon Crochet Tutorial is designed to help you stay motivated and organized.
Finally, don’t be afraid to customize. If a particular stitch or detail feels too advanced, simplify it. Your dragon will still look amazing, and you’ll gain confidence for future projects. The Eastern Dragon Crochet Tutorial is about creativity as much as it is about precision.
FAQ About the Eastern Dragon Crochet Tutorial
Q1: Is this Eastern Dragon Crochet Tutorial suitable for beginners?
Yes, the tutorial breaks down complex steps into simple instructions, making it accessible to beginners while still offering depth for advanced crocheters.
Q2: How long does it take to complete an Eastern dragon crochet project?
The time varies depending on your skill level and available time. Most crafters can finish the dragon within a week if working a few hours per day.
Q3: What kind of yarn is best for the Eastern Dragon Crochet Tutorial?
Soft acrylic or cotton yarn works best. Choose three colors — one for the body, one for the underbelly, and one for accents like horns or whiskers.
Q4: Can I adjust the size of the dragon?
Absolutely. Use thicker yarn and a larger hook for a bigger dragon, or thinner yarn and a smaller hook for a smaller version. The pattern adapts easily.
Q5: Do I need special tools besides a hook and yarn?
You’ll need stuffing, stitch markers, embroidery thread, and a tapestry needle for assembly. These tools make the process smoother and more precise.
Q6: How can I make my dragon look more realistic?
Focus on details like scales, whiskers, and color contrasts. Embroider expressive eyes and block the finished dragon to hold its shape beautifully.
Video Tutorial
This Eastern Dragon Crochet Tutorial has shown you how to plan, create, and personalize a stunning crochet dragon inspired by Eastern mythology. From choosing the right materials to adding intricate details, you now have a complete guide to bring this legendary creature to life with yarn and a hook.
Whether you’re a beginner or an experienced crocheter, the process is rewarding and allows you to express your creativity. We’d love to hear your honest opinion and suggestions about this tutorial — what parts you enjoyed most, what challenges you faced, and how your own dragon turned out. Your feedback helps us improve and inspire even more crafters around the world.