If you have been searching for a complete Dog Crochet Rug Tutorial, you are in the right place. This guide will walk you step by step through the process of creating a beautiful and practical crochet rug in the shape of a dog. Whether you are a beginner or an experienced crocheter, this tutorial will give you the confidence and knowledge to craft a charming rug that can brighten any room. The goal of this article is not only to teach the technique but also to provide inspiration, tips, and answers to the most common questions about crocheting a dog-shaped rug.
The Dog Crochet Rug Tutorial described here focuses on clarity, easy-to-follow instructions, and creative possibilities. By the time you finish reading, you will have a solid understanding of the tools, materials, stitches, and assembly methods needed to make your own unique piece. This project is a great way to combine your love for handmade décor with your passion for animals, resulting in a piece that is both functional and decorative.
Another reason why this Dog Crochet Rug Tutorial stands out is its versatility. You can adapt the pattern to match your home décor, personalize it with colors, or even make it as a thoughtful handmade gift. Crocheting a dog rug can be relaxing and rewarding, especially if you enjoy projects that show your personality. Let’s dive into the essential steps and techniques that will help you master this project.
Materials and Tools Needed for a Dog Crochet Rug
To begin your Dog Crochet Rug Tutorial, it is essential to gather all the materials and tools before starting. Proper preparation will make the process smoother and more enjoyable. Here is a detailed breakdown to help you get started.
First, you will need high-quality yarn suitable for rugs. Choose durable, washable yarn that can withstand regular use. Cotton yarn is a popular option because of its softness and strength, but you can also use acrylic blends for easy care. Select colors that match your décor or use multiple shades to create a playful design.
Second, pick the right crochet hooks for the yarn weight you choose. A larger hook will produce a looser and softer rug, while a smaller hook will make a denser and firmer piece. For most rug projects, a hook between 6 mm and 8 mm works well. Make sure you have stitch markers and a tapestry needle for finishing.
Third, you will need a non-slip rug pad or backing if you plan to place your rug on a slippery floor. This ensures safety and keeps the rug in place. You might also want to keep scissors and a measuring tape on hand for quick adjustments as you work.
Fourth, consider preparing a printed or sketched pattern of the dog shape you want to achieve. Having a visual reference will help you maintain proportions as you crochet each section. This can be as simple as an outline of a dog’s head and body or a more detailed template depending on your skill level.
Fifth, make sure your working space is comfortable and well-lit. Crocheting a rug, especially one with details like ears, paws, and tail, requires focus and good visibility. Setting up a pleasant environment can make the experience more enjoyable and less straining on your eyes.
Finally, double-check your materials list before you start. Having everything ready will allow you to immerse yourself in the creative process without interruptions, which is one of the secrets to a successful Dog Crochet Rug Tutorial.
Step-by-Step Instructions for Crocheting the Rug
This section of the Dog Crochet Rug Tutorial covers the main steps to create your project from start to finish. By following these instructions, even beginners can achieve a professional-looking result.
First, begin by crocheting the base circle that will form the body of the dog. Start with a magic ring and work double crochet stitches around it, increasing gradually until you reach the desired size. This circular base provides stability and sets the foundation for the rest of the rug.
Second, move on to shaping the dog’s head. Create a smaller circle or oval for the head, again using double or half-double crochet stitches. Attach it to the body base as you go, or sew it later with a tapestry needle for a clean finish. This gives your rug its recognizable dog silhouette.
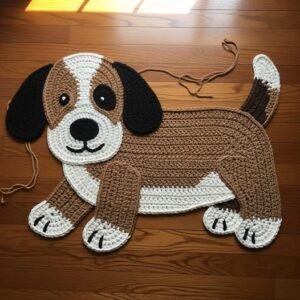
Third, craft the ears and tail separately. Use simple triangular or oval shapes for the ears, and a long narrow piece for the tail. These details add character and make the rug stand out. Experiment with colors or textures for these parts to make your rug unique.
Fourth, make the paws or feet if you want an extra-detailed rug. Small circles or ovals can be crocheted and then attached to the main body. This step is optional but adds a charming, playful touch to the final piece.
Fifth, once all pieces are crocheted, assemble the rug. Sew or crochet the parts together firmly, making sure they are well aligned. Pay attention to symmetry, especially with the ears and paws, to keep the design balanced.
Finally, finish by weaving in the ends of your yarn and adding any decorative details such as a collar, eyes, or a nose. Embroidery or appliqué can be used to create facial features. This is where your creativity truly shines in this Dog Crochet Rug Tutorial.
Tips and Tricks for a Professional Finish
While the basic steps of the Dog Crochet Rug Tutorial are simple, a few tips and tricks can elevate your work to the next level. These suggestions will help you create a rug that is not only beautiful but also durable.
First, always check your gauge before starting the full project. Make a small swatch to ensure your stitches match the pattern size. This prevents surprises later and helps maintain proportion across the rug.
Second, use color changes strategically. When switching yarn colors, do so at the end of a row or round for a cleaner look. Secure your ends carefully to avoid unraveling during use or washing.
Third, consider adding a border or edging around the rug. A simple single crochet or scalloped edge can make the rug look polished and professional. Borders also help reinforce the shape and keep the edges from curling.
Fourth, if you want extra softness, double up your yarn or use a thicker hook. This technique can make the rug plush and comfortable for kids or pets to sit on.
Fifth, block your finished rug before use. Blocking involves wetting or steaming the rug and shaping it to its final dimensions. This step helps even out stitches and gives your project a crisp, finished appearance.
Finally, remember that practice makes perfect. If this is your first Dog Crochet Rug Tutorial, don’t be discouraged by minor mistakes. Each project you make will improve your skills and confidence.
Customizing Your Dog Crochet Rug
One of the most enjoyable aspects of following a Dog Crochet Rug Tutorial is the ability to customize your project. This section explores ideas to make your rug uniquely yours.
First, you can personalize the color scheme. Use neutral tones for a sophisticated look or bright colors for a playful design. Mixing different yarn textures can also create an interesting visual effect.
Second, think about size adjustments. If you want a small mat for a pet area or a larger rug for a living room, simply add more rounds to the base or enlarge the pattern pieces.
Third, add personal touches like embroidered initials, a name tag, or decorative appliqués. These details can turn your rug into a memorable gift for a loved one or a special home accent.
Fourth, consider experimenting with different dog breeds. By altering ear shapes, tail styles, or color patterns, you can represent specific breeds or even mimic the look of your own pet.
Fifth, use this project to learn new stitches or techniques. For example, try textured stitches for the dog’s fur or bobble stitches for paws. This keeps the project interesting and improves your crochet skills.
Finally, remember that customization is about creativity. The beauty of a Dog Crochet Rug Tutorial is that it serves as a starting point—you can adapt it as much as you like to reflect your style.
Frequently Asked Questions (FAQ)
1. How long does it take to complete a Dog Crochet Rug?
The time varies depending on your experience and the size of the rug. On average, a medium-sized rug can take 10 to 15 hours spread over several days.
2. Can beginners follow this Dog Crochet Rug Tutorial?
Yes, this tutorial is designed with beginners in mind. The steps are simple, and the stitches used are basic, making it accessible to those new to crochet.
3. What type of yarn is best for a Dog Crochet Rug?
Durable, washable yarn like cotton or acrylic blends works best. These materials are easy to clean and hold their shape well over time.
4. How do I prevent my crochet rug from slipping on the floor?
You can attach a non-slip rug pad or backing to the underside of your rug. This is especially important if you place it on smooth surfaces.
5. Can I machine wash my Dog Crochet Rug?
This depends on the yarn you choose. Most cotton and acrylic yarns are machine-washable, but always check the care instructions on the label.
6. How can I make my rug look more professional?
Pay attention to finishing details such as weaving in ends, blocking the rug, and using neat color changes. These steps give your project a polished look.
Pattern here
This complete Dog Crochet Rug Tutorial has shown you how to plan, create, and customize a charming crochet rug shaped like a dog. From gathering materials to finishing touches, every step is designed to be beginner-friendly while offering room for creativity. With patience and practice, you can craft a rug that is both practical and decorative, adding warmth and personality to your space.
We hope this article has inspired you to start your own project. If you try this tutorial, please leave your sincere opinion and suggestions in the comments or share your experience with others. Your feedback helps us improve and motivates others to join the world of crochet.