Starting a crochet tote bag step by step tutorial is an exciting journey for beginners and experienced crafters alike. This type of project is not only practical but also fashionable, making it the perfect blend of creativity and functionality. A crochet tote bag is versatile, eco-friendly, and can be used in daily life for shopping, carrying books, or even as a stylish accessory. In this tutorial, we will explore every detail you need to know to make your own beautiful tote bag from scratch. Whether you are completely new to crochet or already comfortable with yarn and hooks, this guide will give you all the essential information you need.
What makes a crochet tote bag step by step tutorial so appealing is its simplicity combined with the opportunity to express personal style. Crochet allows endless variations in texture, stitch patterns, and colors, so no two tote bags need to look the same. This article will walk you through the process of selecting the right materials, learning the stitches, creating the base and sides of the bag, and finishing it neatly. You will find that making your own tote bag is not just a craft project, but also a way to personalize your daily accessories and reduce waste by avoiding single-use bags.
By following this crochet tote bag step by step tutorial, you will gain not only a handmade tote bag but also the confidence to experiment with future crochet projects. The skills you learn here can be applied to many other designs, such as purses, backpacks, and storage baskets. Crochet is an empowering craft that combines creativity, relaxation, and productivity. In the following sections, we will break the process into manageable stages, so you can crochet at your own pace and enjoy the satisfaction of seeing your tote bag take shape.
Choosing the Right Materials for Your Crochet Tote Bag
When beginning a crochet tote bag step by step tutorial, selecting the right materials is one of the most important steps. The type of yarn and hook you choose will directly affect the look, durability, and usability of your tote bag. For tote bags, cotton yarn is highly recommended because it is sturdy, washable, and holds its shape well. Synthetic yarns may stretch too much, while wool can be too soft for carrying heavier items. Always keep in mind the functionality of the tote bag when choosing your yarn.
Another essential material to consider is the crochet hook. The size of the hook depends on the thickness of the yarn you select. A medium-sized hook is often ideal for tote bags, as it creates stitches that are tight enough to support weight but flexible enough to give the bag some movement. Investing in a comfortable hook with an ergonomic handle can make the process more enjoyable, especially if you plan to spend long hours crocheting.
Beyond yarn and hooks, you may also want to prepare some extra accessories. Stitch markers can help you keep track of your rows, especially if you are a beginner. A tapestry needle will be necessary for weaving in loose ends once the bag is finished. Some crocheters also like to add fabric lining to their tote bags for extra strength and style, though this is optional. Preparing all your tools in advance ensures a smooth and stress-free crafting experience.
Choosing the right color is another fun part of the process. While neutral shades like beige, cream, or black are versatile and match most outfits, bright and bold colors can make your tote bag stand out as a statement piece. You can also use multicolored yarn or create your own stripes for a personalized touch. The freedom to experiment with colors is one of the greatest joys of crochet.
Durability is something you cannot overlook. If you plan to use your tote bag for grocery shopping or carrying heavier items, opt for thicker yarn and tighter stitches. A bag made with durable materials will last longer and be more practical. Think about your intended use before finalizing your materials, as this will guide your decisions during the entire project.
Finally, remember that crochet is meant to be enjoyable. Do not stress if your first choice of yarn or hook is not perfect. With practice, you will learn which materials you prefer and what works best for your style. This crochet tote bag step by step tutorial is all about learning and improving, so enjoy the process as much as the final product.
Learning the Basic Crochet Stitches
Before you dive into the crochet tote bag step by step tutorial, you need to be comfortable with the essential crochet stitches. The most commonly used stitches for tote bags are chain stitch, single crochet, and double crochet. These stitches form the foundation of your bag and allow you to build a strong yet flexible structure. Practicing these stitches before starting the project will make the process much easier.
The chain stitch is usually the first stitch you will learn. It creates the foundation row for most crochet projects. In a tote bag, chains are often used to create the base or to form handles. Mastering this stitch ensures your bag starts with a clean and even foundation. Take your time practicing until you can make chains of consistent size.
Single crochet is another essential stitch in this crochet tote bag step by step tutorial. It creates a tight, dense fabric, which is perfect for a tote bag that needs to carry weight without stretching too much. This stitch is also easy for beginners to learn and produces a neat, solid surface. Many tote bags are built entirely with single crochet stitches because of their durability.
The double crochet stitch is slightly taller and more open than single crochet. It can be used to add texture or create decorative patterns in your tote bag. Some crafters prefer to combine single and double crochet rows to achieve a balanced look. Learning to alternate between these stitches will allow you to experiment with different designs.
Slip stitches are also worth practicing. They are often used to join rounds or close gaps in the project. Although they are not the main stitch in a tote bag, they play an important role in maintaining a polished and professional finish. Mastering these smaller details adds to the overall beauty of your handmade bag.
For those who want to go a step further, learning special stitches like half-double crochet or puff stitches can give your tote bag extra style. These stitches may require more practice, but they add unique texture and personality to your bag. Do not hesitate to try new stitches once you are comfortable with the basics.
Crochet is a skill that improves with practice. By mastering these stitches, you will gain the confidence needed to follow along with the rest of this crochet tote bag step by step tutorial. Remember, consistency is key, so keep your tension steady and focus on making each stitch uniform.
Creating the Base and Sides of the Tote Bag
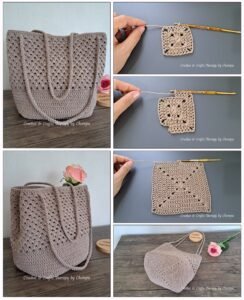
The foundation of this crochet tote bag step by step tutorial lies in creating a strong and well-shaped base. The base can be worked flat in either a rectangular or oval shape, depending on your desired style. A rectangular base gives the tote a structured, boxy look, while an oval base results in a softer, rounded design. Whichever shape you choose, it is important to keep your stitches tight and even to prevent sagging later.
To make the base, start with a chain of the desired length and build rows of single crochet stitches until it reaches the width you want. For an oval base, you will work in rounds, crocheting around the initial chain and increasing stitches at the corners. This step requires patience and attention to detail, as it sets the tone for the entire bag. The stronger your base, the more practical your tote bag will be.
Once the base is complete, you can begin working up the sides. The sides of a tote bag are usually created by crocheting in continuous rounds without increasing stitches. This causes the fabric to grow vertically and form the walls of the bag. Keep your tension consistent to maintain even sides. You can also experiment with stitch patterns at this stage to add texture and visual interest.
As your bag grows taller, you may want to measure it regularly to ensure it fits your needs. A shorter tote is perfect for casual outings, while a taller one works better for shopping or carrying books. This customization is one of the advantages of following a crochet tote bag step by step tutorial instead of buying a pre-made bag. You are in full control of the final size and shape.
Adding stripes or color blocks in the sides can make your tote bag more stylish. Switching yarn colors between rows is a simple yet effective way to create unique patterns. This not only enhances the look of the bag but also allows you to match it with your personal wardrobe. Be sure to weave in ends securely so the bag remains strong and tidy.
The sides are where you can truly showcase your creativity. Whether you keep them simple with single crochet stitches or add variety with double crochet rows, the goal is to make a tote bag that is both beautiful and functional. By the time you finish the sides, your project will already look like a real tote bag, and the excitement of moving on to the handles will motivate you to complete it.
Finishing Touches and Adding Handles
No crochet tote bag step by step tutorial would be complete without guidance on finishing touches and handles. Handles are an essential part of any tote bag, as they determine how comfortable and practical the bag is to use. You can choose between short handles for carrying in your hand or longer straps for wearing over the shoulder. Some people even add both for versatility.
To create handles, you can simply chain the desired length and attach them securely to the sides of the bag using single crochet stitches. For extra durability, reinforce the connection by crocheting multiple rows where the handle meets the bag. This ensures that your tote bag can carry heavier items without risk of breaking. Strong handles are a key feature of any reliable tote.
Another option for handles is to crochet them separately and sew them onto the bag later. This technique gives you more control over placement and allows you to create thicker or decorative straps. You can also experiment with braided yarn or even leather straps for a mixed-material look. The style of handle you choose will define the overall character of your tote bag.
The finishing touches are just as important as the main structure. Weaving in loose ends carefully with a tapestry needle will give your tote a professional appearance. Some crocheters also choose to block their finished bag, which involves lightly wetting and shaping it so that the stitches set evenly. This step can make a noticeable difference in the final look.
Lining your tote bag with fabric is optional but recommended if you plan to carry smaller items. A lining prevents objects from poking through the stitches and adds extra stability. You can choose a fabric that complements the yarn color for a stylish and cohesive finish. Sewing in a lining is a simple step that elevates your bag from handmade to high-quality handmade.
Finally, consider adding decorative elements like tassels, buttons, or crochet flowers. These small details personalize your tote and make it truly unique. The beauty of a crochet tote bag step by step tutorial is that you are free to adapt it to your style. Once your handles and finishing touches are complete, you will have a tote bag that is ready to use proudly in your everyday life.
FAQ About Crochet Tote Bag Step by Step Tutorial
1. How long does it take to make a crochet tote bag?
The time depends on your skill level and the size of the bag. Beginners might need several days, while experienced crocheters can complete it in a few hours.
2. What is the best yarn for a crochet tote bag?
Cotton yarn is usually the best choice because it is durable, easy to clean, and holds its shape well.
3. Can I wash my crochet tote bag?
Yes, most crochet tote bags made with cotton yarn can be machine washed on a gentle cycle. Always check the yarn label for care instructions.
4. Do I need to line my tote bag?
A lining is optional but recommended for durability and to prevent small items from slipping through the stitches.
5. Can I make a tote bag using only basic stitches?
Absolutely. Many tote bags are made entirely with single crochet stitches, making them beginner-friendly.
6. How do I make the handles strong enough?
Reinforce the connection points with extra rows of stitches and use sturdy yarn to ensure the handles hold up over time.
Video Tutorial
By following this crochet tote bag step by step tutorial, you have learned how to choose the right materials, practice essential stitches, build the base and sides, and finish your tote with strong handles and decorative touches. Crocheting your own tote bag is not only rewarding but also a sustainable and stylish way to create something useful.
We hope this guide has inspired you to start your project and add your personal flair to your design. Please share your honest opinion and suggestions—we would love to hear your experiences and ideas for future crochet creations.