A crochet toilet paper holder for countertop is not only a functional bathroom accessory but also a creative way to add charm and personality to your space. Whether you’re an experienced crocheter or just getting started, making your own holder is a rewarding project that enhances both organization and aesthetics.
This decorative item allows you to store extra toilet paper rolls neatly on the bathroom counter, keeping them within easy reach while adding a cozy, handmade touch. A crochet toilet paper holder for countertop can match your bathroom’s color scheme, make use of leftover yarn, and even serve as a conversation piece for guests.
In this tutorial-style article, we’ll walk you through everything you need to know about making your own crochet toilet paper holder for countertop. We’ll explore pattern ideas, essential materials, helpful techniques, and style tips to personalize your project. Keep reading to unlock inspiration and guidance for your next handmade home accessory!
1. Choosing the Right Yarn and Materials
When starting your crochet toilet paper holder for countertop, your material choices matter. The holder needs to be sturdy enough to support the weight of toilet paper rolls and stable when sitting on a flat surface.
Opt for cotton yarn or a sturdy acrylic blend. Cotton is highly recommended because it’s durable, washable, and holds its shape well over time. Choose medium to bulky weight yarn for structure.
Select a crochet hook size that complements your yarn—usually a 4.0 mm to 6.0 mm hook works best. You’ll also need a yarn needle for weaving in ends, scissors, and optional decorative elements like buttons or ribbons.
To enhance the shape of your crochet toilet paper holder for countertop, consider using plastic canvas, cardboard inserts, or a small weighted base. These elements help maintain the structure while keeping the holder upright.
When choosing colors, think of your bathroom décor. Neutrals like white, beige, or gray offer a clean look, while bright shades or multicolored yarns add fun and character. Patterns with stripes, florals, or textured stitches create extra visual interest.
It’s a good idea to make a small swatch before starting the full project. This helps you test the gauge and ensures your piece will fit the toilet paper rolls perfectly without being too tight or too loose.
2. Basic Pattern Structure and Crochet Techniques
The base structure of a crochet toilet paper holder for countertop typically includes a round or square bottom, cylindrical body, and an open top to allow rolls to stack inside. Some patterns also include a handle or flap.
Begin with a magic ring or chain stitch to form the base. Work in rounds, increasing evenly until you achieve the desired diameter that fits your standard roll. Make sure the base lies flat on the counter.
Once the base is complete, switch to working upward in the round to form the holder’s body. You can use basic stitches like single crochet or half-double crochet for a tight, solid structure.
Textured stitches like the puff stitch or bobble stitch can give your crochet toilet paper holder for countertop a beautiful, handcrafted appearance. Don’t be afraid to mix stitches for a unique look.
Some crafters enjoy adding a lid or decorative top cover with a floral or animal shape, adding whimsy and function. These extras can also keep the rolls dust-free if your bathroom is prone to humidity.
To finish your project neatly, weave in all yarn tails with a blunt yarn needle. You can add a border around the top using contrasting yarn for a polished effect.
3. Customization and Creative Variations
What makes your crochet toilet paper holder for countertop truly special is the personal touches you bring to the design. Crochet allows for endless customization in size, shape, and decoration.
Consider making holders with one, two, or even three-tier capacity, depending on your needs. A single-roll holder is ideal for compact spaces, while multiple tiers add convenience for families or guest bathrooms.
For a farmhouse or rustic vibe, incorporate jute or hemp twine alongside cotton yarn. These fibers add texture and a natural look, perfect for vintage-inspired bathrooms.
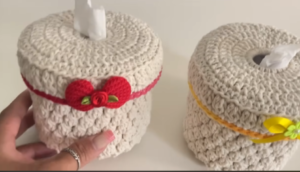
Add embellishments such as crocheted flowers, leaves, or even pom-poms. These details bring a handmade elegance that elevates your crochet toilet paper holder for countertop from practical to artful.
Create themed holders for different seasons or holidays—think snowflake motifs for winter, pastel shades for spring, or bold reds and greens for Christmas. Your countertop holder can change with the calendar!
If you’re gifting the holder to a friend or relative, consider adding their initials with surface crochet or embroidery. It’s a thoughtful way to personalize your handmade present.
You can also combine crochet with other craft techniques like sewing or macramé to create a hybrid design that suits your skill level and taste.
4. Maintenance, Placement, and Practical Tips
Keeping your crochet toilet paper holder for countertop clean and functional is simple with a few practical tips. The good news is that most yarns used for this type of project are machine washable.
Make sure to check the yarn label for care instructions. If handwashing is required, use mild detergent and cold water. Gently reshape and air dry to maintain the original structure.
Place your holder in a dry, flat area of the countertop. Avoid spots near the sink or shower to reduce the chance of water splashes or moisture damage to the yarn.
If you’ve added a base insert like cardboard, consider lining it with plastic before inserting it into the crochet piece. This helps protect it from humidity and prolongs the life of the holder.
To keep the rolls upright and snug, avoid overstretching the crochet. The holder should fit tightly enough to support the rolls without collapsing or leaning to one side.
Refresh your holder occasionally by spritzing it with fabric-safe essential oil spray for a lovely scent in your bathroom. Lavender or eucalyptus can add a spa-like touch.
If the holder begins to sag or tilt over time, reinforce the base by adding a small ceramic tile or wooden disc to provide balance and support.
FAQ – Frequently Asked Questions
What type of yarn is best for a crochet toilet paper holder for countertop?
Cotton yarn is the best choice because it’s durable, machine washable, and holds its shape well. Acrylic yarn can also work but may stretch more over time.
How many rolls should a countertop holder accommodate?
Most crochet toilet paper holders for countertop are designed to hold one to three rolls. You can adjust the height of the pattern to suit your storage needs.
Can beginners make a crochet toilet paper holder for countertop?
Absolutely! Simple patterns using basic stitches like single crochet are great for beginners. As you gain experience, you can experiment with textures and embellishments.
How do I keep the holder from collapsing or tipping over?
Use a sturdy yarn, consider inserting a weighted base like a ceramic tile or plastic disc, and ensure your stitches are tight and firm.
Is it necessary to line the holder?
Not always, but lining the base can improve stability, especially if you’re using cardboard as support. A waterproof liner helps protect against moisture in the bathroom.
Can I wash my crochet toilet paper holder?
Yes, most cotton and acrylic yarns are washable. Use gentle detergent and air dry flat to maintain the shape and color of your crochet work.
Creating a crochet toilet paper holder for countertop is a delightful project that combines functionality with creativity. From selecting materials to mastering the basic pattern structure and exploring custom variations, this project invites you to personalize your bathroom while enjoying the calming rhythm of crochet.
We’ve explored practical tips for construction, maintenance, and customization—everything you need to create a piece that’s both useful and decorative. Whether you’re making one for yourself, as a gift, or for seasonal decor, this holder is sure to bring charm and utility to any space.
We’d love to hear your thoughts! If you tried this tutorial or have your own tips and ideas, please leave a sincere opinion below. Your feedback helps us continue creating helpful and inspiring content for crafters like you.


