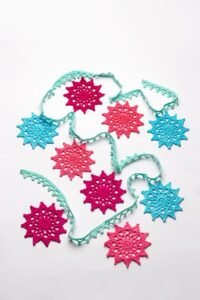
Crochet star garlands are not only aesthetically pleasing but also versatile. You can use them for holiday decorations, baby showers, or even as a unique touch to your everyday home decor. With just a few materials and a bit of time, you can create a handmade piece that radiates warmth and creativity.
In this article, you’ll find everything you need to get started: from the list of materials to detailed instructions and tips for customizing your garland. Plus, we’ll answer frequently asked questions to ensure your project is a success. Let’s dive into the steps of making your Crochet Stars Garland Free Pattern today!
1. Materials Needed to Create Your Crochet Stars Garland
Before you start crocheting, it’s important to gather all the materials. Having everything ready ensures a smooth and enjoyable crafting experience. Here’s what you’ll need:
- Yarn Selection
Choose a yarn type that suits your desired look. Cotton yarn works great for a clean and structured star, while acrylic yarn offers a softer, fluffier appearance. Opt for multiple colors to make your garland more vibrant. - Crochet Hook Size
A medium-sized hook, such as 4.0mm or 5.0mm, is typically ideal for creating stars. Adjust the hook size based on your yarn thickness for the best results. - Scissors and Yarn Needle
Scissors are essential for trimming the yarn, and a yarn needle helps weave in loose ends seamlessly, giving your stars a polished finish. - Optional Embellishments
Consider adding beads, buttons, or glitter to your stars for an extra decorative touch. These small details can make your garland truly unique. - Measuring Tape
This helps ensure your stars are consistent in size and your garland is the desired length. - Pattern Printout or Digital Reference
Have the pattern accessible as you work to easily follow each step of the tutorial. - THE BEST CROCHET PATTERNS
2. Step-by-Step Instructions for Crocheting Stars
Now that your materials are ready, let’s move on to crocheting the stars. Follow these detailed steps to craft your stars perfectly:
- Create a Magic Circle
Start by forming a magic circle, which is the foundation for your star. This technique allows you to adjust the circle’s size for a tight center. - First Round of Stitches
Crochet six single crochets into the magic circle, then tighten the circle to close the gap. Slip stitch into the first stitch to complete the round. - Forming Star Points
To create the points, chain three stitches, then double crochet into the next stitch. Skip one stitch and slip stitch into the following one to anchor the point. Repeat this pattern around the circle. - Adding More Rounds for Larger Stars
For bigger stars, add additional rounds by increasing stitches proportionally. This step is optional but gives you versatility in star sizes. - Fastening Off and Finishing
Once your star is complete, cut the yarn, leaving a small tail. Use the yarn needle to weave in loose ends. - Customizing Your Stars
Experiment with different yarn colors, sizes, or even multi-colored stars to make your garland stand out.
3. Assembling Your Star Garland
After crocheting your stars, it’s time to assemble the garland. Here’s how to do it:
- Measure Garland Length
Decide how long you want your garland to be. Use a measuring tape to plan the spacing between stars. - Attach the Stars
Use the same yarn or a contrasting color to attach the stars. Thread a yarn needle and pass the thread through one tip of each star. - Ensure Equal Spacing
Leave equal gaps between stars for a balanced look. You can use pins or clips to temporarily hold stars in place while threading. - Secure Knots
Tie secure knots at the start and end of the garland to prevent slipping. - Add Optional Decorations
Enhance the garland by stringing additional elements like pom-poms or tassels between the stars. - Display Your Garland
Hang your garland on walls, windows, or mantels using adhesive hooks, nails, or simply drape it over furniture.
4. Tips and Tricks for Perfect Crochet Stars
Here are some pro tips to help you achieve the best results:
- Practice with Scrap Yarn
If you’re new to crocheting, practice the pattern with scrap yarn before using your final materials. - Use Stitch Markers
Stitch markers are helpful for keeping track of your starting point, especially when working on larger stars. - Maintain Consistent Tension
Consistent yarn tension ensures your stars are uniform in size and shape. - Block Your Stars
For a polished look, block your stars by lightly wetting them and pinning them to shape as they dry. - Work in Good Lighting
Proper lighting helps you see stitches clearly, reducing errors. - Experiment with Patterns
Combine different crochet patterns to create unique star designs and enhance your garland.
FAQ: Crochet Stars Garland Free Pattern
Q1: Can beginners follow this tutorial?
A: Absolutely! This tutorial is beginner-friendly and provides step-by-step guidance for creating a simple yet stunning garland.
Q2: How long does it take to complete a garland?
A: It depends on your experience level and the garland length. Typically, a small garland can be completed in a few hours.
Q3: What type of yarn is best for this project?
A: Cotton yarn is ideal for structured stars, while acrylic yarn is great for a softer look.
Q4: How do I clean the garland?
A: Hand wash the garland gently with mild soap and let it air dry to preserve its shape and color.
Q5: Can I add other shapes to the garland?
A: Yes! Feel free to incorporate hearts, flowers, or other crochet shapes to customize your design.
Q6: What if my stars aren’t uniform?
A: Use consistent tension and block your stars to correct any irregularities.
Conclusion
Creating a Crochet Stars Garland Free Pattern is a fun and rewarding DIY project that enhances any space with handmade charm. This free tutorial walks you through every step, from gathering materials to assembling your garland. Whether you’re making it for yourself or as a gift, the possibilities for customization are endless.
We’d love to hear your thoughts! Share your experience and suggestions in the comments below to inspire others. Happy crocheting!


