Crochet snowflakes are a beautiful and versatile way to add a touch of handmade elegance to your winter decorations. Whether you’re adorning your Christmas tree, embellishing holiday cards, or adding a unique touch to gift wrap, these crochet snowflake patterns bring charm and warmth.
In this guide, we’ll show you step-by-step how to crochet a snowflake pattern using recommended techniques and stitches.
This tutorial is perfect for both beginners and advanced crocheters, ensuring that everyone can create a stunning snowflake. Let’s dive in!
1. Why Crochet Snowflake Patterns Are a Winter Must-Have
Crochet snowflakes have long been a favorite among crafters for their delicate beauty and timeless appeal. Their intricate designs capture the wonder of snowflakes falling in winter, and they bring an extra sense of coziness to any setting.
Not only are crochet snowflakes visually appealing, but they are also incredibly versatile. You can hang them as ornaments, sew them onto clothing, or use them as decorative coasters. Their variety in size, shape, and design allows them to suit different purposes. Moreover, crochet snowflake patterns make wonderful gifts for loved ones, especially if you customize them with unique colors or designs.
For those interested in sustainability, crochet snowflakes are an eco-friendly decor choice. Instead of disposable ornaments, you’re crafting something reusable that will last for years. By choosing natural fibers, you can further enhance their eco-friendly appeal.
2. Essential Materials for Your Crochet Snowflake Pattern
To get started with your crochet snowflake, it’s important to have the right materials. For most snowflake patterns, you’ll need a few essentials to ensure a smooth crocheting experience and a beautiful result.
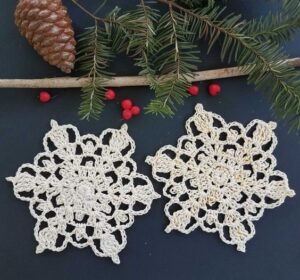
Yarn: Lightweight, high-quality cotton yarn is typically recommended for crochet snowflakes. Cotton gives a nice, crisp finish, which helps the intricate details of the snowflake pattern stand out. Opt for white, silver, or even pale blue to replicate the appearance of real snowflakes. However, feel free to experiment with other colors if you’re looking to create something unique.
Hook: Crochet hook size can vary depending on the yarn thickness and the desired snowflake size. Generally, sizes between 2.00 mm and 3.50 mm work well for this type of project. A smaller hook will produce tighter, more defined stitches, which are ideal for delicate patterns.
Additional Supplies: Other materials you might need include scissors, a tapestry needle for weaving in ends, and optionally, fabric stiffener if you want your snowflakes to hold their shape for hanging or display.
3. Basic Stitches You’ll Need for a Crochet Snowflake Pattern
Understanding some basic crochet stitches will help you create a variety of snowflake designs. Here’s a quick guide to the key stitches you’ll need.
Slip Stitch (sl st): The slip stitch is a foundational stitch used to join rounds, move across chains, or create subtle transitions in patterns. It’s typically used in finishing touches for crochet snowflakes, where neatness is key.
Chain Stitch (ch): Chains are essential in many crochet patterns, acting as the “spine” of your design. In snowflake patterns, chains often form the foundation of each point or round. Chains can vary in number, so always pay attention to the specific pattern’s instructions.
Double Crochet (dc): The double crochet is a versatile stitch that adds height and openness to your design. In snowflake patterns, double crochet stitches often appear in clusters to create intricate designs and details. For a refined look, work these stitches with even tension.
4. Step-by-Step Guide: Crochet Snowflake Pattern
Here is a simple yet elegant snowflake pattern. Follow each step carefully, and feel free to adjust to suit your style.
Round 1
- Start with a magic ring. (Alternatively, you can chain 4 and join with a slip stitch to form a ring.)
- Chain 3 (counts as your first double crochet).
- Work 11 double crochets into the ring. Slip stitch into the top of the beginning chain to close the round (12 dc total).
Round 2
- Chain 4 (counts as 1 dc and chain 1 space).
- Double crochet in the next stitch, chain 1. Repeat from * to * around. Slip stitch to the third chain in the beginning chain-4 to close (12 dc with ch-1 spaces).
Round 3
- Slip stitch into the first chain space, then chain 5 (counts as a double crochet and chain 2 space).
- In the next chain space, work 1 dc, ch 2. Repeat around. Slip stitch to the third chain in the beginning chain-5 to close the round.
By following these instructions, you’ll have a beautiful crochet snowflake to enjoy.
5. Adding Final Details and Shaping Your Snowflake
Once your snowflake is complete, a few final touches can enhance its appearance. Shaping and stiffening can help ensure your snowflake remains beautiful for years to come.
Blocking: Lay your snowflake on a flat surface and gently pin each point into place. This will help your snowflake achieve its ideal shape. Use a blocking mat or towel to pin it securely.
Stiffening: For a sturdier finish, consider applying a fabric stiffener. Use a mixture of equal parts water and white glue, then dip your snowflake in it before shaping and letting it dry. Alternatively, spray-on fabric stiffeners are also available and can be easier to use.
Trimming and Embellishing: Finally, you can trim any loose ends or add embellishments like tiny beads, sequins, or glitter for an extra festive touch. These small details can make your snowflake look more polished and personal.
6. Creative Uses for Your Crochet Snowflakes
Crochet snowflakes are incredibly versatile, and there are countless ways to use them in your home decor, holiday crafts, or as thoughtful gifts.
Ornaments: Crochet snowflakes make beautiful holiday ornaments. Attach a loop of ribbon to hang them on your Christmas tree, or string multiple snowflakes together to create a festive garland.
Gift Toppers and Cards: Adding a handmade snowflake to a holiday card or gift adds a unique touch that shows the recipient how much you care. Consider using them as reusable gift toppers for eco-friendly wrapping.
Home Decor: Display your snowflakes as window or wall decor, adding a winter wonderland vibe to any room. You could also use them as coasters, place settings, or table centerpieces.
7. Tips for Beginners: Making Your First Crochet Snowflake Pattern
Creating a crochet snowflake for the first time can seem daunting, but a few tips can make the process more enjoyable and successful.
Start Simple: Choose a beginner-friendly pattern to get comfortable with the stitches. Simple designs often look just as lovely as intricate ones, especially when they’re made with care.
Practice Consistent Tension: In crochet, consistent tension is key to a polished look. Make sure your stitches are even by practicing before you start your snowflake.
Experiment with Yarn and Hooks: Different types of yarn and hook sizes will yield different results. Play around with various materials to find the combination that suits your style and preferences.
By following these steps and tips, you’ll be able to create a crochet snowflake pattern that reflects your style and skill level. Embrace the magic of winter by adding handmade crochet snowflakes to your decor this season!


