If you’re a fan of handmade crafts, combining pop culture characters with classic techniques, you’re going to love Crochet Minion Granny Squares. This fun and playful project merges the traditional granny square pattern with everyone’s favorite yellow creatures — the Minions! Whether you’re a beginner in crochet or an experienced crafter looking to try something new, Crochet Minion Granny Squares offer a creative way to bring joy into your projects.
Crochet Minion Granny Squares can be used in many ways: to decorate blankets, pillows, bags, or even as stand-alone coasters. These cute character-inspired squares are not just adorable but also customizable. You can change facial expressions, colors, and accessories, making each square unique. Plus, they’re a great way to use up yarn scraps you might have lying around.
From kids’ bedroom decorations to handmade gifts for Despicable Me fans, these crochet squares open a world of fun possibilities. In this article, you’ll learn how to create these character-inspired motifs, with detailed explanations and tips. We’ll explore ideas for design variations, techniques, color combinations, and how to join your squares into a finished product.
1. Getting Started with Crochet Minion Granny Squares
Before diving into the actual crochet process, it’s important to gather your materials and understand the basic components. To start with Crochet Minion Granny Squares, you’ll need a few essential tools. Make sure you have a medium-weight yarn in yellow, blue, black, white, and gray. You’ll also need a 4mm or 4.5mm crochet hook, scissors, and a yarn needle.
The base of the design is the traditional granny square, modified to include facial features like eyes, glasses, and mouth. This means you should be comfortable with basic stitches such as chain (ch), slip stitch (sl st), single crochet (sc), half-double crochet (hdc), and double crochet (dc). If you’re still learning, there are plenty of resources to practice these foundational stitches.
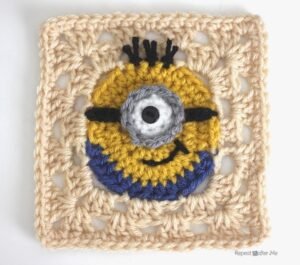
For the Minion’s eye, you’ll use color changes and small crochet circles. This detail adds a playful and recognizable character look to the square. Some variations have one large eye, while others feature two smaller ones. You can decide depending on which Minion you want to represent — Kevin, Stuart, or Bob.
As you begin your project, work your square in rounds starting from the center. This allows the face to stay centered. Make sure your tension is consistent to keep your square flat. Blocking your squares after finishing helps shape them perfectly, making them easier to join into larger projects.
Each square takes about 45 minutes to complete once you’re familiar with the pattern. You can make several in a day, depending on your pace. It’s also a fun project to do in groups or as part of a crochet club activity.
Don’t worry about perfection at first. These squares are meant to be fun and expressive. Slight differences in size or facial expression add charm and personality to your Crochet Minion Granny Squares.
2. Designing Your Minion’s Face and Expression
The charm of Crochet Minion Granny Squares lies in the face — it’s what makes the square instantly recognizable and delightful. Designing the facial features gives you room for creativity and humor. Begin with the eye(s). Using white yarn, crochet a small circle for the eyeball, then add a smaller black circle for the pupil. Attach these using a yarn needle or by stitching them directly into your square.
To add the goggles, crochet a ring in gray yarn slightly larger than the white eye and place it over the eye like a frame. Stitch it in place neatly. For the strap, use black yarn to make a band that stretches from one side of the square to the other. This gives the impression that the goggles wrap around the Minion’s head.
Now comes the fun part: the expression. You can use black yarn to stitch a smile, a frown, or a surprised look. A small curved line below the eye(s) is all it takes to change the mood of the square. Want your Minion to look sleepy? Add some eyelids with light blue yarn. Feeling playful? Give your square a little tongue with a pink yarn detail.
You can also experiment with different hairstyles. Some Minions are bald, while others have sprigs of hair sticking up. Use short black yarn strands and secure them at the top of the square to represent these styles. This extra detail makes your Crochet Minion Granny Squares even more fun.
If you’re making a series of squares, you can assign each one a different expression. This variety adds movement and personality to blankets or other finished projects. Children especially love identifying which square looks silly or sleepy or mischievous.
Don’t forget to keep everything securely fastened. Since these squares are often used for items that will be handled or washed, tightly securing the features will make your squares durable and long-lasting.
3. Creative Uses for Your Minion Granny Squares
Once you’ve made several Crochet Minion Granny Squares, you might wonder what to do with them. Luckily, the possibilities are endless. The most popular option is to assemble them into a blanket. Join the squares using a whip stitch or single crochet technique, and consider adding a border in blue or yellow to tie everything together.
Another fun option is to use the squares as decorative pillow fronts. Simply attach the square to a solid-colored fabric pillowcase and secure the edges. This is a quick and impressive gift idea for kids or Minion fans.
You can also create a tote bag using the squares as the front and back panels. Line the inside with fabric for added durability, and attach crochet handles or recycled belt straps. This makes a playful, practical accessory.
For smaller uses, try turning individual squares into coasters, wall hangings, or appliqués for children’s clothing. You can even make bookmarks by attaching a square to a crochet chain.
Teachers and caregivers have used Crochet Minion Granny Squares as teaching tools or reward tokens. Because they’re colorful and engaging, they grab children’s attention easily.
You can even make festive holiday decor by adding Santa hats or party hats to your squares depending on the season. These modifications make your squares timely and seasonal.
Think outside the box! Combine your Minion squares with other themed granny squares to tell a story or represent different movie scenes. This keeps your crochet practice fun and full of possibilities.
4. Tips for Success and Personalization
To make your Crochet Minion Granny Squares stand out, pay attention to small details. Consistency in size is important if you plan to join them into a larger project. To ensure uniformity, always use the same hook size and yarn type for each square.
Don’t be afraid to personalize each square. You can embroider initials, add small accessories like a crochet banana, or experiment with glitter yarn for goggles. These additions bring extra joy to the crafting process.
Make sure to keep your ends neat. Weaving in your yarn tails carefully will ensure a tidy and finished look. Consider using a yarn needle with a blunt tip for better control during this process.
If you’re working on many squares at once, set up a small production line. Make several eyes in one session, then do all the mouths in another. This method saves time and maintains a consistent style across your squares.
Always store your yarn and finished squares in a clean, dry space. Avoid direct sunlight to preserve the vibrancy of your yarn colors. Using resealable plastic bags or boxes is a smart way to protect your work.
Lastly, remember to enjoy the journey. Crocheting should be relaxing and rewarding. Take breaks when needed and admire your growing collection of Crochet Minion Granny Squares. Each one you complete is a cheerful piece of creativity.
Frequently Asked Questions (FAQ)
What yarn is best for Crochet Minion Granny Squares?
A medium-weight (worsted) acrylic yarn is ideal. It’s affordable, widely available, and easy to wash — perfect for items like blankets or kids’ accessories.
Can beginners try this project?
Yes! As long as you’re familiar with basic stitches like single crochet and double crochet, you can complete these squares. It’s a great next step for beginners who want to learn about color changes and facial details.
How do I join Crochet Minion Granny Squares into a blanket?
You can use the whip stitch, slip stitch, or single crochet method to join squares. Make sure they are all the same size for the best results, and block them beforehand for even edges.
Are these squares machine washable?
Yes, if you use machine-washable yarn and weave in the ends securely, your finished pieces will be durable. It’s always good to place them in a mesh laundry bag to avoid stretching.
How long does it take to make one square?
Once you know the pattern, each square can be made in around 45 minutes to 1 hour. Beginners might take a little longer, but with practice, the time decreases significantly.
Can I sell products made with Crochet Minion Granny Squares?
While you can sell handmade items inspired by Minions, be mindful of copyright if using recognizable character designs commercially. Always credit your own design interpretation and check local laws if selling.
Creating Crochet Minion Granny Squares is a rewarding and joyful experience for crochet lovers of all skill levels. This project blends the charm of granny squares with the humor and personality of the beloved Minions, making each square a tiny celebration of creativity. You’ve learned how to get started, design facial features, explore different project ideas, and apply useful crochet tips. Now it’s your turn!
We’d love to hear your thoughts! Have you tried making Crochet Minion Granny Squares? What did you use them for? Share your experience and suggestions in the comments — your feedback helps inspire even more crochet lovers in our creative community.


