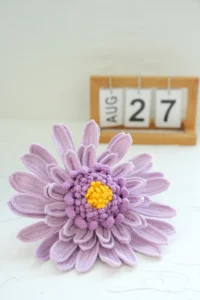
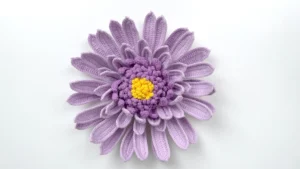
If you are looking for a Crochet Gerbera Daisy Pattern Free Tutorial, you have come to the right place! Gerbera daisies are beautiful flowers that can brighten up any space, and with this step-by-step guide, you will learn how to crochet your own stunning blooms. Whether you are a beginner or an experienced crocheter, this tutorial will help you create realistic, long-lasting flowers using simple crochet techniques.
Crocheting flowers is a great way to practice your skills while making something beautiful and functional. You can use your crocheted gerbera daisies to decorate your home, embellish accessories, or even create a unique bouquet for special occasions. In this tutorial, we will cover the materials you need, the basic stitches required, and a complete step-by-step guide to creating your own gerbera daisy.
Follow along as we break down each part of the process in detail, and by the end of this article, you will have a gorgeous crochet gerbera daisy that you can proudly display or gift to a loved one.
1. Materials Needed to Crochet a Gerbera Daisy
Before you start crocheting, it is essential to gather all the necessary materials. Having the right tools and yarn will ensure that your Crochet Gerbera Daisy Pattern Free Tutorial results in a beautiful and realistic flower.
Yarn: Choose lightweight cotton or acrylic yarn in colors of your choice. Bright colors like red, pink, yellow, and orange work well for gerbera daisies.
Crochet Hook: A 2.5mm to 3.5mm hook is ideal for creating delicate and detailed petals.
Tapestry Needle: Used for weaving in ends and assembling the flower.
Scissors: A sharp pair of scissors to cut the yarn cleanly.
Floral Wire (Optional): Helps to give structure to the stem if you want to create a standing flower.
Green Yarn or Floral Tape: If you decide to make a stem, green yarn or floral tape will give it a realistic finish.

Having these materials ready will make the crocheting process smoother and more enjoyable. Now, let’s move on to the basic stitches you need to know.
2. Basic Crochet Stitches for Gerbera Daisy
To create a beautiful Crochet Gerbera Daisy Pattern Free Tutorial, you need to be familiar with some fundamental crochet stitches. Here are the key stitches used in this pattern:
Slip Knot & Chain Stitch (ch): The starting point for most crochet projects.
Slip Stitch (sl st): A simple stitch used to join rounds and create smooth edges.
Single Crochet (sc): A tight and compact stitch used for shaping petals.
Half Double Crochet (hdc): A versatile stitch that adds height and texture.
Double Crochet (dc): Commonly used for creating larger petals.
Magic Ring (MR): A technique used to create a tight, adjustable center for the flower.
If you are a beginner, take some time to practice these stitches before starting the gerbera daisy pattern. Mastering these basics will make the process easier and more enjoyable.
3. Step-by-Step Crochet Gerbera Daisy Pattern
Now that you have your materials and know the necessary stitches, let’s dive into the Crochet Gerbera Daisy Pattern Free Tutorial. Follow these steps carefully to create a beautiful and realistic gerbera daisy.
Step 1: Create the Center
Make a magic ring and crochet 10 single crochets into it.
Pull the ring tight and join with a slip stitch.
Work a second round, increasing stitches evenly.
Step 2: Make the Petals
Using a bright-colored yarn, start a new round by chaining four.
Work a combination of double crochet and single crochet stitches to shape each petal.
Continue around until you complete all petals.
Step 3: Add Depth and Layers
To make the daisy more realistic, create a second layer of petals behind the first layer.
Use slightly longer stitches to give depth and volume.
Step 4: Assemble the Flower
Weave in all ends and secure the petals in place.
If making a stem, attach a floral wire to the back and wrap it with green yarn or floral tape.
Step 5: Final Touches
Adjust the petals and shape them for a natural look.
Spray lightly with water and shape the petals for a lifelike appearance.
4. Tips and Tricks for Perfect Crochet Gerbera Daisies
Creating a perfect Crochet Gerbera Daisy Pattern Free Tutorial requires attention to detail. Here are some expert tips to make your flowers look more realistic:
Use Variegated Yarn: This adds a natural gradient effect to the petals.
Stiffen the Petals: Lightly starch or block your finished flower to keep its shape.
Mix Different Petal Sizes: Adding variation in petal length makes the flower look more authentic.
Experiment with Colors: Try making multi-colored daisies for a unique effect.
Use a Small Hook for Tighter Stitches: A smaller hook will create denser and more defined petals.
Practice Tension Control: Keeping even tension ensures that all petals are uniform in size and shape.
By following these tips, you can make your crocheted gerbera daisies look professional and realistic.
FAQ About Crochet Gerbera Daisy Pattern
Q1: Can beginners crochet a gerbera daisy?
A: Yes! With patience and practice, even beginners can successfully create a beautiful crochet gerbera daisy.
Q2: How long does it take to crochet a gerbera daisy?
A: Depending on your skill level, it can take anywhere from 1 to 3 hours to complete one flower.
Q3: What type of yarn is best for crocheting flowers?
A: Cotton or acrylic yarn with good stitch definition is best for crocheted flowers.
Q4: Can I use these flowers for decoration?
A: Absolutely! They are perfect for home decor, gifts, and accessories.
Q5: How do I stiffen crochet flowers?
A: You can use a fabric stiffener, spray starch, or a sugar-water solution to maintain their shape.
Now that you have completed this Crochet Gerbera Daisy Pattern Free Tutorial, you should have a beautiful crocheted flower to showcase. Crocheting flowers is a rewarding and enjoyable hobby that allows you to create something unique and long-lasting.
If you enjoyed this tutorial, please leave a comment with your opinion and suggestions. Happy crocheting!


