Starting a Crochet Braided Headband Tutorial can be one of the most enjoyable projects for beginners and advanced crocheters alike. This accessory is stylish, functional, and incredibly versatile, making it the perfect addition to any wardrobe. By learning this step-by-step process, you will not only improve your crochet skills but also create a handmade piece that is both fashionable and practical. Whether you want to keep your ears warm during colder months or simply add a unique detail to your hairstyle, this project is worth your time.
The beauty of the crochet braided headband is that it looks complicated but is actually simple once you understand the basic techniques. With just a few common stitches and an understanding of how to braid strips together, you can make a headband that looks store-bought yet carries the charm of handmade craftsmanship. Using yarn you already have at home makes it cost-effective, and it is also a great way to use up scraps from previous projects. The result is a soft, cozy, and stylish headband that you will be proud to wear or gift.
In this Crochet Braided Headband Tutorial, we will cover everything from the materials you need to detailed step-by-step instructions. You will also find tips on choosing the best yarn, adjusting the size, and styling your finished headband. By the end, you will be confident enough to make more than one, experimenting with different yarn colors and textures to suit your personal taste.
Materials You Need for a Crochet Braided Headband
To start this project, you only need a few basic materials. First and foremost, you will need yarn. For a beginner, medium-weight yarn is recommended because it is easy to work with and gives the headband a nice thickness. Acrylic yarn is a popular option since it is affordable, durable, and comes in a wide variety of colors. If you prefer a softer finish, you may opt for cotton or wool blends.
Next, you need a crochet hook that matches the weight of your yarn. Check the yarn label for the suggested hook size, but generally, a 5mm or 5.5mm hook works perfectly for this project. Having the right hook ensures your stitches are uniform and that your braid holds its structure. Additionally, a yarn needle will be necessary for weaving in the ends after you finish crocheting.
You will also need scissors to cut your yarn cleanly. Some crocheters like to use stitch markers, especially when working on longer strips, to keep track of rows without losing count. While not essential, these can make your work easier and more accurate. Finally, keep a tape measure handy. This will help you size the headband correctly, ensuring it fits comfortably around your head or the head of the person you are making it for.
Gathering the right materials before you begin is crucial. It allows you to focus on the crocheting itself without unnecessary interruptions. With these simple tools in place, you are ready to move on to the fun part—creating the strips that will eventually be braided into your headband.
One tip for beginners is to choose yarn colors that contrast slightly with each other if you plan on using multiple shades. This creates a visually striking braid and makes the weaving process easier to follow. On the other hand, a single color can give a more elegant and subtle look, perfect for minimalistic styles.
Finally, don’t worry if you are new to crochet. The stitches required for this Crochet Braided Headband Tutorial are basic, and with patience, you will master them quickly. Even if your first attempt is not perfect, each project improves your skill and confidence.
Step-by-Step Crochet Instructions
Begin by creating three long crochet strips, which will later be braided together. To do this, start with a slip knot and chain the length you need. For an adult headband, the strip should measure around 18 to 20 inches long, as the braid will reduce the final length slightly.
Once you have your foundation chain, use a simple stitch like the half double crochet or single crochet. These stitches are easy to master and create a solid yet flexible strip. Continue crocheting rows until the strip is about 1.5 to 2 inches wide. This width works well because it balances comfort and style. Repeat this process until you have three identical strips.
When all three strips are complete, place them side by side and sew them together at one end using your yarn needle. Make sure the stitches are tight enough to hold but not bulky. This will give you a clean starting point for braiding.
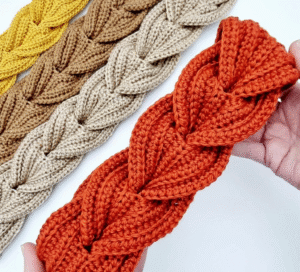
Next, braid the strips together just as you would with hair. Cross the right strip over the middle one, then the left strip over the new middle. Continue this process until you reach the other end. Keep the braid even by pulling gently on each strip as you work. When you finish braiding, sew the loose ends together securely.
At this stage, you will have a braided band that looks nearly complete. To turn it into a proper headband, fold the two ends together and stitch them securely, forming a loop. Make sure your seam is strong but discreet, as this will determine the durability of the headband.
After stitching, weave in any remaining yarn ends with your needle. Trim off excess yarn and smooth out the braid with your hands. Your crochet braided headband is now complete, and you can try it on immediately to admire your handiwork.
Styling and Customizing Your Headband
One of the best things about this project is how easy it is to customize. You can make your crochet braided headband in different colors to match your outfits or seasonal trends. Bright, bold yarns are perfect for summer and spring, while earthy tones work well for autumn and winter.
Another way to customize is by adjusting the thickness of the strips. For a chunkier look, crochet wider strips, while for a delicate style, keep them narrower. This small change can drastically alter the final appearance of your headband, allowing you to create multiple variations.
You can also add embellishments like buttons, small flowers, or beads to give your headband a unique touch. Crochet flowers, in particular, pair beautifully with the braided design and can be sewn on with minimal effort.
If you are making the headband as a gift, think about the recipient’s personal style. Some people prefer simple, understated accessories, while others enjoy bold and colorful designs. Personalizing the headband shows thoughtfulness and makes the gift more meaningful.
For those who enjoy fashion versatility, you can even make reversible headbands by using yarns with self-striping or variegated colors. This adds visual interest and ensures your headband always looks unique, even if you wear it frequently.
Lastly, do not forget the functional aspect. A crochet braided headband not only looks stylish but also keeps hair in place and provides warmth during cold days. By experimenting with yarn types, you can make lightweight versions for summer or cozy versions for winter.
Tips for Beginners and Common Mistakes to Avoid
If this is your first Crochet Braided Headband Tutorial, it is important to be patient with yourself. Crocheting can seem intimidating at first, but with practice, the process becomes second nature. Always start with simple stitches before trying more advanced ones.
One common mistake beginners make is crocheting strips of different lengths. To avoid this, measure each strip carefully as you go. Consistency is key to ensuring your braid looks neat and symmetrical.
Another frequent issue is making stitches too tight. This can cause your strips to curl and make braiding difficult. Aim for a relaxed tension that keeps your stitches even without pulling the yarn too tightly.
Don’t skip weaving in the ends properly. Loose yarn tails can unravel over time, weakening the headband. Use a yarn needle to weave the ends back and forth securely before trimming.
If your braid looks uneven, gently pull on the strips to adjust the tension. This small correction can make a big difference in the final look. Also, make sure you are braiding on a flat surface, which helps maintain symmetry.
Finally, enjoy the process. Crocheting is not just about the finished product but also about relaxation and creativity. Each headband you make improves your skill, and soon you will be able to create them effortlessly.
FAQ About Crochet Braided Headbands
How long does it take to make a crochet braided headband?
On average, it takes about one to two hours, depending on your crochet speed and experience. Beginners may take longer, but the project is still relatively quick.
What is the best yarn for a crochet braided headband?
Medium-weight acrylic yarn is recommended for durability and versatility, but cotton and wool blends also work well depending on your preference.
Can I make a crochet braided headband without experience?
Yes, this tutorial uses simple stitches that beginners can easily learn. With patience, even a first-time crocheter can complete this project successfully.
How do I make sure the headband fits properly?
Measure your head before starting and chain the strips slightly shorter than your head circumference, since crochet tends to stretch.
Can I wash my crochet braided headband?
Yes, most yarns are machine washable, especially acrylic. However, it is best to hand wash delicate fibers like wool or cotton blends to maintain their shape.
Can children wear crochet braided headbands?
Absolutely. Simply adjust the length of the strips to fit a child’s head. Softer yarns are recommended for comfort.
Video Tutorial
In this Crochet Braided Headband Tutorial, we explored the materials needed, step-by-step instructions, styling options, and tips for success. This simple yet stylish project is ideal for beginners and experienced crocheters alike. With just a few hours and basic supplies, you can create a handmade accessory that is both practical and beautiful.
Now that you know how to make your own crochet braided headband, give it a try and experiment with colors, textures, and embellishments. Each piece you create will carry your personal touch and creativity.
I’d love to hear your thoughts. Leave a sincere opinion and any suggestions you might have for improving this tutorial. Your feedback helps inspire new ideas and keeps the crochet community growing with creativity and passion.