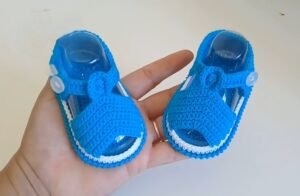
Crochet Baby Sandals are one of the most adorable and functional handmade accessories for little ones. These tiny, cozy creations not only protect delicate baby feet but also add a delightful charm to any outfit. Whether you’re an experienced crocheter or a complete beginner, creating your own pair of Crochet Baby Sandals is both rewarding and surprisingly simple.
The popularity of Crochet Baby Sandals has grown massively over the years thanks to their versatility and the creative possibilities they offer. From bright summer styles to delicate lacy versions for special occasions, there’s a design to suit every taste. Many parents appreciate the fact that these sandals are soft, breathable, and made with love—making them ideal for babies’ sensitive skin.
In this article, we’ll guide you through everything you need to know about Crochet Baby Sandals, including choosing the right materials, crafting your first pair, exploring creative variations, and offering helpful tips to ensure success. You’ll also find answers to common questions in our FAQ section, along with a final summary and invitation to share your thoughts.
1. Choosing the Right Materials for Crochet Baby Sandals
Before starting any crochet project, especially Crochet Baby Sandals, selecting the correct materials is crucial. The comfort and safety of the baby are always the top priority.
First and foremost, you’ll need soft, baby-friendly yarn. Look for 100% cotton yarn or specific baby yarns that are breathable and gentle against the skin. These yarns are ideal because they prevent irritation and are washable—perfect for everyday baby wear.
Next, choose an appropriate hook size. For most Crochet Baby Sandals, a 3.0 mm to 4.0 mm crochet hook works well with baby yarn. This size helps create tight stitches that keep the sandal’s shape while still feeling soft and flexible.
Don’t forget additional materials such as buttons, ribbons, or even small velcro straps. These elements are commonly added for closures and decoration. Just make sure they are securely attached to prevent any choking hazards.
Safety should always come first. Avoid using beads or embellishments that could detach easily. Stick to secure closures and double-knot your ends. This guarantees that your Crochet Baby Sandals will be as safe as they are stylish.
Lastly, consider using a yarn color that matches the season or theme. Pastels are great for spring, while brighter hues can add a summery flair. Neutral tones are always a hit for gifting or when the baby’s gender is still a surprise.
2. Step-by-Step Guide to Crocheting Baby Sandals
Now let’s dive into how to actually make your own Crochet Baby Sandals. While there are various patterns available, most of them follow a similar basic structure.
Start with the sole. This part is crocheted in an oval shape and needs to be sturdy enough to hold its form. You can double up the yarn or crochet two soles and stitch them together for extra thickness.
Then move on to the upper part of the sandal. This is where creativity comes in. You might choose a T-strap, a simple band, or even a criss-cross design. This part attaches to the sole and gives the sandal its unique look.
Add a back strap for better support. Babies love to wiggle their feet, so including a heel strap or an adjustable closure ensures that the sandals stay in place throughout the day.
Stitch everything carefully and securely. Make sure each piece is sewn in firmly and the fit is snug but not tight. Test the structure by gently pulling on each section to confirm its stability.
Add the finishing touches such as a cute button or bow. Remember, any small decoration must be securely attached to avoid risks. Decorative details can really elevate the look of your Crochet Baby Sandals.
Finally, weave in all loose ends and give the sandals a gentle wash. Once dry, your baby’s new favorite footwear is ready to wear—or gift!
3. Creative Design Variations for Baby Sandals
One of the joys of crocheting is the ability to personalize. Crochet Baby Sandals come in countless designs, and you can tweak any pattern to make it your own.
Consider flower embellishments. Small crochet flowers can be added to the top of the sandal to give a sweet, summery appearance. Use contrasting colors for a vibrant look or matching tones for subtle charm.
You could also experiment with open-toe or closed-toe designs. Open-toe sandals are perfect for summer, while closed-toe options offer more protection during cooler seasons.
Think about the straps. Instead of a simple ankle strap, try using criss-cross designs, buckle styles, or even elasticized bands for a modern touch. These options not only look great but also improve the sandal’s fit.
Play with texture. Use puff stitches, shells, or lace-like patterns to give the sandals a more intricate appearance. These textures add depth and uniqueness without compromising comfort.
Mix and match colors. Go bold with two-tone designs or stay classic with soft neutrals. Ombre yarns can also create a beautiful gradient effect that makes the sandals stand out.
Don’t be afraid to incorporate themed elements like nautical buttons, animal faces, or holiday motifs. These fun additions can make your Crochet Baby Sandals even more special for photos or gifting.
4. Tips for Success and Common Mistakes to Avoid
Every craft has its learning curve, and Crochet Baby Sandals are no different. Here are some practical tips to make your project successful from the start.
Always check your gauge. If your stitches are too tight or too loose, the sandal may not fit correctly. A quick gauge swatch can save you time and frustration down the line.
Avoid using stiff or scratchy yarns. Even if the color is perfect, comfort is key. Stick to soft, baby-approved yarns to ensure your sandals are cozy and wearable.
Follow the pattern carefully, especially for shaping the sole and straps. A small misstep in these areas can affect the entire fit and structure of the sandal.
Use stitch markers. When crocheting in the round or working on symmetrical parts, markers help keep track of important sections and ensure consistency.
Take your time attaching the pieces. Rushed seams can lead to sandals that come apart or lose their shape. Neat and even stitching makes a big difference in the final product.
Lastly, always inspect the final item for loose threads, weak spots, or sharp edges. Babies explore with their hands and feet, so making your Crochet Baby Sandals safe and durable is essential.
Frequently Asked Questions
Q: What size should Crochet Baby Sandals be for a newborn?
A: For newborns, a common size is about 3.5 to 4 inches (9–10 cm) in sole length. Always measure the baby’s foot to ensure a better fit.
Q: Are Crochet Baby Sandals safe for walking babies?
A: They are best suited for pre-walkers or indoor use. For walking babies, consider adding a non-slip sole using puff paint or felt.
Q: How long does it take to crochet a pair of baby sandals?
A: On average, it takes 1 to 2 hours depending on the complexity of the pattern and your skill level.
Q: Can I wash Crochet Baby Sandals in a washing machine?
A: It depends on the yarn. Most cotton yarns are machine-washable, but hand-washing is safer to maintain the sandal’s shape.
Q: What age group are these sandals suitable for?
A: Patterns can be adapted for newborns up to 12 months old. Adjust yarn weight and hook size to change the final sandal dimensions.
Q: What if my sandal turns out too big or too small?
A: You can adjust your hook size or add/remove a few stitches in the sole to resize. Always make a test sandal before finalizing.
Creating your own Crochet Baby Sandals is a heartfelt and practical way to use your crochet skills. We’ve explored how to choose the best materials, walked through the basic steps to craft your own pair, offered creative variations, and shared helpful tips for avoiding common mistakes. Plus, our FAQ section covers the most pressing concerns crafters face.
We hope this comprehensive guide inspires you to make your own cozy, beautiful Crochet Baby Sandals. Whether you’re gifting them or dressing up your little one, these handmade shoes carry love in every stitch.
If you’ve enjoyed this tutorial or have any questions, please leave your honest opinion and suggestions below. We’d love to hear how your baby sandal project turned out!


