If you’ve been looking for a Catherine’s Wheel Stitch Tutorial Free Tutorial, you’re in the right place! This beautiful and intricate crochet stitch creates a stunning wheel-like pattern that’s perfect for blankets, scarves, and other textured projects. In this detailed guide, we’ll walk you through every step of the way, from basic materials to mastering the technique with confidence.
The Catherine’s Wheel Stitch Tutorial Free Tutorial is more than just a pattern—it’s a gateway to expanding your crochet skills and making unique handcrafted items. Whether you’re a beginner or someone who already has a few projects under your belt, this stitch adds charm and character to any piece. It might look complicated at first glance, but we’ll simplify it for you.
Not only will you learn how to create this eye-catching stitch, but you’ll also understand how to apply it to different types of crochet projects. We’ve structured this tutorial to ensure that each section builds on the previous one, so by the end, you’ll feel confident using the Catherine’s Wheel Stitch in your own creative works.
1. What is the Catherine’s Wheel Stitch?
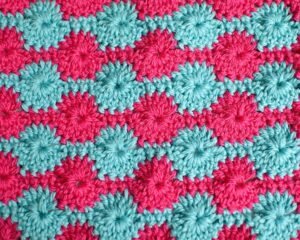
The Catherine’s Wheel Stitch is a vintage-inspired crochet pattern that forms a series of circular motifs, giving the effect of spinning wheels across your fabric. This stitch stands out for its texture and symmetrical design, making it an ideal choice for visually engaging pieces.
It’s typically created using a combination of basic crochet techniques such as double crochet, chain stitches, and slip stitches. Although the pattern might seem elaborate, it’s quite manageable with a little patience and attention to detail.
One of the unique features of this stitch is how it creates a dense fabric, perfect for cozy accessories like throws and shawls. The stitch not only looks appealing but also adds durability to your finished projects.
Crocheters love using the Catherine’s Wheel Stitch for its artistic flair and vintage charm. It works beautifully with contrasting yarn colors to highlight the wheel design more vividly.
The name itself adds a touch of elegance and history to your project. It’s a stitch that carries both visual beauty and traditional appeal, which makes it ideal for personal and gift-worthy creations.
In our Catherine’s Wheel Stitch Tutorial Free Tutorial, we’ll guide you through how to master this stitch so you can incorporate it into your crochet projects seamlessly and with pride.
2. Tools and Materials You’ll Need
Before starting, it’s important to gather the right materials to ensure a smooth crafting experience. Having quality supplies can make a noticeable difference in your stitching.
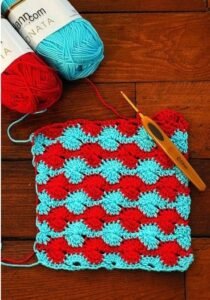
Start with a medium-weight yarn that allows you to clearly see your stitches. Acrylic yarn is a great choice for practicing because it’s affordable and easy to work with. For the best visual effect, choose two contrasting colors.
You’ll need a crochet hook that matches your yarn weight. Typically, a 4.5mm to 5.5mm hook works well for the Catherine’s Wheel Stitch. Check the yarn label for recommendations and adjust accordingly to your tension.
Other essentials include a yarn needle for weaving in ends, stitch markers to keep track of your pattern, and a pair of sharp scissors. These tools will make your workflow cleaner and more efficient.
Having a printed or digital copy of this Catherine’s Wheel Stitch Tutorial Free Tutorial can also help you follow along without missing a beat. Some crocheters even prefer to highlight or annotate patterns to stay organized.
If you’re a beginner, don’t worry—no fancy or expensive tools are needed. The magic lies in the technique, not the gear. However, investing in ergonomic crochet hooks can help prevent hand fatigue during longer sessions.
Once you’ve gathered everything, set up a comfortable workspace. Good lighting and a quiet environment can help you stay focused while you master this beautiful stitch.
3. Step-by-Step Instructions
Now for the heart of our Catherine’s Wheel Stitch Tutorial Free Tutorial—learning how to do the stitch itself. Follow these easy steps to get started:
-
Foundation Row: Chain a multiple of 10 + 6 stitches. This number ensures the wheels form evenly across your fabric.
-
Row 1 (setup row): Start with single crochets across. This forms the base for your wheel stitches.
-
Row 2 (first wheels): Begin with a chain 3, then work clusters of double crochets into specific chains from the base row. You’ll start to see partial circles forming.
-
Row 3 (bridging row): Chain 1 and work single crochets into each stitch across. This helps create a flat surface for the next wheel layer.
-
Row 4 (alternating wheels): Repeat the cluster pattern, but stagger it so the wheels alternate between rows. This is what gives the design its signature movement.
-
Continue Pattern: Repeat rows 3 and 4 until your project reaches the desired length. You can switch colors every two rows for extra contrast.
This stitch requires a bit of counting, so don’t hesitate to use stitch markers or even a row counter. The pattern becomes second nature with a little practice, and the results are truly rewarding.
Watch your progress row by row—it’s satisfying to see the wheels come to life. The alternating cluster rows and single crochet rows give a smooth, flowing look to the overall design.
If you make a mistake, don’t worry. Unraveling and retrying is part of the process. Even experienced crocheters redo rows occasionally, especially when learning new techniques.
The most important part of mastering the Catherine’s Wheel Stitch is patience. Take your time and enjoy the journey of learning something new and beautiful.
4. Tips for Perfecting the Pattern
While the Catherine’s Wheel Stitch is beautiful, a few tips can make your project even more successful. These suggestions are especially helpful if you’re new to textured crochet stitches.
Tip 1: Use color changes wisely. Switching colors every two rows will make the wheels pop more visually. This is a great opportunity to experiment with color theory in your designs.
Tip 2: Maintain consistent tension. Uneven tension can make your wheels look lopsided or distorted. Try to crochet at a steady pace and avoid pulling too tightly on your yarn.
Tip 3: Count often. Since this stitch involves repetitive clusters, it’s easy to accidentally skip or add extra stitches. Counting out loud or using stitch markers can save you from having to unravel later.
Tip 4: Block your finished piece. Wet-blocking or steam-blocking your project can help flatten and even out the wheels, giving a more professional finish.
Tip 5: Practice with a swatch. Before diving into a full blanket or scarf, create a smaller sample square. This allows you to get familiar with the technique without a large time commitment.
Tip 6: Be patient. Remember, the Catherine’s Wheel Stitch Tutorial Free Tutorial is a guide—not a race. Enjoy the rhythm of the stitch and take pride in each section you complete.
These tips can dramatically improve your crochet results, turning a simple stitch into a masterpiece. Like any skill, practice makes perfect—and the joy is in the creation.
Frequently Asked Questions
Q1: Is the Catherine’s Wheel Stitch suitable for beginners?
Yes, with guidance. While the stitch involves a combination of clusters and counts, it’s very approachable with clear instructions like in this Catherine’s Wheel Stitch Tutorial Free Tutorial.
Q2: What projects can I make using the Catherine’s Wheel Stitch?
It’s perfect for blankets, scarves, pillow covers, table runners, and more. Its thick texture makes it ideal for cozy and decorative items.
Q3: Can I use any type of yarn?
Yes, but medium-weight yarn works best for clarity. Thinner yarns may lose detail, and bulky yarns might overwhelm the pattern.
Q4: How many stitches do I need to start?
Start with a multiple of 10 stitches, then add 6 extra chains to balance the pattern evenly across the row.
Q5: Do I need to use different colors?
Not at all, but using contrasting colors will enhance the wheel pattern. It’s a great way to add vibrancy and dimension to your project.
Q6: Can this pattern be used in circular projects?
The traditional Catherine’s Wheel Stitch works best in rows, but with creativity, it can be adapted for circular or modular designs.
In this detailed Catherine’s Wheel Stitch Tutorial Free Tutorial, we explored everything you need to master this elegant and vintage-inspired crochet stitch. From materials and setup to step-by-step instructions and helpful tips, you’re now equipped to create stunning pieces with confidence.
Whether you’re making a cozy blanket, a colorful scarf, or simply enjoying the process of learning a new stitch, the Catherine’s Wheel Stitch adds personality and artistry to your craft.
If this guide helped you, please leave a sincere opinion in the comments and share any suggestions you might have. We love hearing about your progress and learning from your experiences too!


