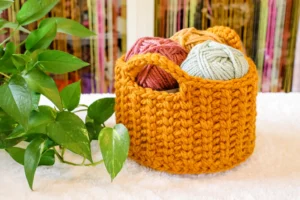
If you are searching for a Beginner Chunky Round Crochet Basket Pattern, you’ve just landed in the right place. This tutorial is designed especially for beginners who want to create a beautiful, functional, and sturdy crochet basket using chunky yarn. Whether you’re organizing your home or looking for a stylish handmade touch, this project is simple, rewarding, and beginner-friendly.
A Beginner Chunky Round Crochet Basket Pattern is perfect because it uses basic stitches, works up quickly, and requires minimal materials. You don’t need to be an expert crocheter to complete this basket successfully. If you know how to make a chain and a single crochet stitch, you are ready to go.
Throughout this guide, you will learn how to crochet a durable round basket step-by-step. The instructions are clear, easy to follow, and designed with beginners in mind. By the end of this article, you will have mastered the basics of basket making and be ready to create different sizes and variations using the same technique.
1. Materials Needed for a Beginner Chunky Round Crochet Basket Pattern
To begin your Beginner Chunky Round Crochet Basket Pattern, it’s essential to gather the right materials. Using the correct supplies will make your basket sturdy, neat, and professional-looking.
The first thing you’ll need is chunky or super bulky yarn. This type of yarn provides the thickness needed to make your basket hold its shape. Cotton or t-shirt yarn is also an excellent choice for durability.
Next, you’ll need a large crochet hook. Typically, a size between 8mm to 12mm works perfectly for this kind of project. The larger hook helps keep the basket flexible while still firm.
A stitch marker is highly recommended, especially for beginners. It helps you keep track of the start of each round, preventing confusion as you work in continuous spirals.
Sharp scissors are necessary for cutting the yarn cleanly. This helps in finishing your project neatly without frayed ends.
A yarn needle is important for weaving in the ends once your basket is complete. This final touch gives your project a polished look.
Having all these materials ready before starting your Beginner Chunky Round Crochet Basket Pattern will ensure a smooth and enjoyable crafting experience.
2. Step-by-Step Instructions for the Crochet Basket Base
The foundation of your Beginner Chunky Round Crochet Basket Pattern starts with creating a solid and flat base. This step determines the size of your finished basket.
Begin with a magic ring. This technique allows you to pull the ring tight, eliminating the hole in the center of your basket. It’s a neat and professional way to start round projects.
Into the magic ring, crochet 6 single crochets. Pull the ring closed tightly. This forms your very first round.
For the second round, make 2 single crochets into each stitch around. You should now have 12 stitches in total. Use your stitch marker to mark the beginning of each round.
In the third round, follow the increase pattern: 1 single crochet in the first stitch, then 2 single crochets in the next stitch. Repeat this around to end with 18 stitches.
Continue increasing in this pattern—adding one more single crochet between increases on each new round—until your base reaches the desired size.
A typical Beginner Chunky Round Crochet Basket Pattern for a medium-sized basket usually stops increasing when the base is about 8 to 10 inches in diameter. Adjust according to your needs.
Once the base is complete, it’s time to stop increasing and move on to building the sides of your basket.
3. Building the Sides of the Crochet Basket
Now that the base is finished, the next step in your Beginner Chunky Round Crochet Basket Pattern is forming the sides. This is where your basket begins to take shape.
To form a clean edge between the base and sides, crochet one round in the back loops only. This creates a natural crease, helping the sides to stand upright.
After the back loop round, continue working in standard single crochets in both loops. No more increasing is needed at this point.
As you build up the sides, keep your tension consistent. Tight tension will create a firmer, sturdier basket, while looser tension will make it more flexible.
Decide how tall you want your basket to be. A typical height ranges from 5 to 8 inches, but you can customize it based on your needs.
Remember to use the stitch marker to keep track of each round. This prevents uneven edges and maintains a neat appearance.
Once you reach your desired height, it’s time to think about finishing the edge, adding handles if desired, and preparing for the final touches.
4. Finishing Touches and Customization Tips
The last steps in the Beginner Chunky Round Crochet Basket Pattern are where you can really make your basket unique and functional.
For a clean top edge, work one round of slip stitches. This simple step flattens and tightens the rim, giving the basket a professional look.
If you want to add handles, leave gaps by chaining a few stitches (usually 5 to 8 chains) and skipping the same number of stitches on the basket. Then, continue single crocheting around. This creates built-in handles that are sturdy and useful.
Consider decorating your basket with color changes. You can switch yarn colors at the start of a round to create stripes or patterns.
Another idea is to use leather or wooden tags for a personalized touch. Simply sew them onto the rim of your finished basket.
If you want an even sturdier basket, double up the yarn strands or use rope together with your chunky yarn. This will create a much firmer structure.
Once you’re happy with your basket’s look and feel, weave in all yarn ends securely using a yarn needle. Your Beginner Chunky Round Crochet Basket Pattern project is now complete and ready to use.
FAQ – Beginner Chunky Round Crochet Basket Pattern
Q1: What is the best yarn for a crochet basket?
The best yarn for a Beginner Chunky Round Crochet Basket Pattern is chunky, super bulky yarn, or t-shirt yarn. Cotton yarn is preferred because it holds shape better than acrylic.
Q2: Can I make this basket with regular yarn?
Yes, but regular yarn will make a softer and less structured basket. For a sturdy result, stick to chunky yarn or double up thinner yarn strands.
Q3: How do I keep my basket from flopping over?
Use tight tension, a smaller hook relative to the yarn size, and consider doubling your yarn or adding rope for extra stability.
Q4: How do I resize the basket?
Increase the number of rounds in the base to make it wider and add more rounds in the sides to make it taller. Follow the same increase pattern for a balanced shape.
Q5: How long does it take to make this basket?
For beginners, it typically takes between 2 to 4 hours to complete a medium-sized basket using the Beginner Chunky Round Crochet Basket Pattern.
Q6: Can I wash my crochet basket?
Yes, if you use cotton or washable yarn. Hand washing is recommended to maintain the shape. Reshape and air dry completely.
In this tutorial, you learned how to create a beautiful Beginner Chunky Round Crochet Basket Pattern from start to finish. We covered the materials needed, how to crochet the base, how to build the sides, and how to add finishing touches like clean edges and handles. This project is beginner-friendly, fast to complete, and highly customizable.
I hope this guide has inspired you to start your own crochet basket today. If you enjoyed this tutorial, please leave your honest feedback in the comments and share your suggestions. Your opinion helps me create even better content for you. Happy crocheting!


