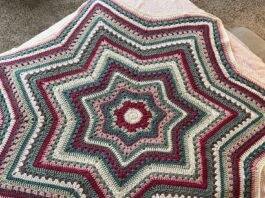
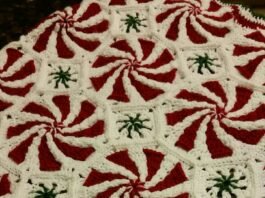
Granny squares are a beloved staple in the world of crochet. With their rich history and versatile applications, these charming crochet patterns are perfect for beginners and seasoned crafters alike.
In this blog post, we’ll delve into the history of granny squares, explore their various uses, and provide a detailed step-by-step tutorial on how to create your own.
Whether you’re looking to enhance your crochet skills or simply want to create a beautiful piece, this guide has got you covered.

A Brief History of Granny Squares
Granny squares have been a popular crochet pattern for generations. Their origins can be traced back to the early 19th century, when crochet became a widely practiced craft. Named for their association with grandmothers who often passed down the skill, these squares quickly became a symbol of home and comfort.
The classic granny square pattern involves creating small, square-shaped motifs that can be joined together to make larger items such as blankets, scarves, or even clothing. These squares are typically made using vibrant colors and intricate designs, which makes them both visually appealing and fun to create.
Over the years, granny squares have evolved. Modern interpretations of these crochet patterns include various shapes, sizes, and color schemes, demonstrating the adaptability and timeless appeal of the granny square.
Why Granny Squares Are Perfect for Beginners
Granny squares are an excellent starting point for those new to crochet. The repetitive nature of the pattern helps beginners develop their skills without feeling overwhelmed. Each square is a small project, allowing crafters to see their progress quickly, which can be incredibly motivating.
One of the biggest advantages of learning granny squares is the versatility they offer. Once you master the basic pattern, you can experiment with different yarns, colors, and stitches to create unique designs. This flexibility makes granny squares a great project for experimenting and growing your crochet repertoire.


Additionally, granny squares are a portable project. You can easily carry your yarn and hook with you and work on your squares wherever you go. This makes them an ideal project for busy individuals who want to fit crochet into their daily routines.
Tools and Materials Needed
Before diving into your granny square project, you’ll need to gather a few essential tools and materials. The most important items are your crochet hooks and yarn. For beginners, a medium-weight yarn and a size H-8 (5 mm) crochet hook are recommended. This combination is easy to work with and provides a good foundation for learning the basic stitches.
In addition to your yarn and hook, you’ll also need a pair of sharp scissors and a yarn needle. The scissors will be used to cut your yarn, while the yarn needle will help you weave in the ends of your finished squares. Having these tools on hand will ensure that you can complete your project efficiently.
Finally, consider using stitch markers. These small tools can be incredibly helpful, especially for beginners, as they allow you to keep track of your stitches and rows. This is particularly useful when creating more complex granny square patterns or when working on multiple squares simultaneously.

Choosing the Right Yarn
Selecting the right yarn is crucial for the success of your granny square project. There are many factors to consider, including the yarn’s weight, fiber content, and color. For beginners, a medium-weight (worsted) yarn is often the best choice. It’s easy to handle and works well with the standard size H-8 crochet hook.
When it comes to fiber content, cotton and acrylic yarns are popular choices for granny squares. Cotton yarn is soft, durable, and has a lovely sheen, making it ideal for projects that require a bit of structure. Acrylic yarn, on the other hand, is affordable, widely available, and comes in a vast array of colors. It’s also machine washable, which is a great advantage for items like blankets and garments.
Color selection is another important aspect of your project. Granny squares are known for their vibrant, multicolored designs, so don’t be afraid to experiment with different color combinations. Consider choosing a color palette that complements your home decor or personal style. Playing with colors can be one of the most enjoyable parts of making granny squares.

Basic Granny Square Pattern
Now that you have your materials ready, it’s time to start crocheting. Here’s a simple step-by-step tutorial to create a classic granny square:
- Start with a Slip Knot and Chain:
- Make a slip knot and chain 4.
- Join with a slip stitch to form a ring.
- First Round:
- Chain 3 (counts as the first double crochet).
- Work 2 double crochets into the ring.
- Chain 2.
- Work 3 double crochets into the ring, chain 2. Repeat from * to * two more times.
- Join with a slip stitch to the top of the beginning chain 3.
- Second Round:
- Slip stitch into the first chain-2 space.
- Chain 3 (counts as the first double crochet).
- Work 2 double crochets into the same chain-2 space.
- Chain 2, work 3 double crochets into the same chain-2 space.
- In the next chain-2 space, work 3 double crochets, chain 2, and 3 double crochets. Repeat from * to * two more times.
- Join with a slip stitch to the top of the beginning chain 3.
- Third Round and Beyond:
- Slip stitch to the next chain-2 space.
- Chain 3 (counts as the first double crochet).
- Work 2 double crochets into the same chain-2 space.
- Chain 2, work 3 double crochets into the same chain-2 space.
- In the next chain-2 space, work 3 double crochets, chain 2, and 3 double crochets. In the next space between clusters, work 3 double crochets. Repeat from * to * around.
- Join with a slip stitch to the top of the beginning chain 3.
Continue this pattern until your granny square reaches the desired size. You can change colors at the beginning of any round to create a multi-colored square.

Joining Granny Squares
Once you’ve made several granny squares, you’ll need to join them together to create your finished project. There are several methods for joining squares, each with its own advantages. Here are three popular techniques:
- Slip Stitch Join:
- Place two squares with right sides facing each other.
- Insert your hook into the corner stitches of both squares.
- Slip stitch through both loops, joining the squares together.
- Continue slip stitching through each stitch along the edge, ensuring that you catch both squares.
- Whip Stitch Join:
- Place two squares with right sides facing each other.
- Thread a yarn needle with a length of yarn.
- Insert the needle through the corner stitches of both squares.
- Whip stitch through each stitch along the edge, ensuring that you catch both squares.
- Join-As-You-Go:
- Begin a new granny square.
- When you reach a side that needs to be joined to an existing square, work as usual until you reach the joining point.
- Slip stitch into the corresponding stitches of the existing square as you work, effectively joining the two squares together.
Each of these methods has its own unique look and feel, so choose the one that best suits your project and personal preference.
Creative Uses for Granny Squares
Granny squares are incredibly versatile and can be used to create a wide range of items. Here are some ideas to inspire your next project:
- Blankets and Throws:
- One of the most popular uses for granny squares is to make blankets and throws. You can create a cozy, colorful blanket by joining together many squares in different colors and patterns. This is a great way to use up leftover yarn and create a unique piece for your home.
- Clothing and Accessories:
- Granny squares can also be used to make stylish clothing and accessories. Consider making a granny square vest, scarf, or even a handbag. These items can add a touch of handmade charm to your wardrobe and make great gifts for friends and family.
- Home Decor:
- Beyond blankets, granny squares can be used to create various home decor items. Use them to make cushion covers, table runners, or even wall hangings. These pieces can add a cozy, handmade touch to any room in your house.
Tips for Perfect Granny Squares
To ensure that your granny squares turn out perfectly, here are a few tips:
- Consistent Tension:
- Maintaining consistent tension is key to creating uniform granny squares. Practice makes perfect, so don’t be discouraged if your first few squares are not as even as you’d like. With time, you’ll develop a feel for the right tension.
- Blocking:
- Blocking your granny squares can help them achieve a more polished look. Wet your squares and pin them to a blocking board, ensuring they are square and flat. Allow them to dry completely before joining them together. This step can make a big difference in the final appearance of your project.
- Experiment with Colors:
- Don’t be afraid to experiment with different color combinations. Granny squares are known for their vibrant and playful designs, so have fun with your color choices. Use a color wheel or online color palette generators to find combinations that you love.
Granny squares are a timeless crochet pattern that offers endless possibilities for creativity and expression. Whether you’re a beginner looking to learn the basics of crochet or an experienced crafter seeking a new project, granny squares are a perfect choice. With their rich history, versatility, and charm, granny squares continue to be a favorite among crochet enthusiasts.
By following the step-by-step tutorial and tips provided in this guide, you’ll be well on your way


