How to Crochet a Mini Car Keychain – Free Amigurumi Pattern & Tutorial is a delightful and creative project that combines charm and practicality. This step-by-step guide will show you how to create a tiny car-shaped keychain using basic amigurumi crochet techniques. Whether you’re new to crocheting or already have some experience, this fun little project will add a personal touch to your keyring or serve as a lovely handmade gift.
Making miniature crochet items is not only enjoyable, but it also helps improve your precision and attention to detail. This mini car keychain is worked in the round using simple stitches and small amounts of yarn, making it a great scrap-busting project. Additionally, its size makes it portable and perfect for quick crafting sessions whenever inspiration strikes.
In this free amigurumi pattern & tutorial, you’ll find all the steps needed to complete your mini car keychain—from materials and stitch instructions to sewing and assembly tips. You’ll be surprised at how such a tiny piece can carry so much character and joy! Let’s begin this creative journey.
1. Gathering Materials and Understanding the Basics
To start this project, gather all the essential materials. You’ll need small amounts of cotton or acrylic yarn in at least three different colors—one for the car body, one for the windows, and one for the wheels. A 2.0mm to 2.5mm crochet hook works well for this size of amigurumi. You’ll also need a yarn needle, some fiberfill stuffing, and a keyring or lobster clasp for attaching the car to your keys or bag.
If you’re new to how to crochet a mini car keychain, it’s important to get familiar with basic stitches. This includes single crochet (sc), slip stitch (sl st), and how to crochet in the round using a magic ring. These are foundational techniques in amigurumi that form the shape of your mini car.
The beauty of this pattern lies in its simplicity. Each piece—the car body, wheels, and windows—is crocheted separately and then sewn together. This modular approach makes it easy to follow even for beginners, while also allowing you to customize colors and sizes to your liking.
Make sure your tension is consistent while crocheting. Tight stitches will help keep the stuffing inside and maintain the structure of your mini car. If your stitches are too loose, the fiberfill might show through the fabric, so adjust your hook size if necessary.
Using stitch markers can help you keep track of your rounds, especially when working small items like keychains. It’s easy to lose count, and markers help prevent mistakes that can distort the shape of your car.
Remember, practice makes perfect. Don’t be discouraged if your first attempt isn’t flawless. Crocheting a mini car keychain gets easier with each try, and the results are incredibly rewarding.
2. Creating the Car Body
To begin the car body, use your main yarn color and create a magic ring with 6 single crochets. This will form the base of the car. You’ll increase each round until you achieve an oval shape suitable for the size of your keychain.
After building up the bottom of the car, continue crocheting without increases to form the sides. This part gives height and dimension to the car, allowing space for windows and wheels to be attached later. Use even, neat stitches to keep the car’s shape firm and symmetrical.
Around round 10 or so, start decreasing slightly to round out the top of the car. This gentle slope mimics the real shape of a car roof and makes the toy more visually appealing. Once you’re satisfied with the shape, stuff the body with fiberfill.
Be sure to pack the stuffing firmly, but not too tight. The goal is to have a plump, stable structure without overstretching the stitches. Use your fingers or a blunt tool to push stuffing into the corners for a clean finish.
Close the top of the car using a few rounds of decreases until you can weave the yarn through the last stitches and pull it tight. Use a yarn needle to tuck in the ends securely inside the body.
At this point, you have the basic shape of your mini crochet car keychain. Set it aside for now while you move on to the wheels and windows.
3. Crocheting and Attaching Details
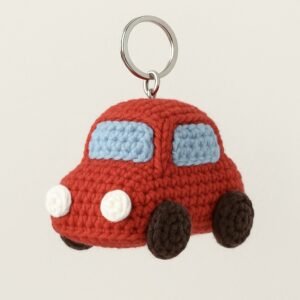
The wheels of the car are tiny circles that give the design a finished, realistic look. Using black or gray yarn, crochet 4 small wheels, each starting with a magic ring of 6 single crochets. Increase the next round to make them slightly bigger, and finish with a round of single crochet.
Once the wheels are completed, flatten them gently with your fingers and use the yarn needle to sew them to each side of the car. Make sure they are aligned and evenly spaced for balance and symmetry.
The windows are optional, but they add a lot of character. Using white or light blue yarn, crochet two small rectangles or ovals. You can also embroider window outlines directly onto the car body using a backstitch or chain stitch.
Attach the windows to both sides of the upper car body. They should sit slightly above the wheel level. Use a matching thread and small, invisible stitches for a neat finish.
If you’d like, you can add extra embellishments such as headlights, a license plate, or embroidered smiles to give your mini car a unique personality. These little touches make your amigurumi keychain even more special.
Lastly, sew a loop of yarn or a small jump ring to the top of the car. Attach this to your keyring or lobster clasp. And just like that, your mini car crochet keychain is ready to hit the road!
4. Tips for Customizing and Gifting
One of the best things about learning how to crochet a mini car keychain – free amigurumi pattern & tutorial is the ability to make it your own. Use vibrant yarn colors to represent different car styles—sports cars, vintage cars, or even race cars with stripes.
You can personalize each car with initials or tiny embroidered symbols to create meaningful gifts. These mini cars make great stocking stuffers, party favors, or even themed decorations for children’s rooms.
To make your keychain even more durable, consider adding a small lining of felt inside the car before stuffing. This reinforces the structure and helps it retain its shape over time.
If you’re crafting these for kids, make sure all attachments are sewn securely. Avoid small beads or buttons that could be a choking hazard. Stick to embroidered features when safety is a concern.
Another fun idea is to turn your mini car into a zipper pull or backpack charm. This adds utility to the design and makes it versatile for different purposes.
Handmade items like this mini car carry sentimental value, and they are a thoughtful way to show care. Whether you’re making one or a dozen, each keychain will reflect your creativity and love for the craft.
FAQ – Frequently Asked Questions
What kind of yarn is best for crocheting a mini car keychain?
Cotton yarn or lightweight acrylic yarn is ideal. These fibers hold their shape well and offer a clean, polished look.
Can beginners follow this pattern easily?
Yes! This free amigurumi pattern & tutorial is designed with beginners in mind. If you’re comfortable with basic stitches like single crochet and working in the round, you’ll do great.
Do I need to use safety eyes or can I embroider the features?
You can absolutely embroider the features. For safety and a handmade touch, embroidered eyes, windows, and smiles are a great choice.
How long does it take to complete a mini car keychain?
Most crocheters can complete the project in 1 to 2 hours. It’s a quick and rewarding craft perfect for spare time or gifting.
What size should the finished keychain be?
Typically, it measures about 2.5 to 3 inches in length. You can scale it slightly by adjusting the yarn weight and hook size.
Can I sell keychains made from this pattern?
Yes, handmade items created from this tutorial can be sold. Just be sure to credit your own work and never copy-paste full patterns for commercial resale.
In this guide, we explored how to crochet a mini car keychain – free amigurumi pattern & tutorial in detail. From selecting materials and crafting the car body to attaching wheels and customizing your design, every step helps you bring this adorable keychain to life. Whether you’re making it for yourself or as a gift, this small project is big on charm and creativity.
Now that you’ve completed your own mini car keychain, we’d love to hear from you! Share your thoughts, let us know how your version turned out, and feel free to suggest improvements or ideas for future patterns. Your feedback helps us grow and keeps this crafting community thriving.


