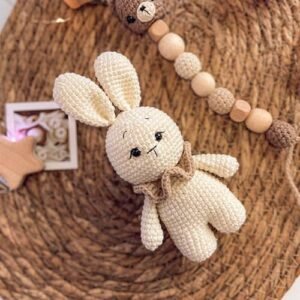
Creating an amigurumi bunny is a delightful and rewarding craft project that allows you to showcase your crochet skills.
Whether you are a beginner or an experienced crocheter, this step-by-step guide will help you create a charming bunny that can be a wonderful gift or a cute addition to your decor.
In this tutorial, we’ll cover everything you need to know, including materials, crochet patterns, and detailed instructions.
Materials You Will Need
Before you begin your amigurumi bunny project, it’s essential to gather all the necessary materials. Having everything ready will ensure a smooth and enjoyable crafting experience.
- Yarn Selection
Choose high-quality yarn that is soft and easy to work with. For amigurumi, cotton or acrylic yarns are ideal because they hold their shape well. You’ll need at least two colors: one for the bunny’s body and another for details like the nose and inner ears. - Crochet Hook
The size of your crochet hook will depend on the thickness of your yarn. For most amigurumi projects, a 2.5mm to 3.5mm hook is suitable. Make sure your hook size matches the yarn label recommendations to achieve the desired tension. - Additional Supplies
Besides yarn and a crochet hook, you’ll need stuffing (polyester fiberfill), a yarn needle for sewing parts together, stitch markers to keep track of your rounds, and safety eyes or embroidery thread for the bunny’s face.
Understanding Basic Crochet Stitches
To create your amigurumi bunny, you should be familiar with some basic crochet stitches. These foundational stitches will form the basis of your project.
- Single Crochet (sc)
The single crochet stitch is the most commonly used stitch in amigurumi. It creates a tight, dense fabric that is perfect for stuffed toys. To make a single crochet, insert your hook into the stitch, yarn over, pull through, yarn over again, and pull through both loops on the hook. - Increase and Decrease Stitches
Increasing and decreasing stitches are crucial for shaping your amigurumi. An increase (inc) is made by crocheting two single crochets in the same stitch, while a decrease (dec) involves crocheting two stitches together to reduce the stitch count. - Magic Ring (mr)
The magic ring technique is used to start crocheting in the round, which is essential for creating seamless, circular shapes. To make a magic ring, wrap the yarn around your fingers, insert the hook under the loop, and draw up a loop. Chain one and crochet the required number of stitches into the ring.
Crocheting the Bunny’s Head and Body
Now that you have your materials and understand the basic stitches, let’s start with the bunny’s head and body. These are typically made as one piece to ensure a seamless appearance.
- Starting the Head
Begin with a magic ring and work six single crochets into the ring. Pull the tail tight to close the ring. Continue crocheting in continuous rounds, following your pattern to increase the stitch count evenly. For a typical bunny head, you’ll increase to about 36 stitches around. - Shaping the Head
Once you’ve reached the desired diameter for the head, continue crocheting without increasing to form the height of the head. This usually involves several rounds of single crochet. Next, start decreasing stitches to shape the top of the head. Place the safety eyes between the rounds before closing the head completely. - Crocheting the Body
After completing the head, you can start the body directly or make it separately and sew it on later. For seamless construction, continue from the neck with single crochets and increase stitches gradually to form the shoulders and body. The body shape typically tapers towards the bottom, so you’ll decrease stitches as you approach the end.
Crafting the Bunny’s Ears and Limbs
The ears and limbs are essential parts of the bunny that give it character and personality. They are usually crocheted separately and then sewn onto the body.
- Making the Ears
The ears are made by starting with a magic ring and working in continuous rounds. After reaching the desired width, continue crocheting without increasing to create the length of the ears. The ears should be slightly tapered towards the tips to resemble a bunny’s ears. - Crocheting the Arms
For the arms, start with a magic ring and crochet in rounds. Increase stitches to the desired width and then continue with single crochets to create the length. To give the arms a slight curve, you can add a few decreases towards the ends. Make two identical arms and stuff them lightly. - Creating the Legs
The legs are made similarly to the arms but are usually a bit thicker and longer. Start with a magic ring, increase stitches, and crochet in rounds. To give the legs a rounded foot shape, you can add a few increases at the beginning and then taper them as you go up. Stuff the legs firmly.
Assembling the Bunny
With all the parts ready, the final step is to assemble your amigurumi bunny. This part requires patience and precision to ensure all parts are securely attached and positioned correctly.
- Attaching the Ears
Position the ears on top of the head, making sure they are symmetrical. Use a yarn needle and the long tail of yarn left from crocheting the ears to sew them onto the head. Secure them tightly and weave in the ends to hide any loose threads. - Sewing the Arms and Legs
Pin the arms and legs in place to ensure they are even. Sew the arms onto the sides of the body, just below the neck. Attach the legs at the bottom of the body, making sure they are positioned for balance. Use tight stitches to ensure the limbs are securely attached. - Finishing Touches
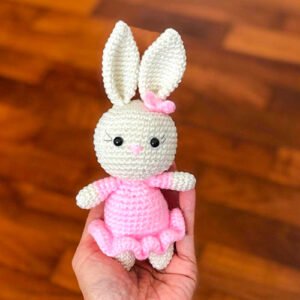
Add any final details to your bunny, such as a small pom-pom tail, embroidered nose, and mouth. You can also add accessories like a ribbon around the neck or a tiny crochet carrot for extra charm. Ensure all embellishments are securely attached, especially if the bunny is meant for a child.
Tips for Perfecting Your Amigurumi Bunny
Creating a perfect amigurumi bunny takes practice and attention to detail. Here are some tips to help you achieve the best results.
- Maintain Consistent Tension
Keeping a consistent tension while crocheting is crucial for an even appearance. If your stitches are too loose, the stuffing might show through. Too tight, and it will be difficult to crochet. Practice maintaining a steady tension throughout your project. - Stuffing the Bunny
Proper stuffing is essential for shaping your bunny. Stuff the head, body, and limbs firmly but not so tightly that the stitches stretch. Distribute the stuffing evenly to avoid lumps and ensure the bunny can stand or sit properly. - Using Stitch Markers
Use stitch markers to keep track of your rounds, especially when working in continuous rounds. This helps you avoid losing your place and ensures you have the correct number of stitches in each round. Moving the marker up every few rounds can help keep your place accurately.
Experimenting with Different Crochet Patterns
Once you’ve mastered the basic amigurumi bunny, you can experiment with different crochet patterns to create unique variations. This can be a fun way to customize your bunnies for different occasions or recipients.
- Changing Yarn Colors
Use different yarn colors to create bunnies with distinct personalities. You can make seasonal bunnies, such as a pastel-colored one for Easter or a vibrant one for a child’s birthday. Mixing and matching yarn colors can also add interesting patterns to your bunny. - Adding Clothes and Accessories
Crochet tiny outfits and accessories for your bunny. Simple patterns for dresses, hats, or scarves can add charm and personality. You can also crochet small items like carrots, flowers, or tiny stuffed animals that the bunny can hold. - Exploring Different Sizes
Experiment with different yarn weights and hook sizes to create bunnies of various sizes. Using bulkier yarn and a larger hook will result in a bigger bunny, while finer yarn and a smaller hook will produce a smaller one. Adjusting the pattern accordingly can help you create a family of bunnies in different sizes.
Sharing Your Amigurumi Creations
Sharing your amigurumi bunny creations can be a rewarding experience. Whether you give them as gifts, sell them at craft fairs, or share them online, showcasing your work can inspire others and connect you with fellow crocheters.
- Giving as Gifts
Handmade amigurumi bunnies make heartfelt gifts for birthdays, holidays, or special occasions. Personalize each bunny with the recipient’s favorite colors or accessories to make it extra special. Packaging your bunny in a cute gift box adds a professional touch. - Selling Your Bunnies
If you enjoy making amigurumi bunnies, consider selling them at craft fairs, local shops, or online platforms like Etsy. Ensure your bunnies are well-made and priced appropriately. High-quality photos and detailed descriptions can help attract customers. - Joining Crochet Communities
Connect with other crocheters by joining online crochet communities or local crafting groups. Sharing your projects, asking for feedback, and participating in crochet-alongs can enhance your skills and provide inspiration. Social media platforms like Instagram and Pinterest are also great places to showcase your work and gain followers.
By following this step-by-step tutorial and using the provided tips and techniques, you can create adorable amigurumi bunnies that are sure to bring joy and delight. Whether you’re making them for yourself, as gifts, or for sale, the creativity and craftsmanship involved in each bunny make them truly special. Happy crocheting!


