If you are passionate about crochet and cute characters, a Hello Kitty Amigurumi Tutorial is the perfect project to bring charm and creativity into your crafting routine. Amigurumi, the Japanese art of crocheting small stuffed toys, has become a global trend, and combining it with the iconic Hello Kitty makes the process even more enjoyable. Whether you are a beginner or an experienced crocheter, following a step-by-step tutorial can help you create a personalized doll that reflects both skill and imagination.
The appeal of Hello Kitty lies in her simplicity and adorable features, which makes her an ideal character to recreate in yarn. Many crafters find that making amigurumi dolls is not only a relaxing activity but also a wonderful way to make meaningful gifts for loved ones. A Hello Kitty Amigurumi Tutorial allows you to master the basics of amigurumi while working with a universally loved design. You will learn essential crochet techniques, shaping methods, and tips for finishing touches that bring the doll to life.
In addition, amigurumi projects are excellent for boosting creativity and patience. By following a detailed Hello Kitty Amigurumi Tutorial, you will gradually see your work transform from a ball of yarn into a charming character. With practice, you can adapt the design, change colors, or add accessories to make your Hello Kitty unique. This flexibility is what makes amigurumi such a fulfilling hobby, blending tradition with personal expression.
Understanding the Basics of Amigurumi
When beginning with a Hello Kitty Amigurumi Tutorial, it’s important to first understand the basics of amigurumi itself. This Japanese art form focuses on crocheting small, rounded, and usually adorable creatures or characters. The foundation of amigurumi lies in simple stitches, most commonly the single crochet stitch, worked in continuous rounds to create smooth shapes.
The first step in any amigurumi project is creating a magic ring, which allows you to start crocheting in the round without leaving a hole in the center. This technique is especially important for forming the head and body of your Hello Kitty doll. Practicing this method ensures that the finished piece has a polished and professional look.
Another crucial element is learning how to increase and decrease stitches. These techniques allow you to shape the different parts of the doll, giving Hello Kitty her recognizable round head, small body, and cute features. In a Hello Kitty Amigurumi Tutorial, you will see how these stitch variations form the foundation of your project.
Choosing the right yarn and hook size is also essential. Typically, cotton yarn is recommended for amigurumi because it holds its shape well and has a clean finish. A smaller hook size than usual is used to keep the stitches tight, preventing stuffing from showing through. This combination is key to creating a durable and neat doll.
Stuffing and assembling are the final steps that bring the amigurumi to life. Polyfill is commonly used to give shape and softness to the toy. Proper stuffing ensures that your Hello Kitty holds her form without becoming too stiff.
Lastly, sewing the parts together with precision is what makes the doll cohesive. The arms, legs, ears, and iconic bow must be attached carefully to achieve the balanced and charming look that makes Hello Kitty instantly recognizable.
Step-by-Step Process of Making Hello Kitty
Starting the Hello Kitty Amigurumi Tutorial involves breaking down the doll into simple parts: the head, body, arms, legs, ears, and accessories. Each section is crocheted separately and then assembled to complete the figure.
The head is usually the largest piece and requires careful attention to stitch counts to maintain a smooth, rounded shape. This is where most of the character’s personality will shine through once you add facial features like eyes, nose, and whiskers.
The body follows next, typically smaller and oval-shaped, attached securely under the head. While simple in construction, it serves as the foundation for attaching the limbs and clothing details.
The arms and legs are crocheted as small cylinders. They are essential for giving Hello Kitty her playful appearance. Placement is important to maintain balance so the doll can stand or sit properly.
The ears, though small, are one of the signature features. They are triangular in shape and positioned symmetrically to achieve the familiar Hello Kitty silhouette. A Hello Kitty Amigurumi Tutorial usually includes exact stitch counts for making them identical.
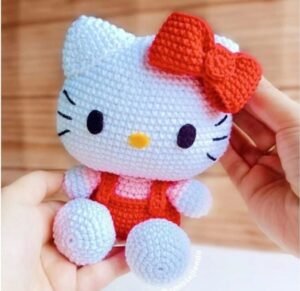
Finally, no Hello Kitty doll is complete without her bow. The bow can be made in various colors, but red is the classic choice. Crocheting this accessory and attaching it to one ear adds the finishing touch that makes the doll instantly recognizable.
Tips for Personalizing Your Hello Kitty Amigurumi
One of the best aspects of following a Hello Kitty Amigurumi Tutorial is the freedom to customize your creation. Even though Hello Kitty is known for her classic white body and red bow, you can add personal touches to make your doll unique.
You can experiment with different yarn colors to dress your Hello Kitty in various outfits. For example, pastel shades give a softer appearance, while bold colors create a more modern look. This customization makes the project more personal and creative.
Accessories are another fun way to add individuality. A small crochet handbag, a tiny hat, or even a scarf can transform your Hello Kitty into a one-of-a-kind doll. These extras also allow you to practice new crochet techniques.
Facial expressions can also be customized. By adjusting the placement of the eyes and whiskers, you can give Hello Kitty different personalities, such as playful, sleepy, or cheerful. This small detail can dramatically change the character’s overall vibe.
Size customization is also possible. By using thicker yarn and a larger hook, you can create a giant Hello Kitty plush, while finer yarn and a small hook produce a miniature version. Both make wonderful gifts or collectibles.
Personalizing your doll not only makes it special but also strengthens your crochet skills. With each variation, you learn more about shaping, color coordination, and design balance.
Why You Should Try a Hello Kitty Amigurumi Tutorial
There are many reasons to take on a Hello Kitty Amigurumi Tutorial as your next project. First, it’s a fun and engaging way to practice crochet skills. Each part of the doll introduces you to different techniques, making it a valuable learning experience.
Second, creating a Hello Kitty doll is rewarding because the final product is both adorable and versatile. It can serve as a gift, a decoration, or even a collectible item. The joy of gifting something handmade is unmatched.
Third, amigurumi projects are known for their therapeutic benefits. The repetitive nature of crochet can reduce stress and promote relaxation, making it an excellent activity for mental well-being.
Fourth, Hello Kitty’s universal popularity ensures that your creation will always be appreciated. Whether for children, friends, or fellow collectors, a handmade Hello Kitty doll is bound to bring smiles.
Fifth, the project is suitable for all skill levels. Beginners can follow the basic steps, while advanced crocheters can add complex details and variations. This adaptability makes the tutorial accessible to everyone.
Lastly, completing a Hello Kitty amigurumi builds confidence in your crafting abilities. Seeing your progress from simple stitches to a fully formed doll reinforces your creativity and patience.
FAQ About Hello Kitty Amigurumi Tutorial
1. What materials do I need for a Hello Kitty Amigurumi Tutorial?
You will need cotton yarn, a crochet hook, stuffing material, yarn needles, and safety eyes or embroidery thread for the face.
2. How long does it take to complete a Hello Kitty amigurumi?
The time varies depending on skill level, but most people finish within a few days of consistent work.
3. Is amigurumi difficult for beginners?
Not at all. Amigurumi uses basic stitches, and a Hello Kitty Amigurumi Tutorial provides clear instructions for every step.
4. Can I wash my Hello Kitty amigurumi doll?
Yes, but it is best to hand-wash gently with mild soap to preserve its shape and softness.
5. Can I make Hello Kitty amigurumi without safety eyes?
Yes, you can embroider the eyes and whiskers instead, which is also safer for small children.
6. How do I make my Hello Kitty amigurumi stand out?
Adding accessories, changing colors, or customizing facial expressions can make your doll unique.
Video Tutorial:
A Hello Kitty Amigurumi Tutorial is a wonderful way to combine crochet practice with creativity. By learning the basics, following the step-by-step process, and experimenting with personalization, you can create a doll that is both adorable and meaningful. From beginners to advanced crafters, this project offers joy, relaxation, and a sense of accomplishment.
We hope this tutorial-inspired guide has given you the motivation to start your own Hello Kitty amigurumi project. If you try it, we would love to hear your sincere opinion and suggestions about your experience. Your feedback helps keep the crochet community inspiring and connected.