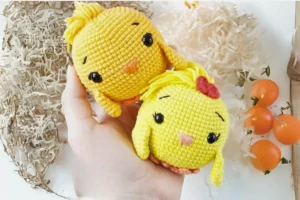
Amigurumi, the Japanese art of knitting or crocheting small, stuffed yarn creatures, has taken the crafting world by storm.
This tutorial will walk you through creating an adorable amigurumi chick.
Using basic crochet patterns and techniques, you’ll be able to craft a charming little chick perfect for gifts, decorations, or as a fun project to improve your amigurumi crochet skills.
Materials Needed for Your Amigurumi Chick
Before we dive into the pattern, let’s gather the necessary materials. Ensuring you have all the supplies beforehand will make your crocheting experience smoother and more enjoyable.
- Yarn: Choose a soft, lightweight yarn in yellow for the chick’s body. You will also need a small amount of orange yarn for the beak and feet, and black yarn for the eyes.
- Hook: A 2.5mm or 3.0mm crochet hook is ideal for this project. The size of the hook will affect the size of your finished chick.
- Stuffing: Polyfill stuffing works great to give your amigurumi chick its shape. You can find this at most craft stores.
- Safety Eyes: These add a professional touch to your amigurumi. 6mm safety eyes are a good size for this project.
- Tapestry Needle: Useful for sewing parts together and weaving in ends.
- Stitch Markers: Optional but helpful for keeping track of your rounds.
With all your materials ready, we can now move on to creating the chick’s individual parts.
Creating the Body of the Amigurumi Chick
The body is the most crucial part of your amigurumi chick. Follow these steps carefully to create a round, cute body for your chick.
Round 1-6: Starting the Base
- Magic Ring: Begin with a magic ring. Crochet 6 single crochets (sc) into the ring.
- Round 2: Increase (inc) in each stitch around. You should now have 12 stitches.
- Round 3: 1 sc, inc repeat around. (18 stitches)
- Round 4: 2 sc, inc repeat around. (24 stitches)
- Round 5: 3 sc, inc repeat around. (30 stitches)
- Round 6: 4 sc, inc repeat around. (36 stitches)
By this stage, your base should be forming nicely, ensuring a round shape for the chick’s body.
Rounds 7-18: Building Up the Body
- Rounds 7-12: Single crochet in each stitch around (36 stitches per round).
- Round 13: 4 sc, dec repeat around. (30 stitches)
- Round 14: 3 sc, dec repeat around. (24 stitches)
- Round 15: 2 sc, dec repeat around. (18 stitches)
- Round 16: 1 sc, dec repeat around. (12 stitches)
- Round 17: Single crochet in each stitch around. (12 stitches)
Your chick’s body should now be taking shape. Ensure it is evenly stuffed to maintain its roundness.
Round 18: Closing Up the Body
- Round 18: Decrease in each stitch around. (6 stitches)
- Finish: Fasten off and weave in the ends.
Stuff the body firmly but not too tight, to give it a squishy feel. You can use your tapestry needle to close any gaps and ensure the body is secure.
Crafting the Chick’s Head
The head is similar to the body but slightly smaller. The steps are almost identical, with a few changes in stitch counts to adjust the size.
Round 1-6: Creating the Base
- Magic Ring: 6 sc in a magic ring.
- Round 2: Increase in each stitch around. (12 stitches)
- Round 3: 1 sc, inc repeat around. (18 stitches)
- Round 4: 2 sc, inc repeat around. (24 stitches)
- Round 5: 3 sc, inc repeat around. (30 stitches)
- Round 6: 4 sc, inc repeat around. (36 stitches)
The base for the head should be forming well, similar to the body but proportionately smaller.
Rounds 7-12: Building the Head
- Rounds 7-12: Single crochet in each stitch around (36 stitches per round).
- Round 13: 4 sc, dec repeat around. (30 stitches)
- Round 14: 3 sc, dec repeat around. (24 stitches)
This will give the head a round, full shape, perfect for a cute amigurumi chick.
Round 15-16: Shaping and Closing the Head
- Round 15: 2 sc, dec repeat around. (18 stitches)
- Round 16: 1 sc, dec repeat around. (12 stitches)
- Finish: Decrease in each stitch around. (6 stitches)
Finish off by weaving in the ends and stuffing the head lightly. Attach the safety eyes between rounds 10 and 11.
Adding the Beak and Feet
Now, let’s add the details that give the chick its character – the beak and feet.
Creating the Beak
- Magic Ring: Using orange yarn, make a magic ring.
- Round 1: 4 sc in the ring.
- Round 2: 1 sc, inc repeat around. (6 stitches)
- Round 3: Single crochet around.
Finish off and leave a tail for sewing. Position the beak between the eyes and sew it on securely.
Crafting the Feet
- Magic Ring: With orange yarn, make a magic ring.
- Round 1: 6 sc in the ring.
- Round 2: Increase in each stitch around. (12 stitches)
- Round 3: Single crochet around.
Finish off and leave a tail for sewing. Attach the feet to the bottom of the chick’s body, ensuring they are evenly placed.
Assembling Your Amigurumi Chick
With all parts ready, it’s time to assemble your chick.
Attaching the Head to the Body
- Positioning: Place the head on top of the body. Ensure it is centered.
- Sewing: Use a tapestry needle and yellow yarn to sew the head to the body. Make sure it is secure.
Adding the Final Touches
- Wings: Optional, but you can crochet small wings using the same pattern as the feet but with yellow yarn.
- Embellishments: Add any additional touches, like a small bow or a tuft of hair on the top of the head.
Final Assembly
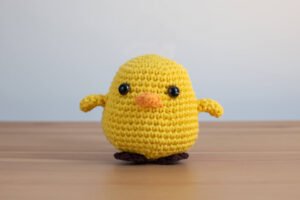
Ensure all parts are securely attached. Your amigurumi chick should now be complete and ready to bring joy to anyone who sees it.
Creating an amigurumi chick is a fun and rewarding project that helps improve your crochet skills. By following this detailed tutorial, you’ve crafted an adorable chick that can be a great gift or a charming addition to your home decor. Remember to experiment with different colors and embellishments to make each chick unique.
Happy crocheting! If you enjoyed this tutorial, feel free to share your creations and any tips you discovered along the way. Keep exploring new crochet patterns and continue honing your amigurumi skills.


