
The is a charming project for crocheters who enjoy creating small, practical handmade pieces with plenty of room for color and personalization. Inspired by the construction shown in the reference image, this design begins with a simple flat crochet panel made in rows and then uses folding, shaping, and careful seaming to transform that rectangle into a tiny baby shoe.
The combination of solid pink sections and a multicolored center creates an especially cheerful appearance, while a small crocheted bow provides a sweet finishing touch. Because most of the foundation uses basic stitches, this project can also be approachable for crocheters who are still developing their skills.
One of the advantages of this Crochet Baby Shoe Pattern is its straightforward construction. Rather than requiring complicated shaping from the first round, you create a narrow rectangular strip using US crochet terminology, working back and forth in rows. The center portion can be made with variegated yarn to produce effortless stripes, while the two outer sections can be crocheted in a coordinating solid shade.
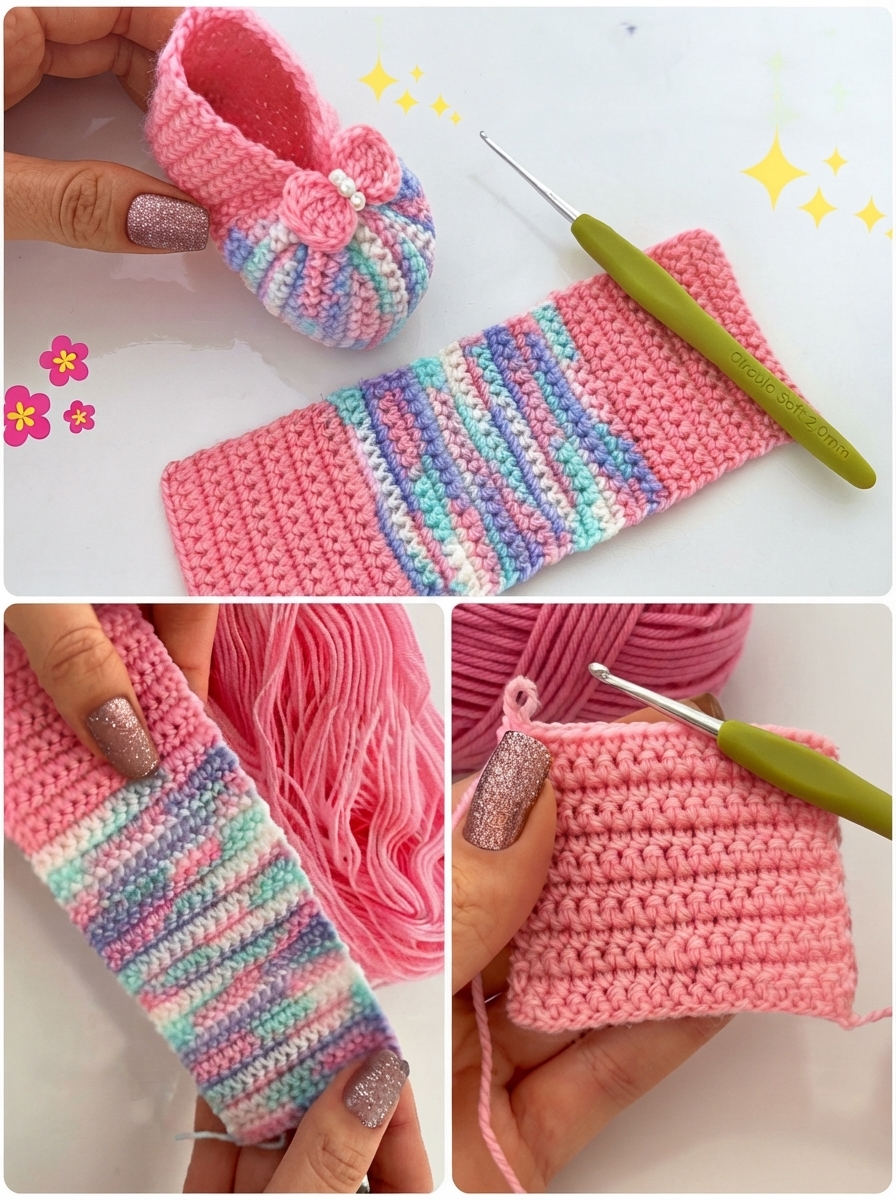
Once completed, the fabric is folded and joined strategically to form the toe, sides, heel, and opening. This method makes it easier to understand how the finished shoe develops from a flat piece of crochet fabric.Before beginning, remember that handmade baby footwear should be treated primarily as a decorative or soft accessory rather than protective footwear.
Small embellishments such as beads can become choking hazards if they loosen, so for items intended for babies it is safer to embroider decorative details or securely crochet them directly into the design. Always supervise babies when they are wearing handmade accessories and check the finished shoe carefully for loose yarn ends or decorations. With those practical considerations in mind, the Crochet Baby Shoe Pattern can be a delightful project for baby gifts, keepsakes, photography accessories, or a handmade nursery set.
Materials, Crochet Stitches, and Sizing for the Crochet Baby Shoe Pattern
For this Crochet Baby Shoe Pattern, choose a soft, smooth yarn that feels comfortable against delicate skin. A lightweight DK or light worsted yarn is a practical option because it creates defined stitches without producing an overly bulky shoe. You can use one solid color for the heel and upper portions and a coordinating variegated yarn for the decorative center. The photographed design suggests pink as the main color with pastel pink, mint, white, blue, and lavender in the contrasting section.
A crochet hook around 2.5–3.5 mm is a useful starting range, although the correct hook depends on your yarn and tension. The fabric should be reasonably dense while remaining flexible. If your stitches contain large openings, move down slightly in hook size. If the fabric feels stiff and difficult to fold, use a slightly larger hook. Making a small gauge swatch before starting is particularly useful when creating baby-sized projects.
The main stitch can be single crochet (sc) in US terminology. To make a single crochet, insert the hook into the indicated stitch, yarn over, pull up a loop, yarn over again, and pull through both loops on the hook. Single crochet produces a compact fabric that works especially well for the structured rectangular construction of these little shoes.
You will also need chain (ch) and slip stitch (sl st). A chain is made by yarning over and pulling the yarn through the loop already on your hook. A slip stitch is created by inserting the hook into the desired stitch, yarning over, and pulling the yarn directly through the stitch and the loop on the hook. Slip stitches are useful for neat joining and finishing.
The exact starting chain should be adjusted according to the baby’s foot size, yarn thickness, and your individual tension. As an experimental starting point for a small baby shoe, create a rectangle approximately 6–7 cm wide and 17–20 cm long before folding. These measurements are guidelines rather than universal sizing because crochet gauge varies considerably between makers.
For a better fit, measure the baby’s foot from heel to longest toe whenever possible. Crochet the sample fabric first, then compare the folded construction with the desired finished length. The completed shoe should have some ease and should never constrict the baby’s toes, ankle, or circulation. If you are making the project as a gift without exact measurements, slightly generous sizing is generally more useful than an overly tight fit.
Step-by-Step Crochet Instructions for the Flat Shoe Panel
Begin the Crochet Baby Shoe Pattern with your main pink yarn. Foundation: Ch enough stitches to produce approximately 6–7 cm of width. For many yarn-and-hook combinations, somewhere around 16–22 chains may provide a useful starting point. This number is intentionally adjustable because maintaining the desired physical dimensions is more reliable than using one stitch count for every yarn.
Row 1: Starting in the second ch from the hook, work 1 sc in each ch across. Ch 1 and turn. Row 2: Work 1 sc in every stitch across, ch 1, and turn. Repeat Row 2 until the first solid-colored section measures approximately 5–6 cm in length. Keep the edges straight by counting your stitches after each row.
Now introduce the variegated yarn for the middle portion. Fasten off the pink yarn or carry out a clean color change at the end of the previous row. Contrast Row 1: Ch 1, work 1 sc in each stitch across, ch 1, turn. Continue repeating this row until the multicolored section measures approximately 6–8 cm. The changing yarn colors should naturally create narrow horizontal stripes similar to those visible in the reference project.
To emphasize the textured stripes, you may optionally work some rows through the back loop only (BLO). For BLO single crochet, insert the hook under only the back loop of each stitch instead of both top loops. This creates subtle horizontal ridges. You can alternate standard single crochet rows with BLO rows or use BLO throughout the colored section for stronger texture.
Change back to the main pink yarn when the center reaches the desired length. Continue working 1 sc in each stitch across, ch 1, and turn until the second pink section is approximately the same length as the first. The finished piece should resemble one long rectangular strip with a colorful middle and matching solid sections at both ends.
Before shaping the shoe, place the rectangle on a flat surface and inspect it carefully. The side edges should be reasonably straight, the stitch count should remain consistent, and both pink sections should look balanced. Do not worry if the rectangle curls slightly at this stage; gentle blocking or shaping with your hands can relax the fabric. Avoid stretching it excessively because that can change the finished size.
Folding, Shaping, and Assembling the Baby Shoe
The distinctive feature of this Crochet Baby Shoe Pattern is the transformation from a flat rectangle into a dimensional shoe. Place the finished strip with the preferred side facing down. Fold the panel so the two solid sections begin forming the upper and heel areas while the contrasting center becomes part of the rounded front and lower body. Pinning the folds temporarily with stitch markers can make this stage easier.
At the toe end, the fabric needs to be gathered or folded so that the multicolored portion develops the rounded shape seen in the finished example. Thread a yarn needle with matching yarn and work a running stitch through the edge that will form the front. Pull the yarn gradually until the fabric gathers into a rounded toe. Do not pull so tightly that the stitches bunch into a hard knot.
Secure the gathered section with several strong stitches. Then seam the adjoining edges using whip stitch, mattress stitch, or slip stitches. If using a yarn needle, mattress stitch can provide a relatively discreet join. Insert the needle through corresponding edge loops on alternating sides, then gently tighten the seam every few stitches.
Shape the opposite end into the heel. Fold the pink section so that its edges meet neatly and seam them together. Try to keep the heel centered relative to the toe. Once the basic structure is joined, turn the shoe right side out if you assembled it inside out. Use your fingers to gently round the toe and smooth the heel.
The opening should remain flexible and wide enough for a baby’s foot to enter comfortably. If the edge looks unfinished, attach the main yarn at the back and crochet a simple edging. Edging Round: Ch 1, work sc evenly around the entire opening, then sl st into the first sc. Fasten off. Be careful not to add too few stitches because that could make the opening tight.
Make the second shoe by following exactly the same measurements, stitch counts, row counts, and assembly method. Keeping notes while making the first shoe is extremely helpful. Record the hook size, number of foundation chains, rows in each color section, finished rectangle measurements, and any changes you made during assembly. Those details make it much easier to create a matching pair.
Making the Crochet Bow, Finishing, and Customizing the Pattern
A small crochet bow gives this Crochet Baby Shoe Pattern its playful finished appearance. For a simple version, ch 7–10 depending on the desired bow size. Starting in the second chain from the hook, sc across. Ch 1 and turn. Continue working sc rows until you have a tiny rectangle approximately 2–3 cm tall. Fasten off while leaving a long yarn tail.
Pinch the rectangle in its center to create two rounded bow loops. Wrap the long yarn tail around the middle several times and secure it firmly at the back. Alternatively, crochet a narrow center band and wrap that around the bow. Sew the completed bow directly onto the front of the shoe using several secure stitches.
For baby items, crocheted or embroidered decorations are preferable to loose embellishments. Although decorative beads may look attractive in display pieces, they can present a choking hazard if detached. If the shoes are intended to be worn by a baby, consider replacing beads with French knots, small embroidered dots, or a tiny contrasting crochet center.
Finish the project by weaving every yarn tail securely into the fabric. Use a yarn needle to weave each end back and forth through several stitches, changing direction at least once before trimming. Run your fingers around the inside of each shoe afterward to make sure there are no uncomfortable knots or stiff yarn ends.
Color customization is one of the easiest ways to create variations. A classic version could combine cream with soft beige, while a brighter version could use turquoise, coral, yellow, or lavender. A self-striping yarn in the center is especially convenient because it produces multiple colors without requiring frequent yarn changes. You can also use leftover yarn to create individual narrow stripes.
Once you understand the rectangular construction, the pattern becomes easy to adapt. Make the center section longer for a more prominent striped toe, adjust the solid sections for a deeper heel, or add a narrow crocheted strap across the opening. Whatever variation you choose, preserve comfort and flexibility, especially when making shoes intended for an infant rather than decorative display.
FAQ About the Crochet Baby Shoe Pattern
Is the Crochet Baby Shoe Pattern suitable for beginners?
Yes. The basic fabric relies primarily on chain stitches, single crochet, and simple seaming, making it accessible to confident beginners. The folding and shaping stage requires a little patience, but stitch markers can help you position the pieces before sewing permanently.
What crochet terminology does this pattern use?
This tutorial uses US crochet terms. The primary abbreviations are ch = chain, sc = single crochet, sl st = slip stitch, and BLO = back loop only.
What yarn is suitable for crochet baby shoes?
Choose a soft yarn that is comfortable against the skin and easy to wash. DK or light worsted yarn can work well, but the final choice should depend on the desired size and fabric density. Always check the yarn manufacturer’s care instructions.
How can I make both shoes exactly the same size?
Count every row and stitch while making the first shoe and write the numbers down. Also measure each colored section in centimeters. Use the same hook, yarn weight, tension, and assembly placement for the second shoe.
Can I make this Crochet Baby Shoe Pattern larger?
Yes. Increase the width and length of the starting rectangle proportionally. Rather than adding an arbitrary number of stitches, use the intended foot measurement as your guide and make a gauge sample before committing to the full project.
Why does my crochet rectangle curl?
Slight curling can occur because of yarn tension or dense single crochet stitches. Make sure your foundation chain is not excessively tight. Gentle blocking can also help relax the rectangle before assembly.
Can I use different colors instead of variegated yarn?
Absolutely. Work several rows in individual colors and change yarn whenever you want another stripe. This is also an excellent way to use small amounts of leftover yarn while maintaining the striped appearance.
How do I keep the edges straight?
Count your stitches after every row and remember that the turning chain in this version does not count as a stitch. Work the first single crochet into the first actual stitch and make sure you do not accidentally skip the final stitch.
Are handmade crochet shoes safe for babies?
They should be soft, correctly sized, and free from loose components. Avoid decorations that can detach, inspect seams and yarn ends carefully, and supervise babies while handmade accessories are being worn. Crochet baby shoes are not a substitute for protective footwear.
Can these shoes be washed?
That depends on the yarn. Many baby-friendly acrylic and cotton yarns are washable, but always follow the care instructions for the specific fiber you use. Gentle washing can also help preserve the bow and overall shape.
How can I make the toe more rounded?
Gather the toe edge gradually rather than pulling the yarn tight immediately. Distribute the folds evenly with your fingers, tighten a little at a time, and secure the gathers only after you are satisfied with the shape.
Can I sell finished shoes made from this type of project?
Handmade items can generally be created for gifting or selling when the design and instructions are your own or you otherwise have permission to use the source pattern. For items marketed for babies, also make sure you understand and follow any applicable product-safety, labeling, and consumer requirements in the location where they will be sold.
Conclusion
The Crochet Baby Shoe Pattern demonstrates how a surprisingly simple piece of crochet fabric can become an adorable three-dimensional baby accessory. By starting with a rectangular panel, combining single crochet, optional back-loop texture, solid colors, and variegated stripes, you can build the foundation without complicated shaping.
The most important stages are keeping the rectangle even, measuring each section carefully, gathering the toe gradually, and creating secure seams around the heel and sides. Once those steps are complete, a small crochet bow gives the shoe a polished decorative finish while allowing plenty of opportunities for personalization.
You can adapt this project with different yarn combinations, stripe arrangements, edging styles, and sizes while preserving the same basic construction. Remember to prioritize softness, comfortable sizing, secure yarn ends, and baby-safe decorations whenever the finished shoes are intended to be worn.
After completing your Crochet Baby Shoe Pattern, leave your sincere opinion about the project and share any suggestions or creative changes you would make. Your ideas about colors, yarn choices, sizing, and embellishments can inspire new versions of this sweet handmade baby shoe.