
Crochet Shark Socks Pattern is a playful crochet project that transforms ordinary cozy footwear into an eye-catching pair of shark-shaped slipper socks. Inspired by the design shown in the photo, the finished piece combines a gray shark body, contrasting white belly, triangular fins, a pointed tail, small dark eyes, and an open mouth surrounded by white crochet teeth.
The foot appears to disappear right into the shark’s mouth, creating the humorous illusion that a shark is swallowing the wearer’s leg. Despite its detailed appearance, the project can be approached as a collection of simple crochet shapes assembled carefully at the end.
One of the advantages of making a Crochet Shark Socks Pattern yourself is the freedom to adjust the size, yarn, colors, and proportions. The basic construction can be adapted for adults, teens, or children simply by changing the length and circumference of the slipper body.
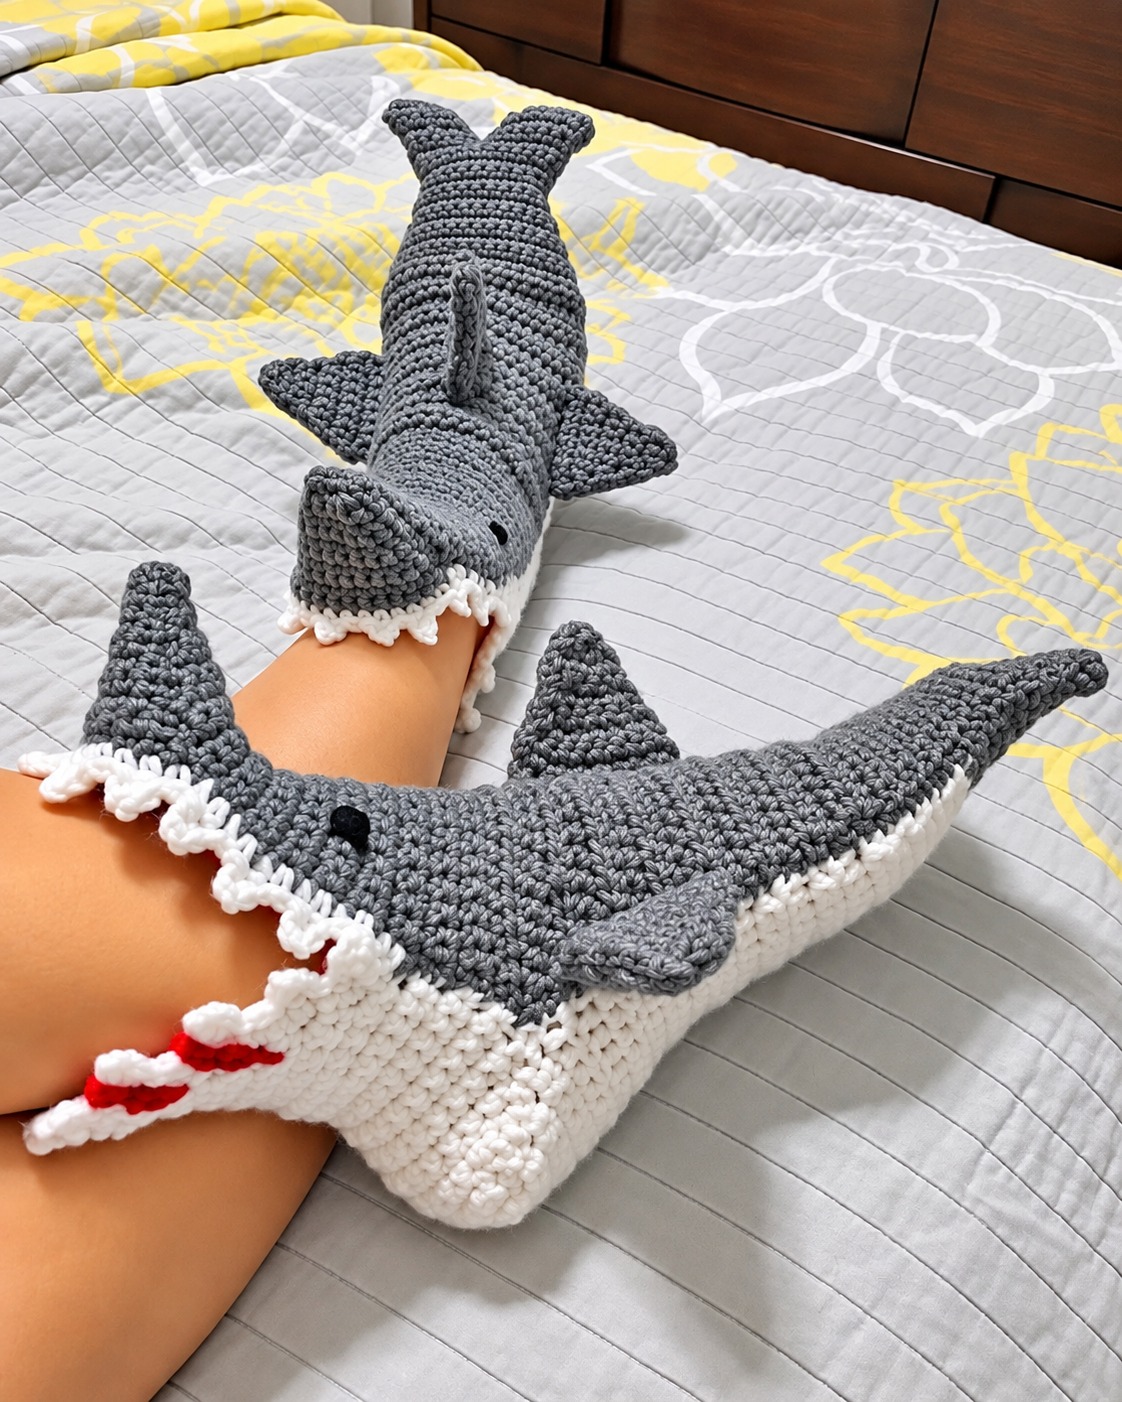
Gray and white create the familiar shark appearance shown in the inspiration image, while red inside the mouth provides a fun accent. Crocheters can also experiment with blue, charcoal, turquoise, or even fantasy colors. More important than matching an exact stitch count is maintaining the correct shape and checking the fit regularly while working.
This tutorial uses US crochet terminology and explains a practical method for recreating the overall look rather than claiming to reproduce an existing commercial pattern stitch for stitch. You will work mainly with single crochet, increases, decreases, and simple shaping techniques. Basic amigurumi skills are helpful because several portions are worked continuously in rounds. The project can also be customized according to your yarn weight and desired finished size. Before beginning, read through the complete instructions so you understand how the shark body, mouth, fins, tail, belly, and decorative details work together.
Materials, US Crochet Abbreviations, and Preparing the Shark Sock
For this Crochet Shark Socks Pattern, choose a medium or bulky yarn that produces a dense yet comfortable fabric. You will need gray yarn for the shark’s upper body, white yarn for the underside and teeth, a small quantity of red yarn for the mouth, and black yarn for the eyes. A soft acrylic or washable yarn works particularly well for slipper-style projects. Select a crochet hook that produces tight stitches without making the fabric excessively stiff. You will also need a yarn needle, scissors, stitch markers, and optionally non-slip fabric treatment for the sole.
The main US crochet abbreviations used throughout the project are: ch = chain, sl st = slip stitch, sc = single crochet, hdc = half double crochet, dc = double crochet, inc = increase, and dec = decrease. An increase normally means working two single crochet stitches into the same stitch. A decrease combines two stitches into one. You may use an invisible single crochet decrease when possible because it creates a smoother surface, especially around the shark’s snout and tail.
Begin by determining the required foot length. Measure from the heel to the longest toe and also measure around the widest part of the foot. The finished slipper should be comfortably fitted rather than extremely loose. Crochet naturally stretches, so periodically slide the unfinished body over the foot while working. If the socks are intended as a gift, use a standard slipper measurement as your guide and remember that different yarns can produce dramatically different dimensions even with identical stitch counts.
A practical construction method is to begin near the front portion of the slipper and establish a rounded foundation. Ch 2, then work approximately 6 sc into the second ch from the hook. Place a marker in the first stitch and work continuously in rounds. On the next round, work 2 sc in each stitch. Continue increasing evenly on subsequent rounds until the circumference comfortably fits the intended foot. For example, distribute six increases evenly around each increase round rather than placing them randomly.
Once the correct width is established, stop increasing and work 1 sc in each stitch around. This creates the tubular foundation of the shark. Continue until the body reaches the point where you want to begin shaping the opening and heel area. The exact number of rounds will depend on foot size, yarn thickness, hook size, and personal tension. This measurement-based approach makes the crochet shark slippers considerably easier to resize than instructions based only on fixed stitch counts.
The gray shark section should eventually wrap around the top and sides of the foot while the white portion creates the lighter underside. You can achieve this either through color changes during the rounds or by crocheting a separate white belly panel and sewing it onto the finished body. For beginners, a separate panel is often easier. Crochet an elongated white oval using sc, increasing around each curved end until it matches the underside of your slipper, then save it for assembly.
Shaping the Shark Body, Snout, Heel, and Characteristic Tail
The shark silhouette is what makes the Crochet Shark Socks Pattern instantly recognizable. After establishing the basic slipper body, concentrate on keeping the top slightly rounded and the sides smooth. Continue working even rounds of single crochet until the piece covers most of the foot. Try the slipper on frequently. The fabric should stretch enough to remain secure without compressing the foot. If additional width is required, add a few evenly spaced increases rather than suddenly expanding one area.
To form a more sculpted shark shape, introduce gentle decreases toward the area that transitions into the tail. A useful technique is to place one dec on each side of selected rounds, followed by one or two rounds without decreases. Gradual shaping creates a cleaner silhouette than removing many stitches at once. Keep your stitch marker positioned at the beginning of every round so that both sides remain reasonably symmetrical.
The dramatic tail can be crocheted separately. Begin with a small chain or magic ring and create one tapered triangular lobe using sc. Increase gradually until the fin reaches the desired width, then decrease toward the joining edge if necessary. Make a second matching lobe. Position the two pieces in a V formation and stitch them securely to the narrow back section of the shark. Alternatively, both lobes can be worked as one shaped piece if you are comfortable with short rows and directional crochet.
Next make the dorsal fin. Start with a short foundation chain and crochet back and forth in rows. Increase near the center during the early rows to create width, then use decreases to produce a triangular point. Another simple method is to begin along the wide base and dec at both ends of each row until only a few stitches remain. Fasten off and leave a long yarn tail. Sew the dorsal fin vertically along the center of the gray shark body.
The side fins are constructed similarly but should generally be somewhat smaller and flatter. Crochet two matching triangular or slightly rounded fins using gray yarn. A combination of sc and hdc can help produce a gentle curved shape. Place one fin on each side of the shark before sewing anything permanently. Pinning all three fins first makes it much easier to check their alignment. Once satisfied, sew around the bases firmly while leaving the outer portions free.
For a clean finish, weave the yarn tails through several stitches on the wrong side. The tail and fins should remain soft rather than being heavily stuffed. Flat or lightly structured fins move naturally and keep the slipper comfortable. At this stage, your Crochet Shark Socks Pattern should clearly resemble a shark even though the mouth, teeth, eyes, and final decorative elements have not yet been added.
Creating the Open Shark Mouth, White Teeth, Eyes, and Belly
The mouth is the focal point of these crochet shark socks. Rather than treating it as a simple decorative line, create a contrasting opening around the ankle or foot entrance so that the wearer’s leg visually emerges from the shark’s mouth. Work a round of white single crochet around the opening. Keep the stitches evenly spaced because this foundation round will support the decorative teeth.
Add a narrow red section just inside the mouth if you want to reproduce the dramatic look of the inspiration project. Attach red yarn to the inner edge and work sc or sl st evenly around. One or two rounds are usually sufficient. The red should remain an accent rather than overpowering the white jaw. Fasten off carefully and weave the ends into the inside of the slipper where they will not rub against the foot.
The teeth can be made directly along the white border. Attach white yarn and work a repeating sequence such as sl st, ch 3, sl st into the second ch from the hook, sc into the next ch, sl st into the following foundation stitch. Repeat around the mouth while adjusting spacing whenever necessary. Each short chain creates a pointed tooth. If you prefer larger teeth, use ch 4 and work stitches back down the chain before attaching the point to the border.
Another option is to crochet individual triangular teeth and sew them around the jaw. This method takes longer but offers excellent control over placement. Keep the teeth soft and flexible, particularly if the slippers will be worn around the house. Avoid hard components around the mouth opening. The finished teeth should create the recognizable shark effect while allowing the foot to enter and exit comfortably.
For the eyes, embroider small black circles or knots onto both sides of the shark head. Embroidery is a simple choice for a soft textile project because there are no detachable plastic pieces. Make several small stitches in the same area until you achieve a neat round eye. Position both eyes before securing them permanently so you can compare their height and distance from the mouth.
Finally, attach the white belly panel prepared earlier. Center it along the underside and pin it carefully from front to back. Using white yarn and a yarn needle, sew around the entire perimeter with small, consistent stitches. Avoid pulling too tightly, which could distort the slipper. This white underside creates a strong contrast against the gray body and completes the classic visual identity of the Crochet Shark Socks Pattern.
Assembly, Sizing, Finishing, Care, and FAQ for Crochet Shark Socks Pattern
Before completing the second slipper, test the first one thoroughly. Put it on and check the heel, toe, ankle opening, and overall length. The mouth should open sufficiently for the foot to pass through without excessive stretching. If it feels tight, add an extra edging round with strategically placed increases. If the opening feels loose, work a final round with a few evenly distributed decreases.
Now make the second Crochet Shark Socks Pattern using the same measurements and construction sequence. Count the rounds of the first sock and write them down as you work so the second shark matches. Also record the number of stitches around the widest section, the dimensions of each fin, and the approximate tail length. Small handmade variations are natural, but careful notes will make the pair appear much more balanced.
When all crochet pieces are finished, inspect every seam. Reinforce the dorsal fin, side fins, tail, belly, and mouth edging wherever necessary. Weave each yarn end securely through several stitches before trimming it. Turn the slipper inside out and check for long yarn floats or bulky knots that could feel uncomfortable against the foot. A smooth interior makes an enormous difference in wearable crochet projects.
If these slippers will be used on smooth flooring, consider adding an appropriate non-slip sole treatment intended for textile slippers. Crochet itself can slide on polished surfaces, so treat these primarily as cozy novelty slippers unless suitable grip has been added. Always follow the instructions for whichever textile-safe anti-slip product you choose and allow it to cure fully before wearing.
For washing, follow the care instructions printed on your yarn label. Washable acrylic yarn can often be gently cleaned without difficulty, while wool and specialty fibers may require hand washing. Place the slippers flat to dry and reshape the tail and fins while damp. Avoid high heat unless the yarn manufacturer specifically permits it, because excessive heat can affect both the fiber and the carefully shaped crochet details.
The finished Crochet Shark Socks Pattern combines practical crochet construction with imaginative character design. Once you understand how the basic slipper body is formed, the decorative possibilities are extensive. You can create a traditional gray shark, a bright blue version, contrasting fins, oversized teeth, or smaller sharks for children. The same construction principles can also help you develop your own animal-inspired crochet slippers.
FAQ – Frequently Asked Questions About the Crochet Shark Socks Pattern
Is the Crochet Shark Socks Pattern suitable for beginners?
An adventurous beginner who understands single crochet, increases, decreases, chains, and slip stitches can attempt this project. The main challenge is shaping and assembling the separate pieces rather than performing complicated stitches.
What crochet terminology does this tutorial use?
The instructions use US crochet terminology. The primary stitches are ch (chain), sl st (slip stitch), sc (single crochet), hdc (half double crochet), inc (increase), and dec (decrease).
What yarn works well for crochet shark slippers?
A soft medium or bulky washable yarn is practical. Choose a fiber that produces a dense fabric with your selected hook while remaining comfortable enough for wearable slippers.
How can I make the shark socks larger or smaller?
Adjust the circumference during the initial increase rounds and then modify the number of straight rounds to match the required foot length. Measuring the actual foot is more reliable than relying exclusively on a universal stitch count.
How do I make both shark socks the same size?
Keep notes while making the first sock. Record your stitch counts, number of rounds, fin dimensions, tail dimensions, and mouth circumference, then reproduce those measurements for the second slipper.
Can I change the colors?
Absolutely. Gray, white, black, and red create a recognizable shark palette, but the design also works with blue, navy, turquoise, charcoal, or multicolored yarn. Color customization does not change the basic construction.
Should the fins and tail be stuffed?
They generally do not need significant stuffing. Keeping them flat or lightly structured helps maintain flexibility and makes the slippers easier to wear and store.
How are the shark teeth crocheted?
The teeth can be created directly around the mouth with short chains shaped into points, or they can be crocheted individually as tiny triangles and sewn into position afterward.
Can these shark socks be worn on hardwood or tile floors?
Crochet soles may be slippery on smooth flooring. For regular indoor wear, an appropriate textile-safe non-slip treatment can improve traction. The product directions should always be followed carefully.
How should I wash crochet shark socks?
Always check the yarn manufacturer’s care instructions. Gentle washing and flat drying are good general approaches because they help preserve the shape of the body, fins, tail, and teeth.
Can I make this pattern for children?
Yes, the basic design can be resized by reducing the initial circumference and overall length. For children’s projects, embroidered details are a useful way to keep the decorative features soft and integrated into the crochet fabric.
Why is gauge important for this project?
Crochet gauge determines how large the finished slipper becomes. Two people using the same hook and yarn can still produce different dimensions because their tension differs. Making a small gauge swatch and measuring the foot helps prevent sizing problems.
Conclusion
The Crochet Shark Socks Pattern turns a simple slipper concept into a memorable crochet project filled with personality. Throughout this tutorial, you learned how to establish a fitted crochet body, use US crochet stitches, shape the shark silhouette, make the dorsal and side fins, create the distinctive tail, add a contrasting white belly, and finish the open mouth with playful crochet teeth.
The most important part of this project is working from measurements rather than depending entirely on fixed stitch counts. By checking the foot length and circumference as you crochet, you can adapt the same basic Crochet Shark Socks Pattern for several sizes and different yarn weights. Careful placement of the fins, eyes, belly, mouth, and teeth then transforms that basic slipper structure into the shark-inspired design.
Once you have completed your first pair, you can experiment with different colors, yarn textures, fin proportions, and facial details. Handmade projects become especially enjoyable when you add your own creative choices while preserving the essential construction principles.
If you make these crochet shark slippers, leave your sincere opinion about the project and share any suggestions or creative changes you would make. Your ideas can inspire new variations and help other crocheters discover even more fun ways to personalize their own Crochet Shark Socks Pattern.