
Camo Crosses Quilt Pattern is a visually striking quilting project that combines bold cross shapes, earthy camouflage-inspired fabrics, and an intentionally scrappy arrangement. The quilt shown in the reference image demonstrates how simple rectangular and square fabric pieces can be transformed into a highly textured design when cross quilt blocks, contrasting colors, and directional quilting are brought together.
Shades of blue, cream, tan, brown, gold, and white give the finished quilt a warm rustic character while allowing the individual crosses to remain recognizable. It is a particularly interesting project for quilters who enjoy designs that look complex but are actually constructed from straightforward geometric pieces.
One of the most appealing qualities of the Camo Crosses Quilt Pattern is its flexibility. You do not need every piece of fabric to match perfectly, and you can make excellent use of scraps, fat quarters, or coordinated remnants already available in your sewing room. The camouflage effect comes primarily from distributing related colors throughout the quilt rather than repeating one identical block over and over. Some crosses can be clearly defined, while other shapes can blend gently into neighboring sections. This balance between structure and randomness creates the patchwork character visible in the inspiration photo and makes every finished quilt slightly different.
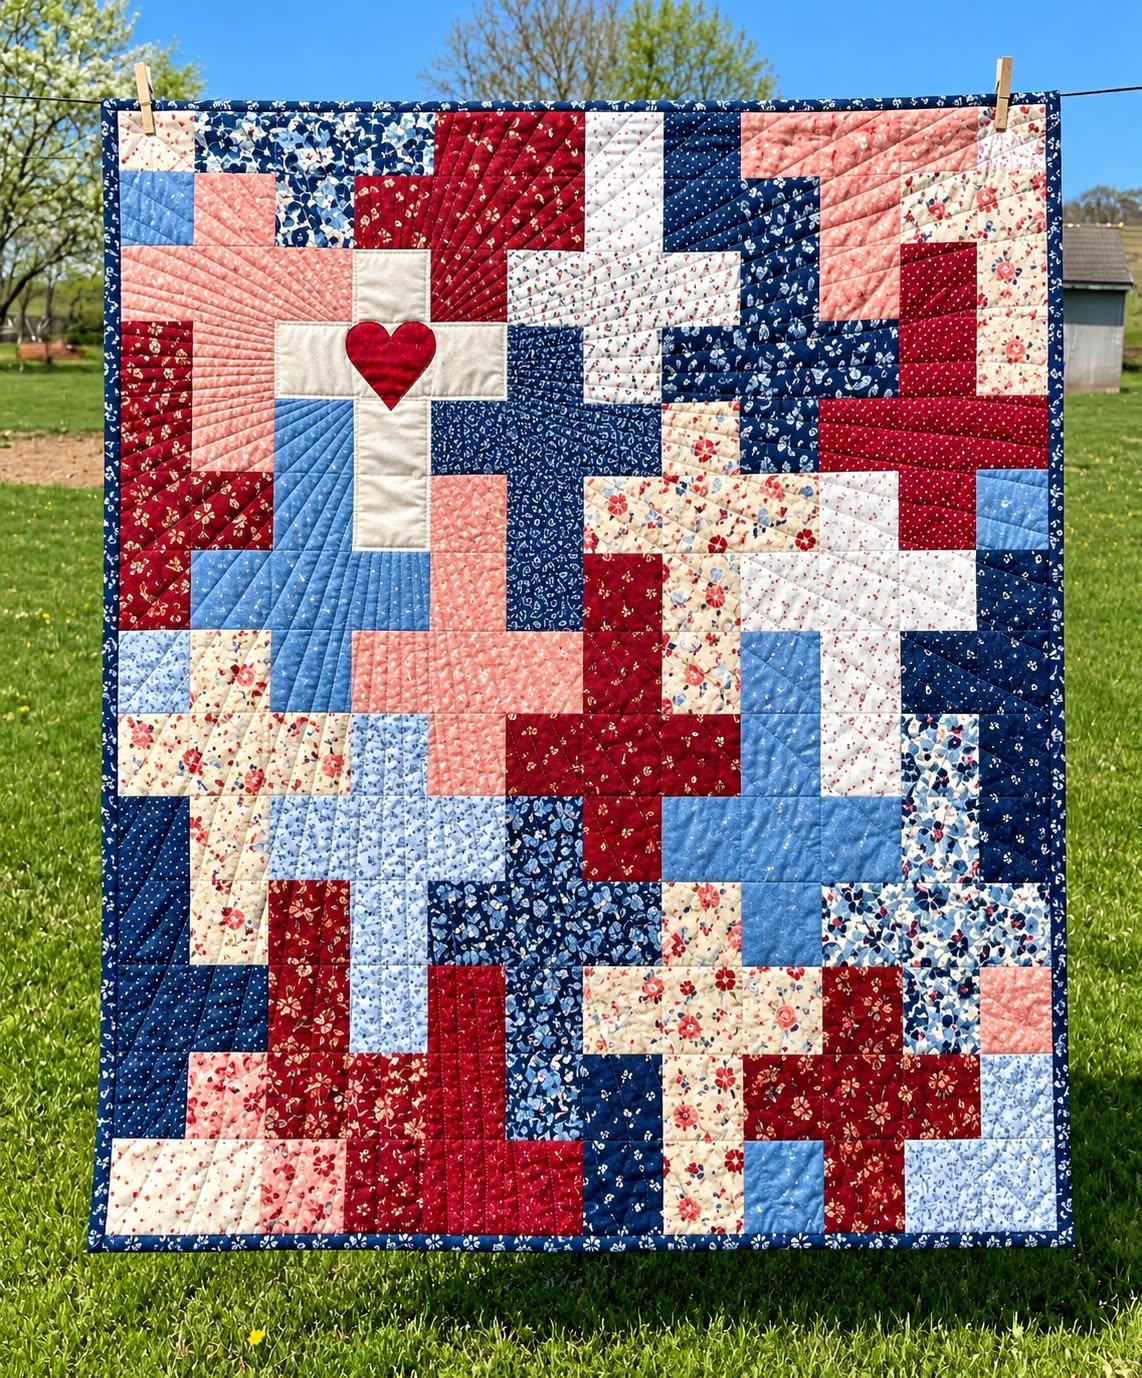
This tutorial explains a practical method for recreating a quilt inspired by the photographed project rather than claiming exact measurements from the finished piece. Because perspective and quilting can affect how large individual pieces appear in a photograph, the measurements below use a consistent modular system that makes the Camo Crosses Quilt Pattern easier to reproduce at home. You will learn how to choose fabrics, cut the basic units, assemble recognizable cross motifs, arrange the blocks into a balanced quilt top, quilt the layers, and finish the edges. Careful measuring and an accurate 6 mm (1/4-inch) seam allowance will help keep the geometric design aligned from beginning to end.
Choosing Fabrics and Cutting the Camo Crosses Quilt Pattern
Begin by building a coordinated camouflage quilt color palette. The inspiration quilt relies heavily on navy, medium blue, pale blue, cream, sandy beige, golden tan, chocolate brown, and white. Instead of selecting only solid fabrics, combine solids with subtle prints, dots, small florals, mottled textures, and tone-on-tone designs. These small variations are especially effective because they create movement without overpowering the cross shapes. For a softer quilt, use low-volume prints; for stronger contrast, place very dark navy or brown pieces beside cream and pale blue sections.
A useful approach is to divide your fabrics into four color families: dark, medium, light, and accent. Dark fabrics might include navy and chocolate brown. Medium fabrics can include denim blue, medium brown, and muted gold. Cream, ivory, pale blue, and white work well for the light group. The accent group can contain one or two stronger colors. In the photographed quilt, for example, a small red heart placed over a cream cross immediately draws attention without changing the overall earthy character of the project.
For an approachable modular version, use a 10 cm finished grid. Cut basic squares at approximately 11.3 cm x 11.3 cm (4 1/2 x 4 1/2 inches) when working with a 6 mm seam allowance. These units finish at about 10 cm once sewn into the quilt. A simple cross can be constructed from five squares: one center square and four matching or coordinating squares positioned above, below, left, and right. Four background squares fill the corners, producing a nine-patch-style cross block that is easy to assemble.
You can also construct elongated crosses like several of those suggested by the reference image. Instead of limiting every arm to one square, extend selected arms by adding another unit. For example, the vertical section may contain five units while the horizontal section contains three. This produces a larger patchwork cross motif and prevents the quilt from looking like a rigid collection of identical blocks. The key is maintaining the same underlying grid so differently sized motifs can still connect cleanly.
Cut more pieces than you think you will initially need, but organize them by color family rather than by exact print. A scrappy quilt becomes much easier to design when you can quickly compare several blues, browns, or neutrals. Place the cut pieces in separate stacks and keep the dimensions consistent. Accuracy during cutting is important because even a small discrepancy can accumulate across a large quilt and make rows difficult to align later.
Before sewing anything permanently, place a selection of pieces on a large table, clean floor, or design wall. Build a few crosses and surround them with contrasting background pieces. Step away and look at the arrangement from a distance. A successful Camo Crosses Quilt Pattern should allow your eyes to discover crosses throughout the surface without making every motif equally obvious. That mixture of visible and partially blended shapes is what gives this style much of its charm.
Sewing Cross Blocks and Building the Patchwork Design
Start with one simple cross block so you can establish your preferred sewing method. Arrange nine squares in three rows. The top row contains background, cross fabric, and background. The middle row contains three cross-colored squares. The bottom repeats the first row. When viewed together, the five coordinated pieces create a clear plus-shaped cross quilt block surrounded by four contrasting corners.
Sew the three squares in each row together using a consistent 6 mm (1/4-inch) seam allowance. Press the seams carefully rather than pulling the fabric across the ironing surface. For the first and third rows, press the seam allowances toward the background squares. On the middle row, press them toward the center square or in the opposite direction. Alternating the seam direction makes it easier to nest the intersections when the rows are joined.
Next, join the three completed rows. Match the intersections carefully and pin or clip them before sewing. Press the finished block flat and check that the cross remains square. If the block is slightly uneven, identify the source before aggressively trimming it. Maintaining accurate seams throughout the project is preferable to repeatedly trimming blocks smaller, particularly when you intend to combine crosses with larger irregular sections.
After completing several standard crosses, experiment with extended cross blocks. Build a longer vertical arm or widen one horizontal section while staying on your established grid. The photographed project has an improvisational quality, so every cross does not need identical proportions. A cream cross may occupy one area while blue, brown, gold, and white crosses emerge elsewhere. This controlled variation makes the quilt much more dynamic than a conventional repeating-block layout.
For the camouflage appearance, avoid surrounding every cross with a single background color. Instead, allow neighboring pieces to change gradually from blue to cream, brown to gold, or white to navy. A blue arm may visually merge with a nearby blue patch while another side contrasts strongly against tan. This technique creates the camo quilt effect without requiring literal camouflage-print fabric. Color placement becomes part of the design itself.
As sections grow, construct the quilt in manageable units rather than attempting to sew the entire top one row at a time. You might assemble a section containing two crosses, another containing one large cross and several filler rectangles, and another dominated by scrappy squares. Once these sections are approximately compatible in size, connect them with additional strips or units. This sectional method is particularly useful for reproducing the irregular appearance seen in the inspiration quilt.
Arranging, Joining, and Preparing the Quilt Top
Once you have enough sections to establish the overall dimensions, lay everything out before joining the final quilt top. Look first at color distribution. If all the darkest browns have accumulated in one corner, relocate a few pieces. Do the same with navy, gold, cream, and white. Balanced distribution does not mean perfect symmetry; it simply prevents one section from becoming visually heavier than the rest of the quilt unless that effect is intentional.
Next, study the crosses themselves. Ideally, your eye should move naturally from one motif to another. Rotate some blocks or extend selected shapes so that the design does not resemble a strict grid. A few crosses can be extremely obvious, while others can partially disappear into fabrics of similar value. This subtle variation is a defining characteristic of a successful Camo Crosses Quilt Pattern inspired by the photograph.
Use filler pieces whenever neighboring sections do not have matching dimensions. Because the project is based on a modular grid, a gap measuring one unit can receive a square, while a two-unit space can receive a rectangle or two squares. These filler pieces are also valuable design opportunities. Use them to introduce a missing color or create a transition between a dark section and a light one.
When satisfied with the arrangement, sew neighboring sections together gradually. Pin important intersections first, especially around the recognizable cross shapes. Sew slowly over bulky seam junctions and avoid stretching the quilt top. Press each newly completed seam before attaching the next section. Periodically measure the quilt from several positions to confirm that the top remains reasonably square.
The red heart visible near the upper portion of the inspiration quilt can be treated as an optional heart appliqué accent. To create a similar feature, draw a symmetrical heart onto paper, transfer the shape to red fabric with your preferred appliqué preparation method, and position it over a light-colored cross. Secure the heart using a small zigzag, blanket stitch, raw-edge appliqué, or turned-edge appliqué technique. The heart is optional, but it creates an attractive focal point among the subdued camouflage colors.
After the top is complete, give it a final press and inspect the back for loose threads or bulky seam allowances. Measure the top through its center horizontally and vertically rather than relying only on the outer edges. If you intend to add borders, cut them according to these measurements. However, a border is not essential; the inspiration piece works beautifully with the patchwork extending almost directly to the binding.
Quilting, Binding, and Finishing the Camo Crosses Quilt Pattern
Prepare a quilt sandwich using the completed quilt top, batting, and backing fabric. Cut the batting and backing several centimeters larger than the quilt top on every side. Place the backing wrong side upward, smooth the batting over it, and position the quilt top right side upward. Remove wrinkles carefully and baste the three layers using safety pins, basting spray, or your preferred quilting method.
The directional quilting visible in the inspiration image contributes significantly to its finished appearance. Rather than covering the quilt with one uniform all-over motif, you can quilt individual areas with gently curving or radiating lines. Begin near the center of a cross or patchwork section and gradually echo the shape outward. On another area, change the direction of the lines. This makes individual fabric sections feel almost sculpted.
If you prefer an easier approach, use straight-line quilting. Quilt parallel lines through each modular unit, changing direction when you enter another large section. Vertical lines can emphasize one cross while horizontal or diagonal lines emphasize another. Keep the spacing reasonably consistent, but do not worry about mathematical perfection. The goal is texture, stability, and visual movement rather than an overly rigid surface.
Once quilting is complete, trim away the excess batting and backing so the edges align with the quilt top. Check each corner with a quilting ruler and square it gently if necessary. Avoid excessive trimming because removing too much fabric can distort the outer patchwork units. At this stage, the crosses and camouflage arrangement should be clearly visible and the quilting texture should reinforce the shapes.
Finish the quilt with double-fold binding. A medium or dark blue binding works particularly well with the photographed color palette because it frames the entire composition without competing with the brown and gold fabrics. Join the binding strips diagonally, press the long strip in half, and sew it around the front perimeter with an appropriate seam allowance. Miter the corners neatly, join the binding ends, then fold the binding to the back.
Finally, secure the back of the binding by hand for a traditional finish or machine-stitch it for speed and durability. Give the completed quilt a careful inspection, removing stray threads and checking that every seam is secure. Your finished Camo Crosses Quilt Pattern can be used as a lap quilt, wall display, meaningful handmade gift, or larger bed quilt when the modular design is expanded. The combination of crosses, camouflage-inspired colors, scraps, and textured quilting ensures that no two versions need to look exactly alike.
FAQ About the Camo Crosses Quilt Pattern
What is a Camo Crosses Quilt Pattern?
A Camo Crosses Quilt Pattern combines cross-shaped patchwork motifs with colors associated with camouflage, nature, rustic fabrics, or muted scrappy palettes. The camouflage effect can come from color placement rather than actual camouflage fabric.
Is this quilt suitable for beginners?
Yes. The basic construction relies primarily on squares, rectangles, straight seams, and simple patchwork assembly. Beginners should start with identical nine-patch cross blocks before experimenting with extended or irregular crosses.
What size should I cut the squares?
For the modular method described here, cut squares approximately 11.3 cm (4 1/2 inches) so they finish near 10 cm after being sewn with a 6 mm or 1/4-inch seam allowance. You can scale the entire pattern by selecting another consistent square size.
How many fabrics should I use?
There is no fixed number. A scrappy version benefits from numerous coordinating fabrics. Try including several variations of blue, brown, tan, cream, gold, navy, and white instead of relying on only one fabric from each color family.
Do all the crosses need to be the same size?
No. Using crosses of different proportions is one of the best ways to achieve the organic appearance suggested by the reference quilt. Just maintain a common modular measurement so the sections remain compatible.
Do I need camouflage-print fabric?
Not at all. The camouflage quilt effect can be created by blending earthy colors and prints. Small-scale brown, blue, beige, cream, and mottled fabrics can produce a sophisticated camo-inspired appearance without literal camouflage prints.
How can I make the crosses stand out more clearly?
Use value contrast. Place a light cross against medium or dark surrounding fabrics, or use a dark cross against cream and pale backgrounds. If you want a subtler appearance, choose fabrics with similar values so the cross blends partially into the surrounding patchwork.
Can I add the red heart shown in the inspiration?
Yes. A fabric heart appliqué is a simple way to create a focal point. Positioning a deep red heart over a cream or white cross creates particularly strong contrast.
What quilting design works best?
Radiating lines, gently curved parallel quilting, echo quilting, and straight-line quilting all complement this design. Changing the quilting direction between different patchwork areas can emphasize the improvisational character of the quilt.
Can this pattern be made from fabric scraps?
Yes. In fact, scrap quilting works especially well for this project. As long as your scraps are large enough for the required squares and rectangles, mixing different prints can add considerable visual interest.
How can I make the quilt larger?
Simply continue building cross sections and filler units on the same modular grid. Add sections evenly around the layout until the quilt reaches your desired dimensions. Measure regularly as the quilt grows.
What seam allowance should I use?
A standard quilting seam allowance of approximately 6 mm (1/4 inch) is recommended. More important than the exact measurement is maintaining the same seam allowance consistently throughout the entire project.
Should I prewash the fabrics?
That depends on your normal quilting practice. If you prewash one fabric, it is generally helpful to treat the others consistently. Prewashing can reduce later shrinkage and remove excess dye, while many quilters prefer unwashed quilting cotton because of its crisp handling and the textured effect created after the finished quilt is washed.
How do I keep a scrappy layout from looking chaotic?
Repeat color families throughout the quilt. A blue fabric does not need to match another blue exactly, but distributing blues, browns, creams, and golds across multiple areas creates visual continuity. Contrast should look intentional even when individual fabrics vary.
Can the pattern be made without the heart?
Absolutely. The heart is an optional decorative feature. Without it, the quilt becomes a more purely geometric cross design and retains the same construction method.
Conclusion
The Camo Crosses Quilt Pattern demonstrates how straightforward patchwork can become an expressive quilt through thoughtful color placement and creative arrangement. Beginning with basic squares and rectangles, you can construct simple five-unit crosses, expand selected motifs, fill the spaces with coordinating scraps, and gradually assemble the pieces into a distinctive quilt top.
VIDEO TUTORIAL:
The most important lesson is consistency within flexibility. Accurate cutting, a dependable 1/4-inch seam allowance, careful pressing, and a shared modular grid provide the technical structure. At the same time, changing the size of the crosses, mixing prints, blending earthy colors, and adding irregular filler sections give the quilt its handmade personality.
You can follow the photographed palette with navy blue, medium blue, cream, tan, gold, brown, white, and a red heart accent, or create an entirely different version using fabrics already in your collection. Once the top is complete, directional or straight-line quilting adds texture and highlights the geometric sections, while a contrasting binding gives the project a polished frame.
Most importantly, allow your Camo Crosses Quilt Pattern to develop naturally rather than trying to make every section identical. The slightly improvised arrangement is part of what makes this style so interesting. If you make your own version, leave your sincere opinion about the project and share any suggestions, color combinations, or creative changes you would use to personalize this quilt.