
Crochet Cat-shaped Pouch Pattern is a charming way to combine practical crochet with an adorable animal-inspired design. This small pouch can be used for coins, keys, earbuds, stitch markers, cosmetics, or other lightweight accessories. The recognizable cat silhouette comes from a simple rectangular body, pointed ears, a small embroidered face, and a narrow crocheted tail.
Because most of the project uses basic stitches, it is also an approachable choice for crocheters who want to practice shaping and color changes without beginning a large project. The finished pouch can be customized in solid colors, tabby shades, calico patches, or any combination inspired by a favorite cat.
One of the advantages of this Crochet Cat-shaped Pouch Pattern is that you do not need a complicated collection of materials. Medium-weight cotton or cotton-blend yarn works particularly well because it produces defined stitches and a firm fabric. You will also need a crochet hook appropriate for your yarn, a yarn needle, scissors, stitch markers, and optional zipper or snap components. For the facial details, small amounts of contrasting yarn can create the nose, whiskers, and other features. Beginners should remember that the exact finished dimensions can vary according to yarn thickness, hook size, and individual tension, so the stitch counts below can be adjusted while preserving the construction method.
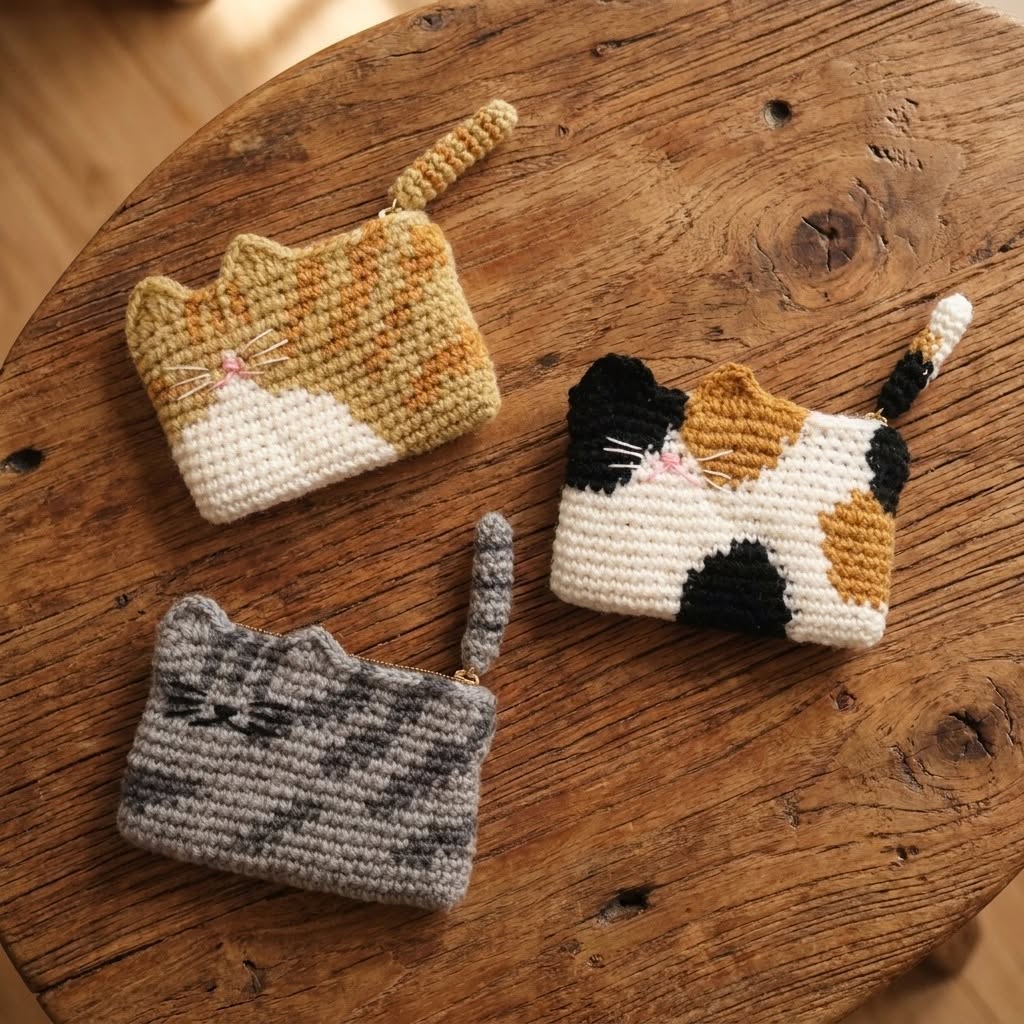
The pouch shown in the inspiration image demonstrates how much personality can be created from simple crochet techniques. One version can be worked in gray for a classic tabby appearance, another in warm beige with a cream muzzle, and another with black, white, and golden patches for a calico effect. Rather than treating those colors as mandatory, this tutorial uses them as inspiration for a customizable crochet cat pouch. The instructions use standard US crochet terminology, including ch (chain), sc (single crochet), sl st (slip stitch), inc (increase), and dec (decrease). Once these abbreviations are understood, the construction becomes straightforward and easy to personalize.
Materials, US Crochet Terms, Gauge, and Planning the Cat Pouch
For this Crochet Cat-shaped Pouch Pattern, choose a medium-weight yarn that creates a dense fabric. Cotton is especially useful because it provides good stitch definition and tends to hold the rectangular pouch shape. As a starting point, try a 3.5 mm to 4 mm crochet hook with compatible yarn. You can change the hook size if necessary to obtain a fabric without large gaps. Gather approximately 40–70 g of your main color plus small quantities of contrasting colors for patches and facial details.
The essential US crochet abbreviations are simple. Ch means chain and creates the foundation of the work. Sc means single crochet: insert the hook into the designated stitch, yarn over, pull up a loop, yarn over again, and pull through both loops. Sl st means slip stitch and is useful for joining or moving across stitches. Inc means working two single crochet stitches into one stitch, while dec means combining two stitches into one, usually with sc2tog.
A practical finished size for a small pouch is approximately 13–16 cm wide and 9–12 cm tall, excluding the ears and tail. These dimensions are only a useful target because crochet tension varies considerably. If you want a wider pouch, add foundation chains. For a taller pouch, simply add rows. The important point is to make the front and back panels identical in their main dimensions so that they can be joined neatly.
To begin a sample panel, Ch 31. Starting in the second chain from the hook, sc in each chain across, giving you 30 sc. Ch 1 and turn. For Row 2, sc in every stitch across. Repeat this simple row until the rectangle measures approximately 9–11 cm high. Keep counting periodically because accidentally adding or skipping an edge stitch can gradually change the width.
For a striped or tabby-style cat-shaped crochet pouch, introduce another shade every few rows. Complete the final yarn-over of the last stitch with the new color, then continue crocheting normally. Carrying yarn over long distances can create unnecessary bulk, so cut and rejoin colors when appropriate. For irregular calico markings, small color sections can be incorporated using tapestry-style crochet, or decorative patches can be embroidered afterward for an easier construction method.
Before continuing, check the density of your fabric. A pouch designed to carry small objects benefits from relatively tight single crochet stitches. If the fabric has obvious openings, try a slightly smaller hook. If it feels excessively stiff and is difficult to crochet, increase the hook size slightly. Consistent tension is more important than matching a specific gauge because this project does not require garment-style fitting.
Crocheting the Front and Back Panels with Cat Ears
The body begins with two matching rectangles. Make the first panel using the instructions above, then create a second panel with exactly the same number of foundation chains and rows. Lay them together periodically to compare their dimensions. This simple check helps prevent problems when assembling the Crochet Cat-shaped Pouch Pattern, particularly if you changed yarn colors between panels.
Next, shape the ears along the upper edge. Instead of making separate pieces, you can crochet small triangular ears and attach them to the top corners. Start one ear with Ch 7. Row 1: sc in the second chain from the hook and across for 6 sc. Ch 1 and turn. Row 2: sc2tog, sc across until two stitches remain, then sc2tog. Continue reducing at both edges until only one or two stitches remain. Fasten off.
Repeat the process to make the second ear. Make another pair if you want ears on both front and back panels. For a simpler pouch, attach one pair to the front and position them so that they rise slightly above the upper corners. Sew each ear securely using a yarn needle and matching yarn. Keep the stitches small and even so the attachment looks integrated with the body.
For extra definition, crochet around each ear with sc before attaching it. Insert the hook around the outer edge and work evenly spaced single crochet stitches. At the pointed tip, you can work (sc, ch 1, sc) into the same space to emphasize the point. This optional edging gives the ears a crisp outline and makes the cat silhouette easier to recognize.
Now add the muzzle or face marking. A cream-colored section like the one visible in the inspiration can be created by changing colors during the final portion of the front panel, but embroidery is an easier alternative for beginners. Use contrasting yarn and a yarn needle to create a soft triangular or curved patch. Avoid pulling the embroidery too tightly because this can distort the crocheted rectangle.
The front panel is where your crochet cat pattern becomes unique. Try symmetrical markings for a simple appearance or asymmetrical patches for a calico-inspired design. If using several colors, keep the reverse side reasonably tidy because loose strands can catch objects placed inside the pouch. Weave every yarn end securely before assembling the two body panels.
Creating the Cat Face, Tail, and Assembling the Pouch
The face requires only a few details. Using pink yarn, embroider a small triangular nose near the upper-middle area of the front panel. A few short stitches are enough. From the bottom point of the nose, make one short vertical stitch and then two small diagonal or curved lines to suggest the mouth. Keeping these details understated often produces the sweetest expression.
For the whiskers, thread a yarn needle with white, cream, or light-colored yarn. Make two or three long straight stitches extending outward from each side of the muzzle. Secure the yarn carefully on the reverse side. If the pouch is intended for a young child, embroidered details are generally preferable to loose decorative pieces because everything remains incorporated into the fabric.
The tail can be made as a narrow crocheted tube or cord. For an easy flat version, Ch 18–25, depending on the desired length. Starting in the second chain from the hook, sc across. Ch 1, turn, and work another row of sc. Fasten off, fold the strip lengthwise if desired, and stitch its long edges together. Alternatively, crochet a narrow tube in continuous rounds for a thicker three-dimensional tail.
Attach the tail to one upper side of the back panel. Stitch the base several times because this part may receive extra handling. A striped tail can be made by alternating two yarn colors every two or three rows. For a calico cat, changing the final section to white or black creates another playful detail inspired by natural coat patterns.
Place the front and back panels with their wrong sides facing each other. Starting at one upper corner, join the layers by working sc through both panels around the side, bottom, and opposite side. Leave the top edge open. Alternatively, sew the pieces together with a yarn needle and mattress stitch or whipstitch. Crocheting the seam produces a decorative border, while sewing creates a subtler finish.
At the opening, you have several closure choices. A zipper provides the most secure storage, while a snap or button makes the project simpler. If adding a zipper, pin or baste it inside the upper opening before sewing it permanently with strong thread. Keep the zipper tape evenly positioned so the pouch remains rectangular. Once assembled, gently shape the corners and ears with your fingers.
Finishing, Customizing, and Caring for Your Crochet Cat-shaped Pouch Pattern
Finishing makes a major difference in the appearance of this project. Use a yarn needle to weave each loose end through several stitches on the wrong side. Change direction at least once before trimming the yarn. This helps prevent ends from working loose through normal handling. Inspect the seams, ear attachments, tail base, and embroidered features before considering the Crochet Cat-shaped Pouch Pattern complete.
Blocking can help straighten uneven edges. Check the care instructions for your chosen yarn first. For suitable fibers, lightly dampen the pouch and shape it on a flat surface, keeping the corners square and the ears pointed. Allow it to dry completely. Avoid stretching aggressively because that may enlarge the stitches and change the pouch dimensions.
Customization is one of the most enjoyable parts of this crochet pouch pattern. A gray body with darker stripes creates a tabby look. Cream and caramel can produce a warm neutral cat, while white, black, and golden brown can suggest a calico coat. You could also ignore realistic colors entirely and make pink, blue, purple, or rainbow cats. The construction remains exactly the same.
A fabric lining is optional but useful when the pouch will hold very small objects. Cut two fabric rectangles slightly smaller than the crocheted body, allowing seam allowance around the edges. Sew the fabric pieces together along three sides, place the lining inside the crochet pouch, turn the upper raw edge inward, and hand-sew it around the opening. The lining also helps prevent sharp objects from stretching the crochet.
You can resize the Crochet Cat-shaped Pouch Pattern without complicated calculations. For a larger pouch, begin with more chains and crochet additional rows. Make the ears proportionally larger by adding foundation chains. For a miniature coin purse, reduce both the starting chain and total number of rows. Always make both body panels identical before joining them.
For routine care, follow the washing recommendations printed on the yarn label. Gentle hand washing is a practical option for many handmade accessories, particularly when they include embroidery, a zipper, or a fabric lining. Reshape the pouch while damp and allow it to dry thoroughly. Proper care helps the stitches, ears, facial details, and tail maintain their shape over time.
FAQ About the Crochet Cat-shaped Pouch Pattern
Is the Crochet Cat-shaped Pouch Pattern suitable for beginners?
Yes. The main body primarily uses single crochet, making it accessible to beginners who already understand chains, turning rows, and basic stitch counting. The ears introduce simple decreases, while the facial features provide useful embroidery practice.
What yarn works best for a crochet cat pouch?
Medium-weight cotton or a cotton-blend yarn is a practical option because it gives the pouch structure and good stitch definition. Acrylic yarn can also work, although the finished texture and firmness may differ.
How large should the finished cat pouch be?
A convenient small accessory pouch can measure approximately 13–16 cm wide and 9–12 cm tall, not counting the ears or tail. These measurements are flexible and can easily be adjusted.
Can I make the pouch without a zipper?
Absolutely. The top can remain open, or you can add a button, magnetic-style closure suitable for crafts, or sewn snap. A zipper is helpful when storing coins or other items that could fall out.
How do I make the cat ears pointed?
Begin with a short row of single crochet stitches and use sc2tog decreases at both sides on subsequent rows. Gradually reducing the stitch count forms a triangular point.
Can I crochet the pouch in different cat colors?
Yes. Solid gray, cream, orange, black, white, tabby stripes, and calico combinations all work well. Color customization is one of the easiest ways to personalize this Crochet Cat-shaped Pouch Pattern.
How can I make the crochet fabric less stretchy?
Use a slightly smaller hook, maintain firm and consistent tension, and choose a structured yarn such as cotton. Adding a fabric lining can provide additional stability.
Can the size be changed?
Yes. Increase or decrease the number of foundation chains to modify the width and adjust the number of rows for the height. Remember to make both panels the same size.
What does sc2tog mean in US crochet terminology?
Sc2tog means single crochet two together. It combines two stitches into one and is commonly used as a decrease. In this project, it helps create the tapered triangular shape of the cat ears.
How can I personalize the cat face?
Change the muzzle color, whisker length, nose shape, stripe placement, or embroidered expression. You can even use yarn colors inspired by a real cat while keeping the same basic pouch construction.
Conclusion
The Crochet Cat-shaped Pouch Pattern turns basic crochet techniques into a practical handmade accessory filled with personality.
Video Tutorial:
Throughout this tutorial, you learned how to create matching single crochet panels, shape pointed ears with sc2tog decreases, add cat-inspired color markings, embroider a nose and whiskers, crochet a tail, join the body, and finish the opening with your preferred closure.
The same construction can be adapted to create many different cats. By changing yarn colors, dimensions, stripes, patches, facial details, and tail styles, one basic crochet cat pouch pattern can produce an entire collection of unique accessories. Beginners can keep the design simple, while more experienced crocheters can experiment with tapestry crochet, linings, decorative edging, and more detailed colorwork.
Most importantly, use the pattern as a flexible guide rather than feeling restricted to one exact appearance. Handmade crochet is especially rewarding when small personal choices become part of the finished project. If you make this Crochet Cat-shaped Pouch Pattern, leave your sincere opinion about the tutorial and share your suggestions for colors, details, or improvements you would like to try in your next cat pouch.