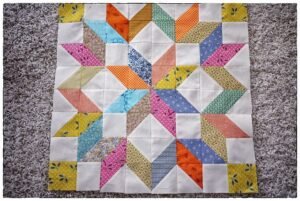
The Carpenter Star Quilt Pattern is one of the most captivating designs in the quilting world, admired for its bold geometry and classic charm. Right from the first glance, this pattern stands out for its striking star layout, clean lines, and the sense of dimension it creates through careful color placement. Quilters of all experience levels often gravitate toward this design because it offers both visual impact and a rewarding creative process. Its traditional roots blend beautifully with modern fabric choices, making it a timeless favorite for anyone looking to craft a meaningful piece.
Working with the Carpenter Star Quilt Pattern allows quilters to explore various techniques while maintaining flexibility in fabric selection and layout. Whether you prefer soft, muted tones or bold, contrasting shades, this pattern adapts effortlessly. Many artisans love using it for bed quilts, wall hangings, or even statement throw pieces. Its symmetry brings a sense of balance, while its versatility invites experimentation. Each finished Carpenter Star quilt becomes truly unique depending on the maker’s choices, making the creative journey as fulfilling as the final result.
One of the reasons the Carpenter Star Quilt Pattern continues to gain popularity is its combination of traditional craftsmanship and modern appeal. Although the pattern looks intricate, it is surprisingly accessible once you understand the basic construction method. The star motif symbolizes guidance, skill, and craftsmanship—qualities that resonate deeply with quilters who appreciate projects that carry meaning. When piecing together this pattern, makers often feel a sense of connection with generations of quilters before them who stitched their creativity into similar designs.
Understanding the Carpenter Star Quilt Pattern
The Carpenter Star Quilt Pattern is built on a foundation of half-square triangles and diamond-shaped components that interlock to form a radiating star. This structured design creates depth and dimension, making it ideal for showcasing color gradients or bold fabric contrasts. Even beginners can grasp the construction process with step-by-step planning.
Many quilters begin by choosing a central color theme that guides the rest of the design. The Carpenter Star shines brightest when colors transition smoothly or when complementary tones create vivid contrast. The pattern thrives on symmetry, so selecting fabrics intentionally is a crucial part of planning.
Another advantage of this pattern is its adaptability in size. You can build a small centerpiece star for a wall quilt or expand it into a larger repeating layout to create a full-size bed quilt. This scalability gives the pattern its timeless appeal across different projects.
The geometric nature of the Carpenter Star also makes it excellent for practicing precision cutting and piecing. Quilters appreciate how the pattern challenges their accuracy while still being achievable with patience and careful planning.
Some makers choose to modernize the pattern by incorporating negative space around the star. This creates a fresh, contemporary look without changing the essence of the design. Modern minimalism meets traditional craftsmanship beautifully here.
Finally, many quilters enjoy how well the Carpenter Star showcases quilting stitches. Whether you prefer hand quilting or machine quilting, the star layout offers natural pathways for creative stitch designs.
Choosing Fabrics for Your Carpenter Star Quilt Pattern
Selecting fabrics for the Carpenter Star Quilt Pattern is one of the most enjoyable parts of the process. Because of the star’s structure, each fabric choice significantly impacts the depth and visual flow of the quilt.
One effective approach is using a monochromatic palette with several shades of the same color. This technique creates a soft, elegant gradient within the star, making it appear almost three-dimensional.
Alternatively, high-contrast colors make the star shape more pronounced. For example, pairing deep blues with crisp whites or vibrant reds with warm neutrals creates dramatic visual appeal. These combinations help highlight the sharp angles and bold geometry of the Carpenter Star.
Fabric prints also bring unique character to the quilt. Small-scale prints work well because they maintain clarity within the geometric shapes. Larger prints may overwhelm the design but can still be used creatively if placed in the background.
Many quilters enjoy mixing solids with subtle patterns to add texture without distracting from the star. The balance between simplicity and complexity is key when working with this iconic design.
Finally, consider the emotional mood you want your finished quilt to convey. Soft pastels create a calming piece, while bright, bold fabrics offer energy and excitement. The Carpenter Star adapts to any mood you choose.
Step-by-Step Construction Tips for the Carpenter Star Quilt Pattern
Starting your Carpenter Star Quilt Pattern project begins with accurate cutting. Consistent block sizes are essential for maintaining symmetry in the final design. Quilters often rely on rotary cutters, clear rulers, and cutting mats to keep measurements sharp and precise.
As you assemble the blocks, chain piecing can speed up the process and maintain consistency. This technique helps keep fabric edges aligned and reduces the risk of shifting while sewing.
Pressing seams correctly is another crucial step. Many quilters prefer pressing seams open to reduce bulk, especially where multiple points meet in the star’s center. Others press seams to one side for added stability. The best method depends on your personal preference and the thickness of your fabric.
When constructing half-square triangles, trimming each unit to the exact size ensures crisp points. This careful trimming step improves the overall accuracy of the quilt top and helps the star take shape beautifully.
Before sewing large sections together, laying out the design helps avoid color placement mistakes. Taking a photo of the layout or using a design wall is extremely helpful in spotting potential issues before stitching.
Once the quilt top is assembled, adding borders can frame the Carpenter Star and enhance the overall design. Some quilters choose narrow borders for a clean look, while others incorporate wider borders to enlarge the quilt while maintaining balance.
Quilting and Finishing Your Carpenter Star Quilt Pattern
When quilting the Carpenter Star Quilt Pattern, you have the freedom to highlight the star or complement the geometric background. Straight-line quilting enhances the clean symmetry of the pattern and works well for a modern finish.
Free-motion quilting offers endless creative possibilities. You can trace the star’s lines, create swirls in the background, or add echo stitching around the shapes for added depth.
Many quilters choose dense quilting within the background and lighter quilting inside the star. This technique makes the star appear more pronounced and dimensional, drawing more attention to the central motif.
Choosing the right batting influences the drape and texture of the finished quilt. Cotton batting creates a traditional feel, while polyester gives more loft, helping the star pop visually.
Binding is the final touch that frames the quilt. Solid fabrics often work best for binding because they provide a clean edge without overwhelming the intricate star design.
After finishing, your Carpenter Star quilt becomes a meaningful piece that reflects patience, artistry, and personal vision. Displaying it in your home or gifting it to someone special turns the project into something truly lasting.
FAQ About the Carpenter Star Quilt Pattern
What skill level is needed for the Carpenter Star Quilt Pattern?
Most quilters consider it suitable for confident beginners and intermediate makers. The pattern looks complex but relies on basic units like half-square triangles.
Can I make the Carpenter Star Quilt Pattern in a small size?
Yes. You can scale the blocks to create anything from a wall hanging to a full bed quilt. The pattern is very flexible.
What fabrics work best for this design?
Both solids and small-scale prints look great. High-contrast fabrics emphasize the star, while gradients create a softer effect.
Do I need special tools?
Standard quilting tools—rotary cutter, ruler, and cutting mat—are enough. A design wall can be helpful but isn’t required.
How do I keep the points sharp in the star?
Trim units carefully, press seams consistently, and sew with an accurate seam allowance to maintain crisp points.
Can beginners try this pattern?
Absolutely. With patience and good preparation, beginners can achieve beautiful results.
Video Tutorial
The Carpenter Star Quilt Pattern blends tradition, geometry, and creativity into a project that is both meaningful and visually stunning. From fabric selection to final quilting stitches, every step offers space for expression and craftsmanship. If you’re looking for a pattern that challenges your skills while delivering impressive results, this timeless star design is an excellent choice. I hope this guide supports your creative journey and gives you the confidence to start your own Carpenter Star quilt. Feel free to share your honest opinion and any suggestions you’d like to see in future articles.