The Crochet 3D Star Motif – Pattern is one of the most charming designs you can add to your creative crochet projects. This type of motif combines texture, structure, and elegance, giving even the simplest pieces a unique handmade touch. Crafters love this pattern because it works for many purposes, from holiday decorations to baby blankets and home décor. Its versatility and beauty make it a favorite among beginners and experienced crocheters alike. In this article, you will learn everything you need to understand, create, and adapt this stunning motif in your own way.
Working with a Crochet 3D Star Motif – Pattern teaches you valuable skills such as shaping, layering, and building depth into your crochet pieces. Unlike flat motifs, 3D designs require a careful balance between tension and stitch placement. This pattern encourages you to explore new techniques without overwhelming you, making it ideal for artistic expression and learning. Whether you want a single star as an ornament or a full project made entirely of stars, the possibilities are endless.
Before diving into the instructions, it is helpful to understand the structural concept behind the Crochet 3D Star Motif – Pattern. A 3D motif usually consists of multiple layers or folded elements that create depth. The star shape is timeless, symbolizing brightness, creativity, and celebration. When transformed into a crochet piece, it becomes a charming representation of craftsmanship and imagination. The more you practice, the more confident you become in shaping each point of the star with precision and personality.
Understanding the Structure of a 3D Star Motif
Creating a Crochet 3D Star Motif – Pattern starts with understanding how a star can be constructed using simple crochet stitches. Many patterns begin with a magic ring, which allows the stitches to gather tightly at the center. The magic ring forms the base that holds the points of the star securely. Consistency in tension is important for achieving a well-defined and symmetrical shape.
Each point of the star is typically made through a sequence of increases and height-building stitches. These may include double crochets, treble crochets, or variations adapted to create dimension. The points should look even, sharp, and well-balanced. The structure of the motif depends on repeating the same sequence with care to achieve harmony in all sections.
A common feature of 3D motifs is layering. Some versions of the Crochet 3D Star Motif – Pattern are made by creating two flat stars and joining them together. When they are stitched back-to-back, they naturally form a three-dimensional shape. This technique makes the star firm and gives it a raised appearance. Other designs achieve the 3D effect by folding or shaping a single star while crocheting.
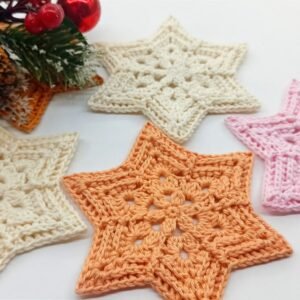
The number of points in the star may vary depending on the design. Most patterns use the traditional five-point star, but some crafters experiment with six-point or even eight-point variations. More points often create a fuller look and add visual complexity to the motif. This personalization allows you to adapt the pattern for different themes and projects.
The yarn weight and hook size also influence the final result. Thicker yarn produces a bold, fluffy star, while thinner yarn creates a delicate and refined piece. Beginners may find it easier to work with medium-weight yarn because it shows stitch definition clearly. Whatever materials you choose, the structure of the star remains the same, allowing easy adaptation.
Finishing touches bring the motif to life. Blocking, adjusting the points, and securing all loose ends contribute to a clean final appearance. A properly finished Crochet 3D Star Motif – Pattern looks professional and polished, ready to be used in a wide variety of creative applications.
Materials and Tools Needed for the Pattern
To create a beautiful Crochet 3D Star Motif – Pattern, you only need a few basic crochet supplies. The first essential item is yarn, which determines the texture and overall appearance of the motif. Acrylic, cotton, and blended yarns all work well for this project. Each fiber type brings a different texture and finish.
Your crochet hook size should match your chosen yarn. Using the recommended hook helps you maintain even tension and ensures that the star forms correctly. If your tension is naturally tight, you may prefer a slightly larger hook to give the motif a softer, more flexible feel. Loose crocheters may choose a smaller hook to add structure.
A stitch marker is helpful if you want to keep track of rounds or stitch counts. While stars are usually easy to follow, the 3D version may include more detailed steps that require precision. The stitch marker ensures you never lose your place, especially when shaping the points.
A tapestry needle is essential for weaving in the ends. This step is important because a secure finish keeps the motif neat and durable. Unsecured ends may loosen over time, especially if the star is used for wearable or frequently handled projects. A clean finish improves the overall look.
Scissors are another basic tool you will need. Sharp scissors make it easier to cut yarn cleanly, preventing frayed ends. While simple, having quality scissors contributes to a smoother crochet experience. Keeping these tools organized ensures you can work comfortably on your project.
Optional materials include beads, stuffing, or decorative elements. Some crafters add a small amount of fiberfill to give the star extra dimension. Others attach beads or bells for festive ornaments. These small additions can transform the Crochet 3D Star Motif – Pattern into a personalized masterpiece.
How to Crochet the 3D Star Motif Step by Step
Creating your own Crochet 3D Star Motif – Pattern begins with forming the center. Many patterns start with a magic ring, into which you make several stitches, often single or double crochets. This tight base pulls together to create a strong foundation for the star’s structure. Take your time to make the ring secure.
Once you finish the center, you begin building the first round of points. Each point typically involves a combination of stitches that increase in height. You may start with a single crochet, then work into half double crochet, double crochet, and even treble crochet, depending on the design. These height changes create the signature sharp tips.
After completing one point, you repeat the same sequence around the motif. Consistency is the key. Each point should look identical so that the final star maintains symmetry. The number of points depends on the pattern, but five-point stars are the most traditional and recognizable.
To create the 3D effect, you may crochet two identical stars. Once finished, you place them together and stitch around the edges, leaving a small opening. If you want, you can add a bit of stuffing before closing the seam. This creates a soft, puffy star with remarkable depth and charm.
Another 3D technique involves folding parts of the star as you crochet. This method does not require stuffing but instead relies on strategic stitch placement. The result is a firm and structured motif that naturally stands out in relief. Both methods work beautifully, and you can choose the one that suits your project.
When the crocheting is complete, shape the star gently with your hands. You can pull the points lightly to refine them, ensuring a crisp outline. Once blocked and adjusted, your Crochet 3D Star Motif – Pattern will be ready to shine in any craft project you have in mind.
Creative Uses for the 3D Star Motif
One of the most exciting parts of making a Crochet 3D Star Motif – Pattern is deciding how to use it. These stars fit perfectly into home décor projects. You can string multiple stars together to create garlands, festive wall hangings, or nursery decorations. Their cheerful shape instantly brightens any room.
During holiday seasons, 3D crochet stars become wonderful ornaments. You can hang them on Christmas trees, add them to wreaths, or use them as gift toppers. With the right colors, they become memorable handmade accents that your friends and family will cherish for years.
Another idea is incorporating the stars into wearable accessories. They can be used as appliqués for hats, scarves, or bags. A single 3D star can elevate a simple piece into something special. Crafters who enjoy personalizing their wardrobe will appreciate this creative touch.
The motif also works beautifully in baby projects. You can add stars to blankets, mobiles, or crib decorations. The soft, playful design makes it ideal for nurseries. Just make sure to attach them securely if used in items for babies or children.
You can also create full projects using only stars. For example, joining several 3D stars together can form a unique table runner, throw blanket, or decorative pillow cover. These pieces become conversation starters due to their dimensional effect and artistic charm.
Finally, the star motif is perfect for handmade gifts. Whether given individually or used in larger projects, the Crochet 3D Star Motif – Pattern adds a personal and thoughtful touch. Handmade stars carry meaning and creativity, making them ideal for special occasions.
FAQ About Crochet 3D Star Motifs
What skill level is required to make a Crochet 3D Star Motif?
Most versions are beginner-friendly, though some patterns may include advanced stitches. Basic crochet knowledge is usually enough.
Can I use any yarn for the 3D star motif?
Yes, you can use any yarn, but medium-weight yarn gives the best definition for beginners.
How can I make the star stiffer?
You can block the star or use fabric stiffener. Thicker yarn also creates a firmer structure.
Do I need stuffing for a 3D star?
It depends on the pattern. Some stars are stuffed to enhance dimension, while others rely on layered construction.
How many points does a star motif usually have?
Most patterns use five points, but you can create stars with six or more points for a different visual effect.
Can I join multiple 3D stars together?
Absolutely. They can be joined to create garlands, blankets, or decorative pieces.
Video Tutorial
The Crochet 3D Star Motif – Pattern is a versatile, beautiful, and enjoyable project for any crochet enthusiast. This article guided you through the structure, materials, step-by-step process, and creative applications of this charming motif. With practice and creativity, you can adapt the design to countless uses and personalize it in meaningful ways. If you found this tutorial helpful, feel free to share your honest opinion and suggest topics you would like to see next. Your feedback helps bring even better content in the future.