Quilt Crossroads Block – Pattern is a classic design cherished by quilters for its balanced geometry, symbolic meaning, and versatility across projects. In this article, you’ll explore how to create this timeless block, how to adapt it to different styles, and how to elevate your quilting skills while keeping your work visually striking and structurally sound. Throughout the text, the key term Quilt Crossroads Block – Pattern will appear to support SEO and maintain clarity for readers looking to master this craft. This guide is written in a friendly, approachable tone, but also aims to provide a deeply informative and well-structured learning path.
The Quilt Crossroads Block – Pattern embodies a sense of direction and unity, often symbolizing life’s intersecting paths. Quilters appreciate this block not only for its beauty but for the message it carries. The construction is based on straightforward shapes—often squares, rectangles, and half-square triangles—making it suitable for beginning quilters, while still offering plenty of creative room for experienced makers. With the right techniques, fabric choices, and layout planning, this block becomes a powerful design element.
Before diving into specific techniques, it’s helpful to understand why the Quilt Crossroads Block – Pattern remains so popular. Its geometric balance works beautifully in quilts of all sizes, from wall hangings to full-bed quilts. The block adapts easily to modern or traditional color palettes. It also provides strong visual movement when repeated, making it excellent for scrap quilts, coordinated sets, and sampler collections. With the foundations set, let’s move into the structured breakdown of this classic quilting design.
Understanding the Structure of the Crossroads Block
The Quilt Crossroads Block – Pattern is built on a foundation of symmetry, which helps the eye navigate the intersecting lines that define it. Each unit tends to mirror its opposite side, allowing beginners to practice alignment and accuracy.
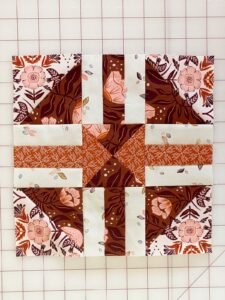
The core of the block typically consists of intersecting strips or triangles that form the “crossroads.” Precision cutting ensures these elements come together with clean intersections. Using a rotary cutter and a reliable quilting ruler is essential for this stage.
Color placement plays a crucial role in emphasizing the visual crossroads. Light-versus-dark contrast is commonly used to make the center intersection stand out. A monochromatic palette, on the other hand, offers a softer, blended look.
Quilters often experiment with adding borders or sashing around the block. This enhances its structural presence in a full-size quilt and helps maintain consistent spacing. A narrow border can frame the design elegantly.
Pressing techniques also influence the final appearance of the block. Pressing seams to one side, or open when needed, reduces bulk and allows seams to lock neatly. This ensures crisp points and a clean final assembly.
Finally, checking measurements as you progress prevents distortions that could affect the entire quilt top. Taking time at each stage ensures the Quilt Crossroads Block – Pattern remains sharp, symmetrical, and visually compelling.
Fabric Selection and Color Planning
Choosing fabrics for the Quilt Crossroads Block – Pattern is one of the most enjoyable steps. This block thrives on thoughtful color contrast, pattern placement, and fabric texture.
Start by selecting two or three primary fabrics that contrast well. High-contrast combinations highlight the crossroads shape, making the geometry pop from a distance. This works especially well in large quilts.
If you prefer a more subtle design, choose fabrics from the same color family. Tone-on-tone prints give a soft, blended appearance that still maintains the structure of the block without overwhelming the eye.
Many quilters use scrap fabrics to create dynamic and unpredictable versions of this pattern. The crossroads lines offer a natural anchor, helping unify otherwise random fabrics into a cohesive, artistic layout.
Fabric scale also matters. Small prints work best for cutting accuracy and maintaining clear lines, while large-scale prints may distort or lose their intended appearance in smaller block pieces.
Prewashing your fabric can prevent shrinkage and bleeding later in the quilting process. This is especially important if you’re using highly saturated colors that might blend into lighter fabrics.
Take time to lay out your fabrics before cutting. Visualizing the Quilt Crossroads Block – Pattern beforehand ensures the colors flow naturally and reduces mistakes during assembly.
Step-by-Step Sewing Tips
Cutting accuracy is the foundation of a successful Quilt Crossroads Block – Pattern. Begin by measuring each piece twice before cutting to avoid misalignment in the later steps.
Chain piecing can speed up your workflow while keeping your seams consistent. This method works especially well for repetitive units like squares and triangles within the block.
Use a consistent seam allowance—typically ¼ inch—to maintain proportional accuracy. Even a small difference can distort the symmetry of the crossroads layout.
After stitching each unit, press it lightly to set the seam. Then open it and press again in the direction that reduces bulk. This ensures the pieces lie flat and connect smoothly during assembly.
As you join larger units, pin at all matching points. The intersections of the crossroads must align perfectly to maintain the visual impact of the Quilt Crossroads Block – Pattern.
Finish by trimming the block to its final measurement. This step guarantees uniformity among all blocks in your quilt, ensuring clean assembly when constructing the quilt top.
Finishing, Quilting, and Displaying Your Work
Once your block is complete, consider how you’ll incorporate it into a full quilt. The Quilt Crossroads Block – Pattern works beautifully on its own or in combination with other blocks.
If you’re creating a repeating quilt, arrange the blocks on a flat surface or design board before stitching them together. This helps visualize the flow of color and geometry across the quilt.
Choose a quilting method that enhances the crossroads structure. Straight-line quilting often complements the block’s geometric style, while free-motion quilting can add softness and texture around the borders.
Adding a border can frame the quilt and stabilize the edges. Choose a fabric that complements the main colors without overwhelming the central design.
Binding is the final touch. For a cohesive look, use a fabric included within the block. For contrast, pick a bold color that helps the quilt stand out.
Once finished, your quilt can be displayed on walls, couches, or beds. The symbolism and visual clarity of the Quilt Crossroads Block – Pattern make it an excellent gift or a memorable keepsake.
FAQ – Quilt Crossroads Block – Pattern
What makes the Crossroads Block unique?
Its symmetrical, intersecting design symbolizes pathways and direction while offering visual balance and adaptability.
Is this block suitable for beginners?
Yes. The block uses simple shapes, making it accessible, but still offers room for skill growth.
What size should I start with?
Twelve-inch blocks are a popular beginner size because the larger pieces are easier to handle.
Can I use scrap fabric for this block?
Absolutely. The crossroads layout unifies scrap pieces beautifully.
How do I keep the intersections aligned?
Pin carefully, maintain a consistent seam allowance, and press seams thoughtfully to reduce bulk.
What quilting style works best with this pattern?
Straight-line quilting enhances the geometric design, but free-motion quilting also works for softer texture.
Pattern
You’ve explored the structure, fabric planning, sewing techniques, and finishing process involved in creating a stunning Quilt Crossroads Block – Pattern. This classic quilting design offers beauty, meaning, and endless creative possibilities. I hope this guide helps you feel confident and inspired as you begin your project. If you enjoyed the article, feel free to share your honest opinion and suggestions—your feedback helps improve future tutorials!