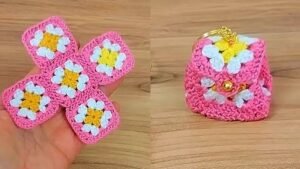
If you have been looking for a creative and easy way to start crocheting, this Crochet mini bag keychain tutorial for beginners is the perfect project for you. It combines simplicity, style, and practicality all in one. Whether you’re completely new to crochet or already familiar with basic stitches, this small and adorable bag will help you practice essential techniques while creating something truly charming. A mini bag keychain is not just a fun accessory—it also makes a great handmade gift, a cute decorative piece, or even a small holder for coins or lip balm.
The beauty of a crochet mini bag keychain is that it can be made using just a few materials, minimal yarn, and basic stitches. This makes it an excellent choice for those who want to learn crochet without feeling overwhelmed. The satisfaction of seeing your first finished project hanging on your bag, car keys, or backpack is unmatched. And the best part? You can personalize it with different yarn colors, buttons, or charms to make it truly unique.
In this Crochet mini bag keychain tutorial for beginners, you’ll learn how to choose the right yarn, use the correct hook size, and follow easy step-by-step instructions. You’ll also get helpful tips to ensure your mini bag keychain looks neat and professional. By the end of this article, you’ll be confident enough to make your own mini crochet creations, add your creative flair, and maybe even start crafting gifts for your loved ones.
Materials You’ll Need for Your Crochet Mini Bag Keychain
To begin this Crochet mini bag keychain tutorial for beginners, let’s start with the essential materials. Having the right tools will make your work much easier and more enjoyable. Even if you are a beginner, you don’t need anything fancy or expensive to start. You can use simple materials that are easily available at local craft stores or online.
First, you’ll need crochet yarn, preferably a lightweight cotton yarn or acrylic yarn. Cotton yarn is perfect for small accessories like mini bags because it holds shape well and comes in a variety of colors. Second, choose an appropriate crochet hook, typically between sizes 2.5 mm and 3.5 mm, depending on the yarn weight. Always check the yarn label for the recommended hook size to get the best results.
Next, make sure you have a pair of scissors and a tapestry needle for weaving in loose ends. A keyring or metal clasp is also needed to turn your mini bag into a functional keychain. You can find keychain rings in different shapes and colors to match your bag’s style.
For decoration, consider adding buttons, beads, or small appliqués. These little details give your mini bag an extra touch of personality. A cute heart button, a flower motif, or a contrasting color trim can make your crochet keychain stand out.
It’s also helpful to have a stitch marker, especially if you’re still learning how to count rows or rounds. This will prevent you from losing your place in the pattern and help maintain even stitches throughout your project.
Lastly, find a comfortable space with good lighting. Crocheting small pieces like a mini bag requires attention to detail, so working in a well-lit area will help you see your stitches clearly and avoid mistakes. Once you have everything ready, it’s time to start crocheting your first mini bag keychain!
Step-by-Step Instructions to Crochet a Mini Bag Keychain
Now that you have your materials ready, let’s dive into the actual steps of this Crochet mini bag keychain tutorial for beginners. The process is simple, and once you complete your first one, you’ll find it easy to repeat with different colors and styles.
Start by creating a slip knot and making a chain of 16 to 20 stitches, depending on how big you want your mini bag to be. This chain forms the base of your bag. Next, work single crochet stitches along the chain, then continue working around both sides to form an oval shape. This technique creates the bottom of the bag and ensures both sides are connected.
Continue crocheting in rounds, using single crochet or half double crochet stitches. Beginners often prefer single crochet because it’s simple and creates a tight texture. After a few rounds, your work will start to look like a small pouch. Remember to check your stitch count at the end of each round to maintain symmetry.
Once the base height is achieved, you can add a flap or lid to close the mini bag. To do this, stop crocheting in the round and work back and forth in rows on one side only. You can shape the flap using decreases or by leaving it rectangular for a simple design.
After finishing the main body and flap, cut the yarn and leave a long tail. Use the tapestry needle to weave in any loose ends and secure your stitches neatly. Then, attach your keyring or metal clasp to the top corner or back of the bag using the yarn tail or a jump ring.
Finally, decorate your mini bag however you like! You can sew on a small button, add an embroidered flower, or even stitch a little charm to the side. Once finished, you’ll have your own handmade crochet mini bag keychain ready to use or gift.
Tips and Tricks to Perfect Your Crochet Mini Bag Keychain
Even though this Crochet mini bag keychain tutorial for beginners is simple, a few helpful tips can make your project look more professional. Paying attention to small details ensures a clean and polished result that you’ll be proud to show off.
First, focus on maintaining even tension while crocheting. Uneven tension can cause your stitches to look loose on one side and tight on the other. Practice keeping your yarn wrapped around your fingers the same way each time for consistency.
Second, always count your stitches at the end of every round or row. Beginners often lose count, leading to uneven shapes. Using a stitch marker at the beginning of each round helps track your progress and prevents mistakes.
Third, block your finished mini bag if needed. Blocking is the process of lightly wetting and shaping your crochet piece so that it dries evenly. This step can make your bag look neater, especially if you used cotton yarn.
Another helpful trick is experimenting with color combinations. You can create striped mini bags by changing yarn colors after a few rows or rounds. Using two or three contrasting colors gives your keychain a vibrant and stylish look.
Also, take time to finish your work neatly. Weave in yarn ends carefully, and make sure the keyring attachment is secure. Small details make a big difference in the overall appearance of your project.
Lastly, don’t rush. Crocheting is meant to be relaxing and enjoyable. Take breaks, stretch your hands, and enjoy each step of creating something beautiful with your own hands.
Creative Ideas and Customization Options
Once you’ve completed your first Crochet mini bag keychain, you can have fun exploring different variations and styles. This project is extremely versatile, so you can adapt it to match your personal taste or even turn it into a small business idea by selling handmade keychains.
Try making mini bags of different shapes. Instead of a rectangle, you could create circular, heart-shaped, or square designs. A round mini bag, for instance, looks very cute and trendy.
Experiment with different stitch patterns. Once you’re comfortable with single crochet, you can try double crochet, puff stitches, or shell stitches to add texture and character to your mini bags.
Add small embellishments to make your mini bag stand out. Buttons, sequins, bows, or tiny tassels give it personality and charm. If you’re giving it as a gift, you can even attach a small name tag or initials for a personalized touch.
Play around with yarn textures and colors. For example, using metallic yarn gives a modern look, while pastel colors create a soft and sweet style. Mixing textures can also produce a visually appealing result.
You can also adjust the size of your mini bag keychain. Making it slightly larger allows you to use it as a coin purse or lip balm holder. Making it smaller turns it into a decorative charm for zippers or backpacks.
Finally, think about seasonal themes—crochet red and green mini bags for Christmas, pastel ones for spring, or bright tropical shades for summer. With creativity, the possibilities are endless.
Frequently Asked Questions (FAQ)
1. What kind of yarn should I use for a crochet mini bag keychain?
Lightweight cotton yarn or acrylic yarn works best. Cotton holds its shape and provides a neat texture, while acrylic is affordable and easy to work with.
2. How long does it take to make a crochet mini bag keychain?
For beginners, it usually takes about one to two hours to complete, depending on your crochet speed and design complexity.
3. Can I wash my crochet mini bag keychain?
Yes! Hand wash it gently with mild soap and let it air dry. Avoid machine washing to maintain its shape and durability.
4. Do I need to know advanced stitches for this project?
Not at all. This Crochet mini bag keychain tutorial for beginners only requires basic stitches like chain, single crochet, and slip stitch.
5. What size crochet hook should I use?
A 2.5 mm to 3.5 mm hook is ideal, but always check your yarn label for recommendations.
6. How do I attach the keyring to the mini bag?
Use the yarn tail or a metal jump ring to securely connect the keyring to the top of your mini bag.
7. Can I sell the mini bags I make?
Absolutely! Handmade mini bag keychains are popular craft fair and online shop items. Just make sure your design is original and well-finished.
Video Tutorial
In this Crochet mini bag keychain tutorial for beginners, you learned how to gather materials, follow easy crochet steps, and personalize your mini bag with unique touches. This project is a wonderful introduction to the world of crochet, helping you build confidence and creativity while making something practical and adorable.
Now that you know how to make your own crochet mini bag keychain, it’s time to grab your hook, choose your favorite yarn colors, and start creating! Whether for personal use or as gifts, each piece you make carries your unique handmade touch.
If you enjoyed this tutorial, please leave your honest opinion and suggestions. Your feedback helps improve future guides and inspires more creative crochet projects for beginners like you.