If you love sewing, quilting, or adding a handmade touch to your home décor, this Apple Mug Rug Tutorial Quilt Pattern is the perfect project to inspire your creativity. A mug rug is a charming mini quilt, just the right size for a cup of coffee and a snack, and this apple-themed design combines practicality with a delightful seasonal look. Whether you are a beginner quilter or an experienced fabric artist, this project is a wonderful way to practice quilting techniques while creating something both beautiful and useful.
The Apple Mug Rug Tutorial offers an enjoyable experience that allows crafters to explore color coordination, fabric selection, and precise stitching. With its small size, it’s the ideal quilting project for those short on time but who still want to enjoy the satisfaction of finishing a handmade piece. You’ll learn how to cut, piece, and quilt your design step-by-step, following a simple yet visually striking quilt pattern inspired by apples.
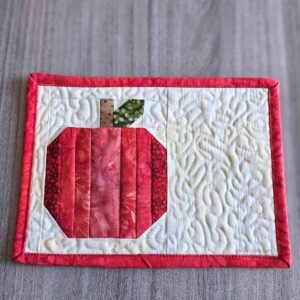
This guide will show you how to make your very own apple-shaped mug rug, from gathering the materials to finishing with binding and decorative details. The best part? It’s a fun, low-stress project that can also be a thoughtful handmade gift for friends, teachers, or anyone who loves a cozy, personalized touch. Let’s dive into this Apple Mug Rug Tutorial Quilt Pattern and learn how to transform small pieces of fabric into something truly special.
Gathering Materials for Your Apple Mug Rug
Before beginning your Apple Mug Rug Tutorial, it’s essential to gather the right materials. A successful quilted mug rug starts with a clear vision of your design and a selection of fabrics that complement each other. Choose high-quality cotton fabric, as it handles well and provides durability for everyday use.
You will need a few basic quilting tools: a rotary cutter, a self-healing cutting mat, quilting ruler, sewing machine, and thread. For batting, use a thin layer of cotton or polyester to give your mug rug a comfortable thickness without making it bulky. Don’t forget an iron and pressing surface for crisp seams and a professional finish.
For the apple design, select fabrics in shades of red, green, and brown. These colors will mimic the natural tones of a real apple, making your quilted piece both charming and realistic. You can even use scraps from previous projects, making this Apple Mug Rug Tutorial an eco-friendly craft.
A key tip is to pre-wash your fabrics to prevent color bleeding later. This simple step ensures your finished quilt pattern will remain vibrant and consistent. Always press your fabrics before cutting to maintain accurate measurements and clean edges.
Additionally, prepare a few optional embellishments such as embroidery thread or small appliqués. These can be used to personalize your mug rug and make it uniquely yours. Small details like embroidered veins on the leaf or a stitched apple stem can elevate your Apple Mug Rug Tutorial Quilt Pattern from simple to spectacular.
Once your materials are ready, organize them neatly in your workspace. Clear organization prevents mistakes and helps you stay focused throughout the quilting process.
Cutting and Piecing Your Apple Mug Rug
The next step in this Apple Mug Rug Tutorial Quilt Pattern is cutting and assembling your fabric pieces. Precision is the key to achieving a balanced and clean design. Using your quilting ruler and rotary cutter, carefully cut the shapes for the apple body, leaf, and stem according to your chosen quilt pattern.
You can find simple apple templates online or draw one yourself on paper before transferring it to the fabric. Make sure to cut your fabric slightly larger than the template to allow for seam allowances. Consistency in cutting ensures that your pieces will align perfectly when sewn together.
When piecing your mug rug, start with the apple’s main body. Sew the fabric pieces together with a ¼-inch seam allowance, pressing each seam flat as you go. This will help your Apple Mug Rug Tutorial come together smoothly without puckering or distortion.
Next, attach the leaf and stem pieces. You can choose to applique them on top or piece them into the main design. Either method works well, depending on your skill level and preferred style. The applique technique allows more flexibility with shapes, while piecing creates a traditional quilted effect.
After assembling all the components, trim your apple shape neatly. This step is where your mug rug begins to take on its recognizable form. Remember, it doesn’t have to be a perfect circle—slightly irregular shapes often add charm and personality to handmade quilts.
Finally, check all seams for accuracy and strength. Small adjustments now can make a big difference in the final look of your Apple Mug Rug Tutorial Quilt Pattern.
Quilting and Binding Your Apple Mug Rug
Now that your apple top is complete, it’s time to quilt and bind your mug rug. This stage is where your project really starts to shine. Layer your quilt sandwich: backing fabric (right side down), batting in the middle, and your apple top (right side up). Pin or baste the layers together to prevent shifting.
When quilting, you can follow the shape of the apple or experiment with creative stitch lines. For example, try quilting curved lines to mimic the apple’s roundness or diagonal crosshatching for a more modern look. Whatever you choose, take your time and enjoy the process—quilting adds both texture and durability to your Apple Mug Rug Tutorial Quilt Pattern.
After quilting, it’s time for binding. Cut fabric strips about 2 inches wide and long enough to wrap around the edges of your mug rug. Fold the strip in half lengthwise and press it. Attach the binding to the front side, then fold it over the edge and hand-stitch it to the back for a clean, polished finish.
If you’re feeling adventurous, consider using contrasting colors or patterns for your binding. This adds an extra pop of visual interest to your Apple Mug Rug Tutorial. For example, a green binding can resemble the apple’s leaf, while a brown or plaid print gives it a rustic touch.
Always press your finished mug rug one final time to remove wrinkles and set the seams. The result should be a smooth, flat, and sturdy mini quilt that’s both functional and decorative.
This is the perfect stage to admire your work and appreciate the effort you’ve invested into every stitch of your Apple Mug Rug Tutorial Quilt Pattern.
Creative Ideas and Personal Touches
Once you’ve completed the basic version of the Apple Mug Rug Tutorial, you can experiment with creative variations. Consider making a set of mug rugs in different fruit shapes—pears, oranges, or strawberries—for a cheerful kitchen display.
Personalization is another fun option. Add embroidered initials, a small heart, or the year to make each mug rug a memorable keepsake. These thoughtful additions make your Apple Mug Rug Tutorial Quilt Pattern not only a project but also a meaningful gift idea.
You can also play with different textures by mixing fabrics such as linen, flannel, or even denim scraps. Combining materials adds dimension and gives your mug rug a tactile quality that enhances its handmade charm.
If you enjoy seasonal décor, try creating apple mug rugs for autumn or back-to-school gifts. Pair them with apple-scented candles or homemade jam for a delightful themed present. These small projects are quick to make and bring warmth to any table setting.
Don’t forget to photograph your finished pieces! Sharing your creations online or with friends can inspire others to try this Apple Mug Rug Tutorial Quilt Pattern too. Showcasing your work is a rewarding part of the crafting journey.
Finally, remember that each mug rug you create is a reflection of your creativity and love for handmade art. There’s no right or wrong way—just your unique expression through fabric and thread.
FAQ – Apple Mug Rug Tutorial Quilt Pattern
1. What is a mug rug?
A mug rug is a small quilted mat, larger than a coaster but smaller than a placemat, designed to hold a cup and a small snack.
2. Can beginners make the Apple Mug Rug Tutorial Quilt Pattern?
Yes! This project is ideal for beginners. The steps are simple and forgiving, offering a great introduction to quilting techniques.
3. What fabrics work best for this project?
High-quality cotton fabrics are recommended because they are durable, easy to sew, and washable.
4. How do I clean my mug rug?
Machine wash gently with mild detergent and air dry to maintain shape and color.
5. Can I make other fruit designs with the same pattern?
Absolutely! You can adapt the same steps to create other fruit shapes, like pears, oranges, or peaches.
6. How long does it take to make one mug rug?
Most people can complete one in a few hours, depending on their sewing speed and experience level.
7. Do I need a sewing machine?
While a sewing machine is recommended for efficiency, you can hand-sew the entire project if you prefer.
8. Can I sell mug rugs made from this pattern?
Yes, handmade versions based on this Apple Mug Rug Tutorial Quilt Pattern can be sold, especially when you add your own personal touches.
9. Is batting necessary for a mug rug?
Batting adds softness and structure, so it’s highly recommended, though optional if you want a thinner mat.
10. What’s the best way to store mug rugs?
Keep them flat in a dry, clean place. Avoid folding to prevent creases and distortion.
The Apple Mug Rug Tutorial Quilt Pattern is a delightful, beginner-friendly quilting project that brings charm, warmth, and creativity to your everyday life. Through cutting, piecing, quilting, and binding, you’ve learned how to turn small fabric scraps into something both practical and beautiful. Whether you make it for yourself or as a handmade gift, each mug rug is a unique piece of art.
Now that you’ve explored this full guide, we’d love to hear from you! Share your honest opinion, experiences, and suggestions below. Every crafter’s journey is special, and your feedback can inspire others to begin their own Apple Mug Rug Tutorial Quilt Pattern adventure.