The Crochet Mouse Ears Hat Pattern is a timeless and playful project that combines comfort, style, and creativity. Whether you are a beginner looking to expand your crochet skills or an advanced crafter searching for your next fun idea, this pattern is both versatile and enjoyable to make. A hat with mouse ears is not only adorable for children but also trendy for adults who love whimsical and cute fashion accessories. By following the right instructions and practicing some basic stitches, you can create a unique piece that is perfect for gifting, wearing, or even selling at handmade craft fairs.
When it comes to crochet patterns, the Crochet Mouse Ears Hat Pattern stands out for its charming details and functionality. The rounded ears add a touch of character to a simple beanie, transforming it into a playful accessory suitable for birthdays, costumes, or themed photo sessions. The best part is that you can experiment with yarn colors, textures, and sizes to customize the hat for any age group. From newborns to adults, this pattern is easily adaptable, making it a favorite among crocheters worldwide.
Creating a Crochet Mouse Ears Hat Pattern also gives crafters a sense of accomplishment, as it balances simplicity with creativity. The process typically involves crocheting a standard hat base and then adding the signature mouse ears on top. With just a few adjustments in stitch counts and yarn thickness, the pattern can be personalized to suit any occasion. If you are passionate about crochet and love working on cute projects, this hat is a must-try.
Why Choose a Crochet Mouse Ears Hat Pattern
The Crochet Mouse Ears Hat Pattern is loved by many because of its versatility and fun design. Unlike plain crochet hats, this one has a character-inspired detail that appeals to children and adults alike. It is not just a winter accessory but also a creative costume piece that can be used for themed parties or holidays.
Another reason to choose this pattern is its adaptability. You can use different yarn weights, colors, and hook sizes to achieve various looks. For instance, a soft pastel yarn creates a sweet look for babies, while bold or darker colors can give the hat a more stylish edge for teens and adults. The choice of yarn and finishing touches allows each crafter to make a unique version of the design.
This pattern is also an excellent choice for beginners. Since it usually involves basic stitches such as single crochet, half-double crochet, or double crochet, it serves as a great practice project for learning tension control and stitch consistency. Even if you are new to crochet, you will find it rewarding and relatively easy to complete.
For those who enjoy making handmade gifts, the Crochet Mouse Ears Hat Pattern is ideal. Handmade hats are thoughtful, cozy, and personal. The addition of the mouse ears makes the gift even more special, showing extra care and creativity. Family members and friends will appreciate the effort behind such a one-of-a-kind item.
In addition, many crocheters choose this pattern as part of their small business projects. Crochet hats with mouse ears are popular in online shops and at craft fairs. Because of their unique style, they attract attention and often sell quickly. This makes the pattern not only enjoyable but also profitable for those who want to monetize their craft.
Finally, the pattern is enjoyable because it sparks creativity. You can add embellishments like bows, flowers, or buttons to make each hat even more personal. This means no two hats need to look the same, giving you endless design opportunities while working with the same base pattern.
Materials and Tools Needed for Crochet Mouse Ears Hat Pattern
Before starting your Crochet Mouse Ears Hat Pattern, gathering the right materials ensures a smooth and enjoyable crafting process. The first essential item is yarn. Most patterns recommend medium-weight yarn for durability and comfort, but you can experiment with lightweight yarns for a softer texture or bulky yarns for a cozy winter hat.
Next, you will need the right crochet hook. Hook size depends on the yarn you choose, but many crocheters prefer sizes ranging from 4.0mm to 5.5mm for this type of hat. Using the recommended hook size ensures the correct stitch tension and helps the hat fit comfortably.
A yarn needle is also essential for finishing your work. You will use it to weave in loose ends and securely attach the mouse ears to the hat. This step is crucial to ensure the hat is sturdy and long-lasting, especially if it will be worn by active children.
You may also want to use stitch markers, especially if you are a beginner. These tools help keep track of rounds and prevent mistakes, making the project less stressful and more enjoyable. They are particularly useful when shaping the mouse ears, which require precise stitch counts.
Scissors are another basic tool you will need. A sharp pair makes cutting yarn easier and prevents fraying. Keeping them handy will save time and effort while you work on your hat.
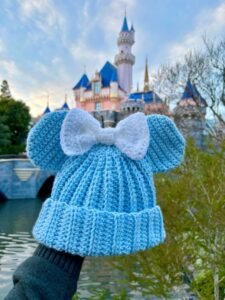
Finally, consider adding optional decorations. Many crocheters like to add a bow between the ears to mimic popular character-inspired looks. You can crochet the bow or use a premade ribbon for convenience. This extra detail enhances the overall charm of the Crochet Mouse Ears Hat Pattern.
Step-by-Step Guide to Crochet Mouse Ears Hat Pattern
Starting your Crochet Mouse Ears Hat Pattern usually begins with creating the base hat. Most crafters use the magic circle technique to start the crown, gradually increasing stitches to form the desired size. This method ensures a smooth and seamless start to your project.
Once the crown is established, you will continue crocheting in rounds to create the body of the hat. Depending on the size you are making, this may involve several rounds of single or half-double crochet stitches. This part is repetitive but relaxing, giving the hat a sturdy and consistent shape.
After the hat base is complete, the next step is making the mouse ears. Each ear is typically crocheted as a flat circle that is then doubled to create thickness and structure. This prevents the ears from flopping over and helps them stand upright when attached to the hat.
Attaching the ears requires careful placement. To achieve a balanced look, many crocheters pin the ears to the hat first before sewing them in place. Once the position is correct, use a yarn needle and strong stitches to secure them firmly. This step is important for durability, especially if the hat will be used frequently.
If you want to personalize your hat further, you can add embellishments such as bows, contrasting trims, or even embroidered initials. These small details can turn a simple hat into a meaningful keepsake or a fashionable accessory.
Finally, finish by weaving in all loose ends and checking the overall shape. Try the hat on or place it on a mannequin head to ensure it looks balanced and appealing. With patience and creativity, your Crochet Mouse Ears Hat Pattern will come to life beautifully.
Tips for Perfecting Your Crochet Mouse Ears Hat Pattern
One of the best tips for succeeding with the Crochet Mouse Ears Hat Pattern is to choose quality yarn. A soft yet durable yarn not only makes the hat comfortable but also ensures the ears maintain their shape. Acrylic blends are often recommended because they are easy to care for and hold their structure well.
Another useful tip is to check your gauge before starting. Different yarns and hook sizes can change the size of your stitches, which may affect the fit of the hat. By making a small swatch first, you can avoid the frustration of ending up with a hat that is too large or too small.
Take your time when attaching the ears. This is the most noticeable feature of the hat, and symmetrical placement makes a big difference in the final look. Using pins to hold them in place before sewing will help you achieve accuracy.
Don’t hesitate to experiment with colors. While traditional mouse ears are often black, you can choose any color combination you like. Bright colors can make the hat playful, while neutral tones give it a more subtle charm. The versatility of the pattern allows for endless creativity.
If you are making the hat for a baby or toddler, ensure that all parts are securely attached and safe. Avoid small embellishments that could pose a choking hazard. Safety should always be a top priority when crafting for children.
Lastly, practice makes perfect. If your first attempt is not exactly as you imagined, don’t get discouraged. Crochet is a skill that improves with repetition, and each project will help you become more confident in your craft.
Frequently Asked Questions (FAQ)
1. What size can I make with a Crochet Mouse Ears Hat Pattern?
You can make sizes ranging from newborn to adult. By adjusting the number of rounds and stitches, the pattern can be customized for any head size.
2. Do I need advanced crochet skills to complete this pattern?
No, the Crochet Mouse Ears Hat Pattern is beginner-friendly. It mainly involves basic stitches, making it accessible for those who are still learning.
3. How long does it take to finish the hat?
On average, it may take between 3 to 5 hours, depending on your skill level and the size of the hat. Smaller sizes are completed faster.
4. What type of yarn is best for this pattern?
Medium-weight acrylic yarn is commonly recommended because it is durable, washable, and helps the ears hold their shape.
5. Can I add other decorations to the hat?
Yes, you can add bows, buttons, or even embroidery to personalize the design. Just make sure embellishments are securely attached, especially for children’s hats.
6. Is this hat suitable for selling at craft fairs or online shops?
Absolutely. The Crochet Mouse Ears Hat Pattern is popular and makes an attractive handmade product for resale.
Video Tutorial
The Crochet Mouse Ears Hat Pattern is a fun, practical, and creative project that anyone can enjoy. From choosing materials to adding the final touches, each step offers opportunities to learn and express your style. Whether you are making it for a loved one, a costume, or as part of your handmade business, this pattern brings both joy and satisfaction.
Now that you know how to create a charming hat with mouse ears, it’s time to pick up your yarn and hook and start experimenting. We hope this guide has been helpful and inspiring. Please share your honest opinion and suggestions—we’d love to know your thoughts about this article and your experiences with the pattern.