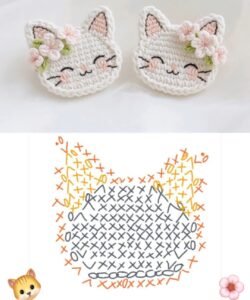
The Crochet Kitty Face Pattern is one of the most charming and versatile crochet designs loved by crafters worldwide. This pattern allows you to create adorable kitty faces that can be used for a variety of projects, such as appliqués, coasters, keychains, pillow decorations, or even as part of larger crochet pieces like blankets and bags. Because it is simple yet visually appealing, the Crochet Kitty Face Pattern is perfect for beginners looking to learn new stitches and for experienced crocheters who want to add a cute touch to their creations.
When working on a Crochet Kitty Face Pattern, it’s important to understand the basic stitches, shapes, and techniques needed to achieve a polished result. The pattern often involves creating a round base for the kitty’s head, then adding small features like ears, eyes, a nose, and whiskers. With the right yarn colors and hook size, you can customize your kitty face to match any theme or project, making it a flexible and creative design.
Another reason the Crochet Kitty Face Pattern is so popular is its ability to connect crocheters of all skill levels. Whether you’re making a small batch of kitty faces for a craft fair or designing a one-of-a-kind gift for a cat lover, this pattern offers endless possibilities. It’s also a fantastic way to practice color changes, small details, and finishing touches, all of which are essential crochet skills. By learning this pattern, you can expand your crochet abilities while creating something undeniably adorable.
Understanding the Basics of the Crochet Kitty Face Pattern
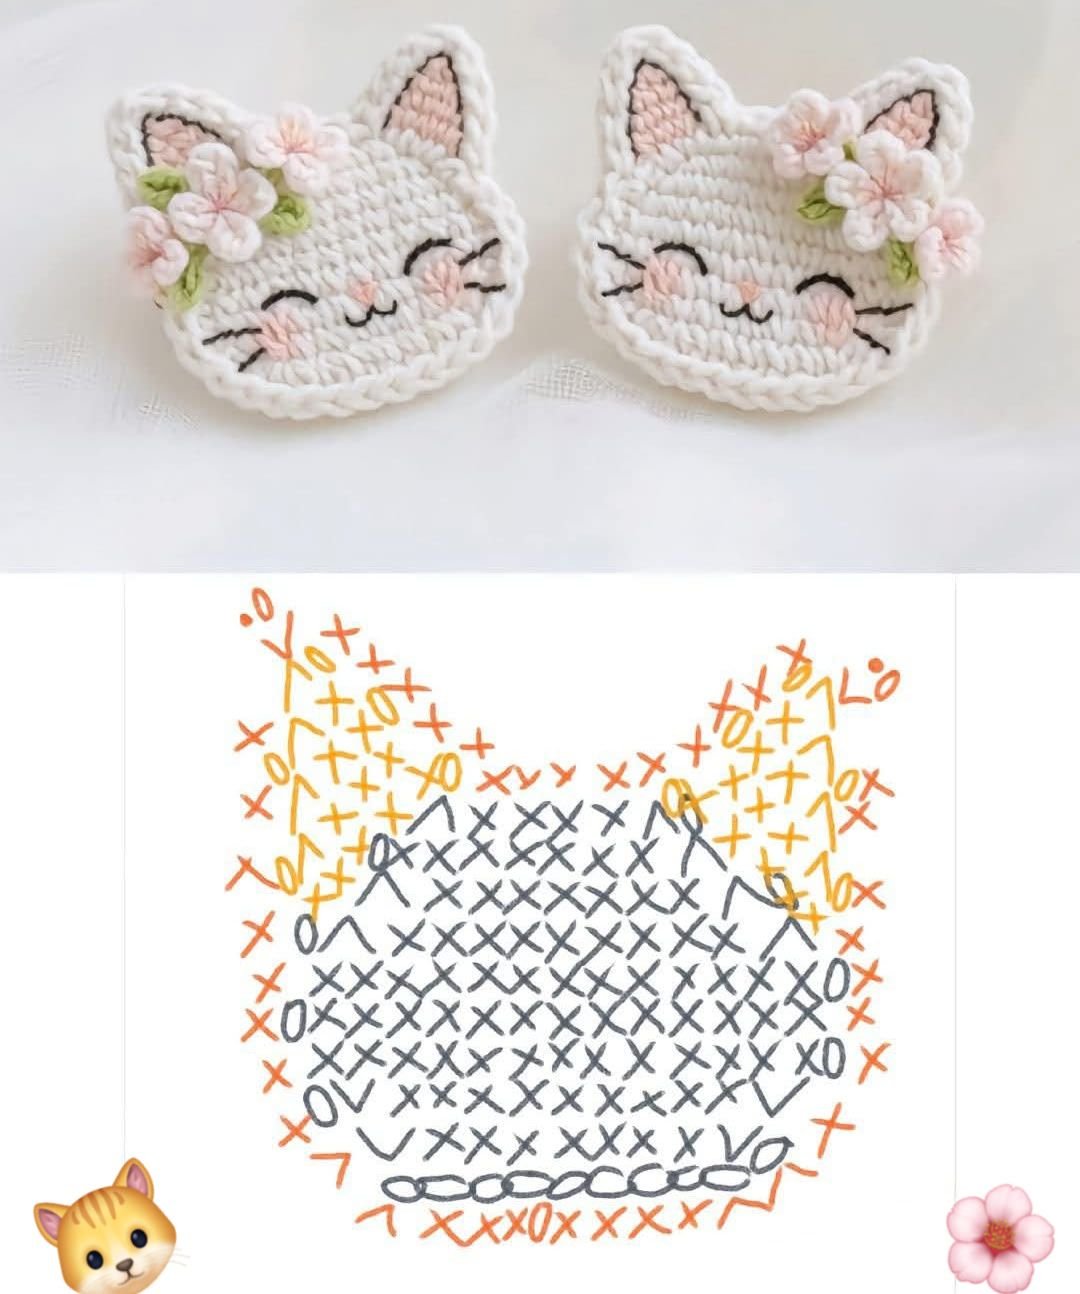
To successfully complete a Crochet Kitty Face Pattern, it’s essential to start with the basics. This pattern usually begins with a magic ring or a small chain circle, forming the foundation of the kitty’s head. Once the circle is established, rounds of stitches are added to increase the size, ensuring a smooth and even base for the face.
Choosing the right yarn and hook size is another key factor in mastering the Crochet Kitty Face Pattern. Thinner yarns create a delicate and lightweight look, ideal for small appliqués or decorative accents, while thicker yarns result in bolder, more durable kitty faces. The hook size should match the yarn weight to ensure tight, even stitches without holes between them.
After creating the base, the next step is to shape the ears. Most Crochet Kitty Face Patterns use simple triangle shapes for ears, which can be crocheted separately and then sewn on or worked directly into the circle as you go. This small detail gives your kitty face its characteristic look and makes it instantly recognizable as a cat.
Adding facial features is where the Crochet Kitty Face Pattern truly comes to life. Using a contrasting yarn or embroidery thread, you can stitch eyes, a nose, and whiskers directly onto the face. Safety eyes can also be used for a more polished, toy-like appearance, especially if the kitty face will be part of a children’s item.
It’s also worth noting that tension plays a big role in how your Crochet Kitty Face Pattern turns out. Keeping your stitches even and consistent ensures a neat, professional finish. Beginners may need to practice a few times to get the right feel, but with patience, the result is always rewarding.
Finally, blocking or lightly pressing your finished kitty face can help it hold its shape better. This step is optional but recommended for those who want a truly crisp and flat appearance, especially if the piece will be attached to something else like a blanket or clothing.
Creative Uses for the Crochet Kitty Face Pattern
One of the most appealing aspects of the Crochet Kitty Face Pattern is how versatile it is. This small yet eye-catching design can be incorporated into countless projects, making it a staple in many crocheters’ repertoires.
You can use the Crochet Kitty Face Pattern as an appliqué to decorate items such as tote bags, sweaters, hats, and scarves. This instantly personalizes and adds charm to otherwise plain accessories, making them stand out as handmade treasures.
Another creative way to use this pattern is by making coasters or small mats. Using sturdy yarn and a slightly larger hook, the kitty faces can be transformed into functional home décor items that bring a playful touch to tables or countertops.
If you enjoy making gifts, the Crochet Kitty Face Pattern is perfect for keychains or small charms. By adding a metal ring or a clasp, you can create cute little accessories that are ideal for party favors, stocking stuffers, or craft fair items.
The pattern can also be scaled up to create pillows or plush toys. By using bulky yarn and enlarging the base circle, your kitty face can become the centerpiece of a cuddly cushion or a decorative pillow for a child’s room.
You can even combine multiple kitty faces to make a themed blanket or wall hanging. This is a fantastic way to showcase your creativity while practicing color changes and stitch consistency. With each square or motif featuring a different expression or color, your finished piece will be both unique and full of personality.
Finally, this pattern is a great way to use leftover yarn. Since the Crochet Kitty Face Pattern requires only small amounts of each color, it’s a sustainable project that helps reduce waste while still producing beautiful results.
Tips for Perfecting Your Crochet Kitty Face Pattern
Even though the Crochet Kitty Face Pattern is beginner-friendly, there are some tips that can make your results look even better. The first is to always count your stitches carefully. This prevents your circle from becoming uneven or lopsided, which can affect the overall appearance of the face.
Choosing the right colors is another important factor. Soft pastels give your kitty face a sweet and gentle look, while bright or bold shades make it playful and fun. You can even experiment with unusual color combinations for a whimsical twist.
Using stitch markers can also help you keep track of where each round begins and ends. This is especially useful for beginners who may lose their place in the pattern.
Another tip is to make the facial features proportionate to the size of the head. If you’re crocheting a larger kitty face, be sure to adjust the size of the eyes, nose, and ears accordingly. This keeps the design balanced and visually appealing.
Practice makes perfect. Don’t be discouraged if your first Crochet Kitty Face Pattern doesn’t look exactly as you imagined. Each attempt will improve your technique and give you a better understanding of how the pattern works.
Lastly, remember to finish your project neatly by weaving in all loose ends. This small step can dramatically improve the look of your kitty face and give it a professional finish.
Adapting the Crochet Kitty Face Pattern for Different Projects
One of the best things about the Crochet Kitty Face Pattern is how easy it is to adapt for different projects. By changing the size, color scheme, or even adding accessories, you can create a wide variety of looks from a single pattern.
For example, adding a small bow or flower to your kitty’s head can give it a playful or feminine touch. You can also embroider unique expressions to make each kitty face one-of-a-kind.
Experimenting with different yarn textures can also produce interesting results. A fluffy yarn might give your kitty a soft, plush appearance, while a smooth cotton yarn will create a crisp, defined shape.
You can also make seasonal versions of your kitty face. A Santa hat for Christmas, bunny ears for Easter, or even tiny sunglasses for summer can make your project festive and fun.
If you’re making a blanket or wall hanging, try mixing kitty faces with other animal patterns for a charming, themed design. This can be a delightful project for a child’s room or as a special gift.
Finally, you can use the Crochet Kitty Face Pattern as a teaching tool. Because it incorporates basic stitches and small details, it’s an excellent pattern for teaching friends or family members how to crochet.
FAQ About the Crochet Kitty Face Pattern
Q: Is the Crochet Kitty Face Pattern suitable for beginners?
A: Yes! This pattern is simple enough for beginners while offering enough detail to keep it interesting for experienced crocheters.
Q: What materials do I need to start a Crochet Kitty Face Pattern?
A: You’ll need yarn in your chosen colors, a matching hook size, a tapestry needle for sewing features, and optionally safety eyes or embroidery thread for details.
Q: How long does it take to make one kitty face?
A: Depending on your skill level, it can take anywhere from 30 minutes to a couple of hours to complete one kitty face.
Q: Can I sell items made from the Crochet Kitty Face Pattern?
A: Yes, handmade items based on this pattern can usually be sold, but always check if the specific pattern you’re using has any restrictions from the designer.
Q: How can I make the kitty face larger or smaller?
A: To make it larger, use thicker yarn and a bigger hook, or add more rounds to the base. To make it smaller, use thinner yarn and a smaller hook.
Q: What’s the best way to attach the kitty face to another project?
A: You can sew it directly onto the project using a tapestry needle and matching thread, or use fabric glue for a quick, no-sew option.
The Crochet Kitty Face Pattern is a delightful and versatile design that every crocheter should try at least once. From appliqués to plush toys, this pattern offers endless creative possibilities while helping you practice essential crochet skills. Whether you’re a beginner or an experienced crafter, you’ll enjoy the process of bringing these cute kitty faces to life.
We hope this article has helped you understand how to make and adapt the Crochet Kitty Face Pattern for your own projects. If you’ve tried this pattern or have tips to share, please leave your sincere opinion and suggestions below. Your feedback can inspire and help other crocheters in the community.