Creating a crochet shoe with granny squares is an exciting and creative way to combine fashion and crafting. Whether you are a beginner or an experienced crocheter, this project allows you to bring color, texture, and unique designs to your footwear. Using granny squares, you can create shoes that are not only functional but also visually striking, perfect for personal use or as gifts. These shoes are versatile and customizable, offering endless possibilities for patterns, colors, and materials.
A shoe project with granny squares requires some basic crochet skills, but it is approachable for anyone willing to follow step-by-step instructions. Each square can be made separately, giving you the freedom to experiment with different yarn types and color combinations. By assembling the squares thoughtfully, you can craft a shoe that fits perfectly and stands out as a stylish handmade accessory.
One of the advantages of making a crochet shoe with granny squares is that it allows for eco-friendly and sustainable crafting. You can repurpose leftover yarn from previous projects, reducing waste while creating something practical and beautiful. This project also fosters creativity, as each choice of square, stitch, and assembly method contributes to the overall design. The result is a unique pair of shoes that reflects your personal style and craftsmanship.
Understanding Granny Squares for Shoes
The foundation of a shoe project with granny squares is, of course, the granny square itself. Granny squares are small, square-shaped crochet motifs that can be joined together to form larger designs. They are versatile and easy to customize, making them ideal for footwear. By selecting the right yarn and hook size, you can create squares that are both durable and comfortable for shoes.
When making granny squares for shoes, it’s important to consider the tension and size of each square. Squares that are too loose may stretch over time, affecting the fit of the shoe. Conversely, squares that are too tight may make the shoe stiff and uncomfortable. By maintaining consistent tension, you ensure that your crochet shoe is not only visually appealing but also functional and wearable.
Color selection plays a crucial role in granny square shoes. You can opt for bright, contrasting colors to make the design pop or use subtle shades for a more elegant look. Experimenting with color combinations allows you to express creativity and create a shoe that matches your personal style. Each square can be a different color, forming a mosaic-like pattern that is both charming and unique.
Joining techniques are essential in a shoe project with granny squares. There are various methods to join squares, including whip stitch, slip stitch, and single crochet join. Choosing the right technique affects both the appearance and durability of your shoe. A well-joined square ensures a comfortable fit and a polished look, enhancing the overall quality of your handmade footwear.
Another important consideration is the shoe sole. For a practical crochet shoe with granny squares, you may want to add a sturdy sole made from rubber, leather, or felt. This not only protects the crochet work but also makes the shoes suitable for outdoor use. Attaching the sole securely ensures that your shoes last longer and provide adequate support.
Finally, remember that personalization is a key benefit of a shoe project with granny squares. You can add embellishments such as buttons, beads, or embroidery to make your shoes even more distinctive. These small details elevate the design, transforming a simple crochet project into a fashionable accessory that reflects your individuality.
Materials and Tools Needed
To begin a crochet shoe with granny squares, you need to gather the appropriate materials and tools. High-quality yarn is essential, as it affects the durability, comfort, and appearance of your shoes. Cotton or acrylic yarns are popular choices, but you can experiment with blends for different textures. Choosing the right color palette is also important for a cohesive and visually appealing design.
Crochet hooks are equally crucial in a shoe project with granny squares. Selecting the correct size ensures that your stitches are even and consistent. Using a hook that is too large may result in loose squares, while a hook that is too small can make the squares stiff. A good rule of thumb is to follow the yarn manufacturer’s recommendations and adjust as needed for your desired tension.
Additional materials may include a yarn needle for sewing squares together, stitch markers to track your progress, and a pair of scissors for clean cuts. If you plan to add a sole, you will also need a strong adhesive or stitching method to attach it securely. Having all materials ready before starting ensures a smoother and more enjoyable crafting experience.
Step-by-Step Guide to Creating the Shoe
The first step in making a shoe project with granny squares is to create individual squares. Start with a basic granny square pattern and make as many as needed to cover the shoe size. Count carefully to ensure you have the right number of squares for the sole, sides, and top of the shoe. Consistent size is key for a well-fitted shoe.
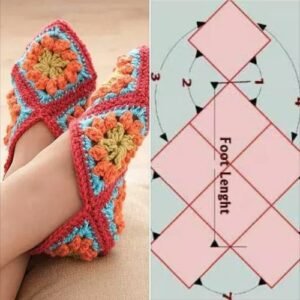
Once the squares are ready, the next step is assembly. Arrange the squares according to your design, paying attention to color and pattern placement. This step allows for creative flexibility, as you can mix and match squares to achieve the desired look. Take your time to visualize the final shoe before joining the squares.
Joining the squares is an essential part of the crochet shoe with granny squares. Use your chosen technique—whether whip stitch, slip stitch, or single crochet join—to connect the squares securely. Ensure that the seams are strong and neat to provide durability and maintain the shoe’s shape over time.
After joining, it’s time to shape the shoe. You may need to fold and stitch squares to form the toe, heel, and sides. Adjust as necessary to ensure a comfortable fit. Adding padding or lining can also improve comfort, especially for shoes intended for prolonged wear.
Next, attach the sole to your granny square shoe. Use strong adhesive or hand stitching to secure the sole. This step is crucial for making your shoe practical and wearable outside. Make sure the sole aligns with the shape of your assembled squares to prevent discomfort while walking.
Finally, add finishing touches. Weave in any loose ends, trim excess yarn, and consider decorative additions such as beads, buttons, or embroidery. These details personalize your crochet shoe with granny squares and elevate it from a simple craft to a stylish fashion statement.
Tips for Perfecting Your Crochet Shoes
One of the most important tips for a successful shoe project with granny squares is to maintain consistent tension throughout the squares. Uneven tension can lead to mismatched shapes and an ill-fitting shoe. Practice and patience are key to mastering this aspect.
Another tip is to choose yarn that is both durable and comfortable. Since shoes endure more wear than typical crochet projects, selecting high-quality yarn ensures longevity and comfort. Cotton or cotton blends are excellent choices, as they provide breathability and softness.
Proper measurement is essential for a well-fitting shoe. Take accurate foot measurements and plan the number and size of granny squares accordingly. A shoe that is too small or too large can compromise comfort and practicality.
Experiment with design variations. You can mix different stitch patterns within each granny square or combine various colors for a unique mosaic effect. This creativity is what makes a crochet shoe with granny squares stand out from store-bought footwear.
Consider adding lining or padding for extra comfort. Crochet alone may not provide enough cushioning for long wear, so adding a soft fabric lining or insole can enhance comfort without affecting the aesthetic.
Finally, don’t rush the process. Taking your time ensures precise stitching, neat assembly, and a high-quality finish. A carefully made crochet shoe with granny squares is rewarding both visually and functionally, reflecting the time and effort invested.
FAQ
Q1: Can beginners make a crochet shoe with granny squares?
Yes, beginners can make these shoes by starting with basic granny squares and following step-by-step instructions. Patience and practice are key.
Q2: What type of yarn is best for granny square shoes?
Cotton or cotton-blend yarn is ideal because it is durable, breathable, and comfortable. Acrylic yarn can also work for decorative shoes.
Q3: How many granny squares do I need for a pair of shoes?
The number depends on the shoe size and design. Typically, 12–20 squares per shoe are needed, but this varies with square size.
Q4: Can I make these shoes washable?
Yes, by choosing machine-washable yarn and securely joining squares, the shoes can be gently washed. Always follow yarn care instructions.
Q5: How do I attach the sole to crochet shoes?
Use a strong adhesive or hand stitching to attach a rubber, felt, or leather sole securely. Ensure alignment with the shape of your squares.
Q6: Can I customize the colors and patterns?
Absolutely. Customization is one of the main benefits of a shoe project with granny squares. Mix colors, stitch patterns, and embellishments for a unique look.
Video Tutorial
Creating a crochet shoe with granny squares is a rewarding project that blends creativity, practicality, and personal expression. From selecting yarn and colors to crafting squares, assembling them, and adding a sole, every step contributes to a unique and functional piece of handmade footwear. By following this guide, you can master the techniques necessary to produce stylish and comfortable shoes. Your creativity shines through each square, stitch, and pattern choice, resulting in footwear that is both charming and functional. Please leave your honest opinions and suggestions to share your experience and inspire others in their crochet journey.