Starting to crochet a flat circle pattern is one of the most fundamental skills for anyone interested in crochet. Whether you are making coasters, rugs, hats, or the base of amigurumi, learning how to create a smooth and even circle lays the foundation for countless projects. A flat circle is created by increasing stitches in a structured way so the shape stays even without curling or rippling. By practicing this basic skill, you gain control over your tension, understand stitch placement better, and open up a world of creative opportunities in crochet.
The beauty of learning to crochet a flat circle pattern is that it looks simple but teaches important techniques. You’ll discover how to work in the round, how to use increases strategically, and how to read or even design your own circular patterns. This makes it a versatile lesson whether you’re a complete beginner or an experienced crocheter seeking to refine your skills. Many handmade items start with this shape, making it an essential addition to your crochet toolkit.
Additionally, being able to crochet a flat circle pattern with consistency will give your finished pieces a polished, professional look. Circles that are uneven or wavy can throw off an entire project. Understanding the math behind increases and stitch placement allows you to customize the size of the circle, adapt it to different yarn weights, and maintain its flatness throughout. This skill not only improves your craftsmanship but also boosts your confidence in tackling larger or more complex projects.
Understanding the Basics of a Flat Circle
To crochet a flat circle pattern successfully, you first need to understand how increases work in crochet. Each round of a circle must expand evenly, which is done by adding extra stitches at regular intervals. Most patterns start with a small loop such as a magic ring or a chain joined into a ring. The first round typically consists of six to twelve stitches, depending on the stitch type, which sets the foundation for future increases.
One key aspect to keep in mind when you crochet a flat circle pattern is maintaining even tension. Uneven tension can cause the circle to buckle or ripple, which affects the final shape. Practicing with smooth, medium-weight yarn can help you see your stitches clearly and develop a feel for the right tension. This makes it easier to count your stitches accurately and ensure your increases are placed correctly.
Another tip for beginners is to mark the first stitch of each round with a stitch marker. This small step helps you keep track of where each round begins and ends, preventing confusion and mistakes. As you become more comfortable with working in the round, you may find you no longer need the marker, but it’s extremely useful when you’re just starting out. Mastering this organization skill is essential for producing a neat and professional-looking flat circle.
Step-by-Step Guide to Crocheting a Flat Circle
When you’re ready to actually crochet a flat circle pattern, begin by making a magic ring or chaining four and joining with a slip stitch to form a ring. This creates the center of your circle. Into this ring, you’ll usually work six single crochet stitches for the first round. This is the foundation that determines how the circle will grow.
In the second round of your crochet a flat circle pattern, you will double the stitch count by working two single crochets into each stitch of the previous round. This increase ensures the circle expands evenly. Counting carefully at this stage is important to prevent mistakes that could distort the shape.
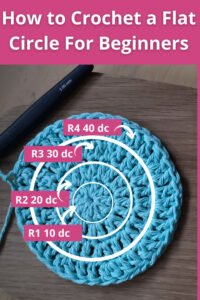
From the third round onward, the increases follow a predictable pattern. For example, in the third round, you might do one single crochet and then two in the next stitch, repeating around. In the fourth round, it becomes two single crochets and then two in the next, and so forth. This methodical approach ensures that your circle stays flat rather than curling into a bowl or ruffling like a wave.
Another detail when you crochet a flat circle pattern is stitch type. Different stitches require different starting counts and increase formulas. For instance, double crochet stitches create a larger, looser fabric and may require a starting round of twelve stitches instead of six. Adjusting your pattern for the stitch type you’re using helps maintain the right shape and size.
Don’t forget to join each round properly if you’re working in joined rounds. Slip stitches and chain stitches at the beginning of rounds can affect the seam line of your circle. Some crocheters prefer to work in a spiral without joining rounds to avoid a visible seam. Both methods are correct, so choose the one that best fits your project.
Lastly, keep checking your circle as you work. Lay it flat on a table to see if it’s curling or rippling. If it curls inward, you may need more increases; if it ripples, you may need fewer. This regular evaluation is a simple but powerful habit that will improve your ability to crochet a flat circle pattern smoothly and evenly.
Tips for Customizing Your Flat Circle
Once you’re comfortable with the basic technique, you can experiment with customizing your crochet a flat circle pattern to suit different projects. Changing the yarn weight or hook size will affect the overall size and texture of your circle. Thicker yarns and larger hooks create larger, softer circles ideal for rugs or placemats, while thinner yarns make delicate coasters or appliqués.
Another way to customize is by using different stitches. A flat circle made with half double crochet will have a different density and appearance than one made with double crochet. You can also mix stitches in creative ways to produce unique textures while still maintaining a flat shape.
Color changes are another great way to personalize your circle. By switching yarn colors at the end of a round, you can create stripes, spirals, or other visual effects. This adds character to your project and allows you to coordinate your work with home décor or personal preferences.
If you want to make your crochet a flat circle pattern larger, simply keep following the increase pattern: add one more stitch between increases on each round. This formula allows you to expand the circle indefinitely without losing its flatness. Many crocheters use this principle to make items like rugs or tablecloths that start with a simple circle and grow outward.
You can also adjust the firmness of your circle by experimenting with tension. Tighter tension creates a sturdier circle suitable for baskets or bag bases, while looser tension results in a softer, drapier circle. Learning how to control this factor gives you more creative freedom.
Finally, don’t be afraid to design your own patterns. Once you understand the basic math of increases, you can chart out exactly how you want your circle to grow. This opens the door to creating original pieces that reflect your style and imagination.
Common Mistakes and How to Avoid Them
One of the most common issues when you crochet a flat circle pattern is ending up with a bowl shape instead of a flat piece. This happens when there aren’t enough increases in each round. Double-check your stitch count after every round to ensure you’re following the pattern correctly.
Rippling is another frequent problem. This occurs when there are too many increases, causing the fabric to ruffle. The solution is to reduce the number of increases slightly or tighten your tension. Small adjustments can make a big difference in the final look of your circle.
Some crocheters struggle with a visible seam line when joining rounds. To minimize this, try working in a continuous spiral rather than joining at the end of each round. Alternatively, use an invisible join technique to create a smoother appearance.
Another pitfall is losing track of your rounds or stitches. This can lead to uneven edges and distorted shapes. Using a stitch marker and counting carefully prevents this issue and helps you maintain accuracy throughout your project.
Inconsistent tension can also affect the shape of your circle. Practice holding your yarn and hook in a way that feels comfortable and produces even stitches. Switching to a different hook size can sometimes help if your tension is too tight or too loose.
Lastly, don’t rush the process. Taking your time to place each stitch correctly and check your work regularly will greatly improve your results. Patience and attention to detail are key to mastering how to crochet a flat circle pattern successfully.
FAQ About Crocheting a Flat Circle Pattern
Q: Why does my flat circle curl up like a bowl?
A: This happens when you don’t have enough increases. Check your stitch count at the end of each round and add more increases if necessary to keep the circle flat.
Q: How do I stop my circle from rippling?
A: Rippling occurs when there are too many increases. Reduce the number of increases or tighten your tension to smooth out the fabric.
Q: Can I use any stitch to crochet a flat circle pattern?
A: Yes, but the starting stitch count and increase formula may vary depending on the stitch type. Adjust accordingly to maintain a flat shape.
Q: Should I work in joined rounds or spirals?
A: Both are valid. Joined rounds create a clear stopping point at the end of each round, while spirals eliminate the seam line for a smoother look.
Q: How can I make my flat circle bigger?
A: Keep adding rounds by following the increase pattern. Each new round should have one more stitch between increases than the previous round.
Q: What’s the best yarn for beginners to practice this pattern?
A: A smooth, medium-weight yarn (like worsted weight) in a light color is ideal for practicing. It makes stitches easier to see and count.
Video Tutorial
Learning to crochet a flat circle pattern is a foundational skill that opens up endless possibilities in the world of crochet. From coasters to rugs to the bases of hats and baskets, this simple shape is the starting point for countless projects. By understanding increases, tension, and stitch placement, you can create circles that are smooth, even, and professional-looking.
This guide covered the basics, step-by-step instructions, customization tips, common mistakes, and frequently asked questions to help you master this essential technique. Now it’s your turn to pick up your hook and yarn and practice creating your own beautiful flat circles.
We’d love to hear your thoughts! Share your honest opinion about this article and any suggestions you might have for future topics. Your feedback helps us continue providing helpful and inspiring crochet content.