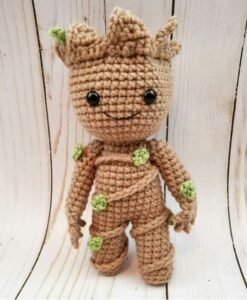
Creating a Cute Groot Amigurumi: Step-by-Step Crochet Pattern is one of the most exciting ways to combine creativity and fandom in the world of crochet. This adorable project allows crafters to bring the beloved Marvel character Groot to life in the form of a charming and huggable amigurumi figure. Not only is it a fantastic handmade gift for fans of “Guardians of the Galaxy,” but it’s also an enjoyable project for crochet enthusiasts looking to improve their skills. By following this guide carefully, you’ll be able to master every stitch and create your very own unique Groot.
When it comes to crochet projects, amigurumi stands out for its ability to transform yarn into cute, character-inspired dolls. The Cute Groot Amigurumi: Step-by-Step Crochet Pattern is especially popular because it combines simple stitches with creative assembly. This makes it perfect for beginners while still offering plenty of room for experienced crafters to experiment with texture, color, and embellishments. By the end of this tutorial, you’ll not only have an adorable Groot but also a deeper understanding of amigurumi techniques.
In this article, you’ll discover everything you need to make your own Cute Groot Amigurumi: Step-by-Step Crochet Pattern from start to finish. We’ll go over the essential materials, walk you through the basic and advanced techniques, discuss how to assemble and decorate Groot, and even share tips for personalizing your creation. Whether you’re crocheting for fun, gifting, or selling handmade items, this project is an excellent way to hone your craft and produce something truly special.
Essential Materials and Tools for Groot Amigurumi
To successfully complete your Cute Groot Amigurumi: Step-by-Step Crochet Pattern, you’ll need to gather a few essential materials. Start with high-quality yarn in shades of brown and green to represent Groot’s bark-like body and leafy details. Soft cotton or acrylic yarn works best for amigurumi projects because it holds shape well and is easy to handle. You’ll also need a matching crochet hook size recommended for your yarn weight to ensure even stitches and a polished look.
Another important item is stuffing. High-quality fiberfill will give your Groot amigurumi a firm yet cuddly shape. Avoid using heavy or uneven stuffing, as this can make your doll lumpy. For small details such as eyes, you can use safety eyes, embroidery thread, or small beads, depending on your preference. This allows you to customize Groot’s expression and give it a truly unique personality.
Stitch markers are also essential for keeping track of your rounds. Since amigurumi is often worked in continuous spirals, it’s easy to lose count of your stitches. Using markers ensures accuracy and saves time when assembling pieces. Don’t forget a tapestry needle for sewing the parts together and weaving in ends neatly. This small step will make your finished Groot look professional and durable.
A pair of small scissors will help you trim loose ends and create a neat finish. If you want to add embellishments, you might also need felt, fabric glue, or extra yarn in accent colors for details like vines or accessories. Having all your materials organized before starting will make the entire process smoother and more enjoyable.
Finally, patience and enthusiasm are key. While the Cute Groot Amigurumi: Step-by-Step Crochet Pattern is beginner-friendly, it requires attention to detail. Set aside dedicated time to work on each part without rushing. Crocheting at a steady pace ensures even tension, resulting in a cleaner and more polished final product.
Once your tools and materials are ready, you’re set to begin crocheting Groot. Having a complete kit at your fingertips makes the process seamless and lets you focus on perfecting your stitches rather than searching for missing items.
Crocheting the Basic Shape of Groot
The body of the Cute Groot Amigurumi: Step-by-Step Crochet Pattern starts with a simple cylindrical shape. Begin by creating a magic ring, which is the foundation for most amigurumi. From there, work single crochet stitches in the round, gradually increasing to form the base. This technique gives Groot a stable structure and helps him stand upright if desired.
After the base is established, continue crocheting in spirals without joining rounds. This method eliminates visible seams and creates a smooth appearance. Be sure to use your stitch marker to keep track of where each round begins. Consistent stitch tension is important here to maintain even shaping throughout the project.
Once you’ve reached the desired height for Groot’s body, it’s time to shape the head. Increase stitches strategically to widen the top portion and form the iconic large head that makes Groot so endearing. Stuff the body lightly as you go to maintain shape but avoid overstuffing, which can stretch stitches and create gaps.
The arms and legs of Groot are created separately and then sewn to the body. These pieces are typically thinner and shorter than the body, so adjust your hook and tension accordingly if needed. Adding a bit of wire inside the limbs is optional but can allow your Groot to be more poseable. This is especially fun if you’re creating him as a display piece.
Don’t forget the roots and branch-like details. Small crocheted tubes or chains can be attached to the top of Groot’s head or around his arms to mimic vines. Using a contrasting green yarn for these details will enhance the character’s natural look. These little extras transform a simple doll into a recognizable Groot.
By the time you’ve completed this section, your amigurumi will start to resemble the famous Marvel character. This is an exciting stage of the project because you can finally see your work coming to life.
Assembling and Adding Details to Groot
Assembling the parts of your Cute Groot Amigurumi: Step-by-Step Crochet Pattern is where your project truly comes together. Begin by pinning the arms and legs to the body before sewing them on permanently. This ensures proper placement and symmetry. Use a sturdy tapestry needle and matching yarn to stitch each piece securely.
Next, focus on Groot’s facial features. If you’re using safety eyes, insert them before stuffing the head completely. For embroidered eyes, use black thread and small, neat stitches to achieve an expressive look. You can also experiment with adding a tiny embroidered smile or even a neutral expression depending on the mood you want Groot to convey.
Adding texture is another great way to enhance your amigurumi. You can use surface slip stitches or crocheted chains to create bark-like patterns across Groot’s body. This technique adds depth and makes the doll look more detailed and realistic without adding significant complexity to the pattern.
Once the body is assembled, attach the green leafy details to the top of Groot’s head and along his arms. These accents can be made using simple chain stitches or tiny crocheted leaves. By varying the shades of green, you can give your Groot a more dynamic and lifelike appearance.
If you want to personalize your Groot, consider adding accessories like a small crocheted flowerpot for him to “stand” in or a tiny scarf in your favorite colors. These little touches make your creation unique and can also increase its appeal if you’re selling it as a handmade product.
At this stage, you should have a fully assembled Groot that’s ready for final finishing touches. Take your time to trim loose ends, adjust stuffing, and ensure all parts are securely fastened for a professional and durable result.
Tips for Perfecting Your Crochet Technique
To make your Cute Groot Amigurumi: Step-by-Step Crochet Pattern look its best, focus on maintaining consistent stitch tension. Uneven tension can result in a lumpy or misshapen figure. Practice holding your yarn and hook comfortably to produce smooth, uniform stitches throughout your project.
Another helpful tip is to count your stitches frequently. Amigurumi patterns rely heavily on precision, and a missed or added stitch can alter the shape dramatically. Using stitch markers in every round will save time and frustration later on.
Choosing the right yarn also makes a big difference. While soft yarn is appealing, too much stretch can create gaps between stitches. A medium-weight, slightly firm yarn is ideal for amigurumi because it holds its shape well without being too stiff.
Take breaks as needed. Crocheting for long periods can strain your hands and wrists, which might affect your tension. Short breaks help you stay comfortable and maintain consistent quality in your work.
Experiment with different techniques to add personality to your Groot. For example, you can try needle sculpting to define facial features or use embroidery to highlight details like tiny vines. These small enhancements elevate your amigurumi from simple to spectacular.
Finally, don’t rush the process. One of the joys of creating amigurumi is watching the character slowly come to life. By taking your time, you’ll enjoy the journey as much as the finished result.
FAQ – Cute Groot Amigurumi: Step-by-Step Crochet Pattern
Q: Is this pattern suitable for beginners?
A: Yes, the Cute Groot Amigurumi: Step-by-Step Crochet Pattern is beginner-friendly with simple stitches and clear instructions.
Q: How long does it take to complete Groot?
A: On average, it takes 6–10 hours depending on your crochet speed and experience.
Q: Can I use different yarn colors?
A: Absolutely. You can customize Groot’s look with different shades of brown and green or even experiment with other colors for a creative twist.
Q: Do I need safety eyes?
A: No. You can use embroidery thread, beads, or felt to create the eyes if you prefer not to use safety eyes.
Q: How do I keep my stitches tight enough?
A: Use a slightly smaller hook than recommended for your yarn weight and maintain steady tension throughout.
Q: Can I sell the finished Groot?
A: Yes, you can sell the finished amigurumi you create from this pattern as long as it’s your handmade work.
Video Tutorial
The Cute Groot Amigurumi: Step-by-Step Crochet Pattern is a delightful project that blends creativity, fandom, and skill-building into one rewarding experience. From gathering materials to assembling the final details, you’ve learned how to craft a charming version of this beloved character. Whether you’re making it for yourself, as a gift, or as part of a handmade business, this pattern offers endless opportunities for personalization and improvement.
We hope this guide has helped you feel confident about starting your own Groot amigurumi project. Share your honest opinion and suggestions in the comments – your feedback helps improve future tutorials and inspires other crochet enthusiasts to join in the fun!