The Mickey Pumpkin Crochet Pattern has become a favorite project among crochet lovers, especially those who enjoy seasonal crafts inspired by popular characters. With Halloween and autumn festivities in mind, creating a cute Crochet Mickey Pumpkin is the perfect way to combine your love for Disney with your passion for handmade décor. This article will guide you through everything you need to know about making your own Mickey Pumpkin using crochet techniques. Whether you’re a beginner or an experienced crocheter, this guide will provide helpful tips, instructions, and creative ideas for your project.
As handmade items gain more popularity, the Mickey Pumpkin Crochet Pattern stands out for its versatility. You can use it to create adorable home decorations, gifts for friends, or even small accessories like keychains or appliqués. Plus, this project is not only enjoyable but also cost-effective, as it requires minimal supplies and can be customized with different yarn colors and textures. When crafted carefully, a Crochet Mickey Pumpkin can become a timeless piece that you’ll proudly bring out every fall season.
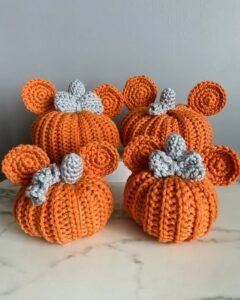
Another reason why the Mickey Pumpkin Crochet Pattern is so popular is its ability to bring a touch of nostalgia and charm to any setting. Fans of Disney and Halloween alike appreciate the playful combination of the classic Mickey Mouse silhouette and the bright orange hues of a pumpkin. This craft allows you to personalize your design, making it larger or smaller, adding a face, or even incorporating different color schemes to match your décor. The possibilities are endless, and in the following sections, we’ll cover the essential steps and tips to get you started.
Why the Mickey Pumpkin Crochet Pattern Is So Popular
One of the main reasons the Crochet Mickey Pumpkin has captured so many hearts is its connection to beloved childhood memories. Disney characters, especially Mickey Mouse, have been a source of joy for decades, and incorporating them into seasonal crafts makes for a truly unique project. This nostalgic appeal gives your crochet piece extra emotional value and makes it a wonderful handmade gift idea.
Another factor is how beginner-friendly this project can be. Many crafters who are new to crochet often start with simple shapes like circles and ovals. The Mickey Pumpkin Crochet Pattern primarily uses basic stitches such as single crochet, double crochet, and slip stitches, which makes it approachable even for those with minimal experience. As you become more confident, you can add advanced techniques like color changes and shaping for more realistic effects.
The Crochet Mickey Pumpkin also fits perfectly into the growing trend of DIY home décor. With people increasingly looking for ways to personalize their living spaces, a handmade Mickey Pumpkin brings a cozy and festive touch to your home during autumn. Whether placed on a mantel, hung as a garland, or used as a table centerpiece, it adds a whimsical flair that store-bought decorations simply can’t match.
Additionally, this pattern can be adapted to suit various purposes. You can make small pumpkins to use as keychains or large ones to stuff as plushies. The Mickey Pumpkin Crochet Pattern gives you flexibility in size, yarn type, and even color palette. Some crafters experiment with pastel shades or even black and white pumpkins for a modern twist on the classic design.
Finally, the accessibility of materials makes this craft even more appealing. Basic yarns, a crochet hook, and some stuffing (if desired) are all you need. There’s no need for expensive tools, which means you can start your Crochet Mickey Pumpkin right away without a big investment. This accessibility makes it an excellent project for both hobbyists and small business owners selling handmade goods.
Essential Materials for Your Crochet Mickey Pumpkin
To create the perfect Mickey Pumpkin Crochet Pattern, having the right materials is key. Fortunately, the supply list is simple and budget-friendly. Most of the items can be found at any craft store or ordered online. The following small paragraphs break down what you’ll need and why each item is important.
First, you’ll need quality yarn. Most crafters prefer using worsted-weight yarn for its balance between thickness and flexibility. Orange yarn is a staple for the pumpkin body, but you’ll also need black or brown for details like the stem and Mickey’s face, and possibly green for decorative leaves. Choosing soft but sturdy yarn ensures that your Crochet Mickey Pumpkin will hold its shape over time.
Second, pick the right crochet hook size. The size will depend on your yarn, but typically a 4 mm to 5 mm hook works well for worsted-weight yarn. A slightly smaller hook than recommended for the yarn will give your stitches a tighter look, which is ideal for stuffed items like pumpkins. This prevents gaps where stuffing might peek through.
Third, don’t forget stuffing if you’re making a plush-style pumpkin. Polyfill is the most commonly used filler for crochet projects. It’s lightweight, easy to shape, and hypoallergenic. Adding just the right amount of stuffing gives your Mickey Pumpkin Crochet Pattern a smooth, full appearance.
Fourth, you’ll need a yarn needle for sewing parts together. This is crucial for attaching Mickey’s ears to the pumpkin body and weaving in any loose ends. A blunt-tipped needle is recommended for safety and ease of use.
Fifth, optional items like stitch markers and scissors can make the process smoother. Stitch markers help you keep track of rounds if you’re crocheting in continuous spirals, and sharp scissors make clean cuts when changing colors or finishing off your project.
Finally, consider adding embellishments. Some crafters like to include felt pieces for Mickey’s facial features or embroidered details for extra character. These small touches can make your Crochet Mickey Pumpkin even more unique and eye-catching.
Step-by-Step Tips for Creating the Mickey Pumpkin Crochet Pattern
Once you’ve gathered your materials, it’s time to bring your Mickey Pumpkin Crochet Pattern to life. The following tips break down the process into manageable steps, making it easier to follow even for beginners.
Start with the pumpkin body. Using orange yarn, crochet a round base and continue working in the round to build up the shape. The key here is maintaining even stitches to create a smooth, symmetrical pumpkin. Increasing and decreasing stitches at the right points will help you achieve the classic pumpkin ridges.
Next, create Mickey’s ears. These are typically smaller round pieces crocheted separately and then sewn onto the pumpkin. The size of the ears can vary depending on how big you want your Crochet Mickey Pumpkin to be. Make sure to stuff them lightly if you want them to hold their shape.
After that, add the stem and leaves. Using brown or green yarn, crochet a small stem and a few leaves. These elements give your Mickey Pumpkin Crochet Pattern a polished, finished look. They’re also a great way to practice shaping techniques on a smaller scale.
Then, personalize your pumpkin. Some people like to embroider a face on their Mickey Pumpkin, while others use felt cutouts for eyes, a nose, and a smile. You can even make a Halloween-themed face with a friendly or spooky expression. This is where your creativity really shines.
Another important tip is to assemble carefully. Use your yarn needle to securely attach the ears, stem, and any embellishments. Take your time with this step to ensure your Crochet Mickey Pumpkin looks neat and durable.
Finally, block or shape your finished piece if necessary. Lightly steaming or shaping your pumpkin can help even out any uneven stitches and give it a more professional appearance. This last step may seem small but makes a big difference in the final result.
Creative Variations of the Crochet Mickey Pumpkin
While the traditional Mickey Pumpkin Crochet Pattern features orange yarn and classic Mickey ears, there are many ways to customize your design. These variations allow you to experiment with colors, textures, and sizes to create a truly one-of-a-kind piece.
One popular variation is the pastel pumpkin. Instead of orange, use soft pink, lavender, or mint green yarn for a whimsical, nontraditional look. This style works beautifully for year-round décor, not just Halloween.
Another fun idea is to make a set of mini pumpkins. These smaller versions of the Crochet Mickey Pumpkin are perfect as keychains, ornaments, or party favors. They’re quick to make and ideal for using up leftover yarn from other projects.
You can also experiment with textured stitches. Instead of standard single crochets, try puff stitches or bobble stitches to give your pumpkin a unique surface texture. This adds visual interest and makes your Mickey Pumpkin Crochet Pattern stand out even more.
A seasonal twist can be achieved by making themed sets. For example, a black pumpkin with orange ears for a spooky Halloween feel or a white pumpkin with gold ears for a more elegant autumn look. These combinations make your crochet work versatile for different occasions.
Adding accessories is another creative touch. Some crafters add tiny bows, scarves, or hats to their Crochet Mickey Pumpkin to give it personality. These small additions make each pumpkin a character of its own.
Finally, consider scaling up your project. Using thicker yarn and a larger hook, you can create a giant Mickey Pumpkin Crochet Pattern as a statement piece for your home décor. This oversized version can be a centerpiece during Halloween parties or family gatherings.
FAQ About the Mickey Pumpkin Crochet Pattern
Q: Is the Mickey Pumpkin Crochet Pattern beginner-friendly?
A: Yes! The pattern mainly uses basic stitches, making it a great project for those just starting with crochet.
Q: How long does it take to complete a Crochet Mickey Pumpkin?
A: Depending on your skill level and the size of the pumpkin, it can take anywhere from a few hours to a full weekend to complete.
Q: What type of yarn is best for the Mickey Pumpkin Crochet Pattern?
A: Worsted-weight yarn is most commonly recommended because it provides a good balance of thickness and flexibility.
Q: Can I sell items made from this pattern?
A: Handmade items created using a general Mickey Pumpkin Crochet Pattern can typically be sold, but you should avoid using trademarked names or images in your marketing.
Q: Do I need stuffing for this project?
A: If you’re making a plush-style pumpkin, yes. However, flat appliqués or ornaments may not require any stuffing at all.
Q: Can I customize the size of my Crochet Mickey Pumpkin?
A: Absolutely! By adjusting your yarn weight and hook size, you can make your pumpkin larger or smaller to fit your needs.
Video Tutorial
The Mickey Pumpkin Crochet Pattern is a delightful and versatile project that brings together the fun of Disney-inspired crafts and the charm of seasonal decorations. From the essential materials to creative variations, you now have all the information you need to start crocheting your own Mickey Pumpkin. This guide showed you how to gather supplies, follow step-by-step tips, and customize your creation with unique touches.
We hope this article has inspired you to try making your own Crochet Mickey Pumpkin and explore different styles and colors. If you’ve already made one, or plan to start soon, we’d love to hear from you. Please leave your honest opinion and suggestions in the comments – your feedback helps us improve and share even more creative crochet ideas with the community!