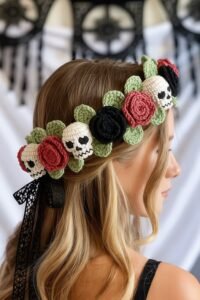
The Skull & Roses Headband – Crochet Pattern is a unique and creative project that brings together two striking elements—skulls and roses—into a single, stylish accessory. This crochet design is perfect for those who want to express a bold, artistic, and slightly edgy style while enjoying the relaxing process of crafting. Whether you’re a beginner looking for an exciting challenge or an experienced crocheter seeking an original idea, this pattern offers something for everyone. By mastering the Skull & Roses Headband – Crochet Pattern, you can create a handmade piece that stands out in any wardrobe and makes an unforgettable statement.
This crochet pattern isn’t just about aesthetics; it’s also a fun, practical project. Creating a Skull & Roses Headband – Crochet Pattern allows you to explore various stitches, shapes, and techniques that will enhance your skills. Roses add a touch of softness and romance, while skull motifs bring in a rebellious edge—making this headband perfect for festivals, themed parties, or as a memorable handmade gift. With this guide, you’ll understand the materials, stitches, and steps needed to bring your skull and rose vision to life.
Another advantage of working with the Skull & Roses Headband – Crochet Pattern is that it’s highly customizable. You can adjust colors, sizes, and even the placement of skulls and roses to match your personal style or your recipient’s tastes. By following the tips and steps in this article, you’ll not only complete a beautiful headband but also gain the confidence to modify the design and make it uniquely yours. Now, let’s explore the details of this one-of-a-kind crochet accessory.
Materials Needed for the Skull & Roses Headband – Crochet Pattern
To get started with the Skull & Roses Headband – Crochet Pattern, you’ll first need to gather the right materials. Having everything ready before you begin will make the crocheting process smoother and more enjoyable. This project doesn’t require expensive supplies—just a few basic crochet essentials and some optional decorative items.
Choose a soft yet sturdy yarn for your headband base. Cotton and acrylic blends are excellent choices because they’re comfortable on the skin and hold their shape well. For the roses, you might want to select a contrasting color to make them pop. A traditional choice is red for the roses and black or gray for the skulls, but you’re free to experiment with your favorite shades.
You’ll also need a crochet hook suitable for your chosen yarn weight. Typically, a 3.5mm to 4.5mm hook works well for this project, but check your yarn label for guidance. Stitch markers, a tapestry needle, and scissors will also be essential tools to keep on hand. These small accessories will make your work more precise and organized.
In addition to yarn and hooks, consider adding optional embellishments. Beads, small buttons, or metallic threads can highlight the roses or skull features and make your headband even more eye-catching. These details aren’t necessary but can help you achieve a truly personalized accessory.
Finally, make sure you have a printed or digital copy of the Skull & Roses Headband – Crochet Pattern on hand. Having clear, step-by-step instructions will help you follow along easily and avoid mistakes. This preparation step is crucial for a stress-free crocheting experience.
By preparing these materials in advance, you set yourself up for success. Starting with the right supplies ensures that your Skull & Roses Headband – Crochet Pattern project will go smoothly from start to finish.
Step-by-Step Guide to Crocheting the Skull & Roses Headband – Crochet Pattern
Once you’ve gathered your materials, it’s time to start creating your Skull & Roses Headband – Crochet Pattern. This process involves crocheting the base headband first, then adding the skull motifs and roses as embellishments. Each step allows you to practice and refine your crochet skills.
Begin by creating the base headband. This is usually a simple band worked in rows or rounds, depending on your preference. A single crochet or half double crochet stitch works well for a sturdy yet flexible base. Measure the band around your head to ensure a comfortable fit before fastening off.
Next, work on the skull motifs. These can be crocheted separately and then sewn onto the headband. Skull patterns often use openwork stitches to create eye sockets and teeth details. While this part may look complex, following the Skull & Roses Headband – Crochet Pattern instructions carefully will make it manageable even for intermediate crocheters.
Once your skull motifs are complete, move on to the roses. Roses are typically created by crocheting a long strip and then rolling it into a spiral before sewing it together. This technique creates a realistic flower shape with minimal effort. You can make several roses in different sizes for a layered effect.
After you’ve prepared the skulls and roses, it’s time to assemble the headband. Arrange the motifs however you like—symmetrically, clustered to one side, or evenly spaced along the band. Pin them in place first to experiment with layouts before sewing them on permanently.
The final step is weaving in all your yarn ends and adding any optional embellishments like beads or metallic thread highlights. This finishing touch will elevate your Skull & Roses Headband – Crochet Pattern from handmade to truly handcrafted artistry.
Tips for Customizing the Skull & Roses Headband – Crochet Pattern
One of the best things about the Skull & Roses Headband – Crochet Pattern is how customizable it is. You’re not limited to the colors or motifs suggested in the original pattern. With a few adjustments, you can make this headband completely your own.
Consider experimenting with different color schemes. While the classic look combines black skulls and red roses, you can create a softer vibe with pastel skulls and white roses or go bold with neon shades for a festival-ready accessory. Color choices are a great way to express your personality.
You can also adjust the size of the skulls and roses. Making smaller motifs will give you a more delicate and subtle look, while larger motifs create a dramatic statement piece. This flexibility allows you to adapt the design for adults, teens, or even children.
Another customization option is to add additional decorative stitches to the headband base itself. A textured stitch like the shell or bobble stitch can make the band more interesting, even before adding skull and rose embellishments.
If you’re feeling adventurous, you can incorporate other motifs into the design. For example, adding leaves around the roses or small crossbones behind the skulls could enhance the theme further. These additions are simple yet make a big difference.
Finally, think about how you’ll fasten your headband. Instead of a continuous band, you can create ties at the ends for an adjustable fit or add a button closure. This small detail can improve comfort and wearability.
By exploring these customization ideas, you’ll transform your Skull & Roses Headband – Crochet Pattern from a standard project into a one-of-a-kind accessory that truly reflects your creativity.
Common Mistakes and How to Avoid Them in the Skull & Roses Headband – Crochet Pattern
Even experienced crocheters can run into challenges when working on the Skull & Roses Headband – Crochet Pattern. Knowing the common mistakes and how to avoid them will save you time and frustration.
One frequent issue is using the wrong yarn weight. A yarn that’s too thick can make the headband bulky, while a yarn that’s too thin may result in motifs that don’t hold their shape. Always check the recommended yarn weight in your pattern before starting.
Another mistake is miscounting stitches in the skull motifs. Because skulls often involve open spaces for eyes and other details, losing track of your stitch count can distort the design. Using stitch markers and counting carefully after each row will help you stay on track.
Some crafters also struggle with attaching motifs evenly. Uneven spacing can make the headband look unbalanced. Pinning your skulls and roses in place before sewing them on will help you visualize the final layout and achieve a polished result.
Tension is another critical factor. If your stitches are too tight, the headband may feel stiff and uncomfortable. If they’re too loose, the motifs might look sloppy. Practicing your gauge before starting the main project ensures consistent tension.
Not weaving in ends properly is another common oversight. Loose ends can unravel over time, reducing the durability of your headband. Take the time to weave them in securely with a tapestry needle.
Finally, rushing the assembly phase can lead to mistakes. Treat assembling the motifs as carefully as you would crocheting them. This patience pays off with a professional-looking finished product.
By being aware of these potential pitfalls, you’ll be better prepared to complete your Skull & Roses Headband – Crochet Pattern successfully and enjoy the process from start to finish.
FAQ About the Skull & Roses Headband – Crochet Pattern
1. Is the Skull & Roses Headband – Crochet Pattern suitable for beginners?
Yes, this pattern can be adapted for beginners, especially if you’re comfortable with basic stitches. Start with the headband base, then progress to simpler skull and rose motifs before attempting more intricate designs.
2. How long does it take to complete the Skull & Roses Headband – Crochet Pattern?
The time varies depending on your skill level and the complexity of your design. On average, it may take between 4–8 hours to complete the entire headband, including all motifs.
3. Can I use different yarn types for the Skull & Roses Headband – Crochet Pattern?
Absolutely. Cotton, acrylic, and blended yarns all work well. Just make sure to choose a yarn weight that suits your hook size and the desired look of your headband.
4. How do I make the roses look more realistic?
Use a slightly smaller hook than recommended to make tighter stitches, and roll the crocheted strip carefully to form a natural spiral. Adding subtle shading with two yarn colors can also enhance realism.
5. Can I wash the Skull & Roses Headband – Crochet Pattern item once finished?
Yes, but always follow the care instructions for your yarn. Most cotton and acrylic yarns are machine washable on a gentle cycle, but hand washing will preserve the shape and details longer.
6. What if I want to make a matching set with the Skull & Roses Headband – Crochet Pattern?
You can use the same motifs to create matching wristbands, chokers, or even decorative patches. This is a great way to build a coordinated look.
Pattern
The Skull & Roses Headband – Crochet Pattern is more than just a crochet project—it’s a creative expression of style and skill. By following this guide, you’ve learned about the essential materials, step-by-step process, customization options, and common mistakes to avoid. With practice and patience, you can create a striking accessory that’s as unique as you are.
If you found this tutorial helpful, we’d love to hear from you. Please leave a sincere opinion and share your suggestions for improving or expanding this guide. Your feedback helps inspire even more creative crochet content!