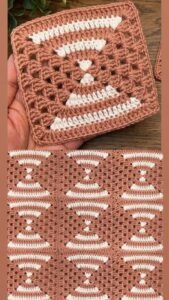
The Joining Square Tutorial Crochet Pattern is one of the most essential techniques every crochet enthusiast should learn. Whether you’re working on a granny square blanket, a decorative pillow cover, or even a wearable accessory, knowing how to join squares seamlessly can take your project from good to exceptional. In this article, we will explore everything you need to know about this technique — from tools and materials to methods, tips, and frequently asked questions. If you’ve ever wondered how to give your crochet projects a professional finish, mastering the Joining Square Tutorial Crochet Pattern will open endless creative possibilities.
When learning crochet, beginners often focus on creating individual motifs, like squares or hexagons, but the art of joining them beautifully is equally important. The Joining Square Tutorial pattern provides a step-by-step approach to help crafters achieve neat, durable, and visually appealing connections between squares. By understanding these methods, you can add texture, color, and personality to your projects without compromising on structure. This guide is crafted to be beginner-friendly while also offering advanced tips for experienced crocheters.
Another advantage of mastering the Joining Square Tutorial Crochet Pattern is that it allows you to customize your projects more effectively. Instead of being limited to one big piece, you can work on smaller squares individually and later join them to create larger items. This is not only easier to manage but also perfect for experimenting with different color combinations and stitches. Throughout this article, we will explore various joining techniques, tips for achieving consistent tension, and creative ideas to make your crochet work stand out.
Understanding the Basics of the Joining Square Tutorial Crochet Pattern
Learning the basics of the Joining Square Tutorial Crochet Pattern is the first step to improving your crochet skills. Before diving into complex techniques, it’s crucial to know what tools, materials, and stitches you’ll need. By starting with the fundamentals, you set yourself up for success and ensure your finished piece is sturdy and beautiful.
First, gather your supplies. Most joining square patterns require a crochet hook that matches your yarn weight, scissors, a tapestry needle, and the squares you plan to join. Choosing a hook size consistent with your squares’ tension is essential to avoid uneven joins. This preparation stage can save you time and frustration later in the process.
Second, understand your stitches. Common stitches used in the Joining Square Tutorial pattern include slip stitch, single crochet, and whip stitch. Each creates a different look and feel. Some crocheters prefer an invisible seam, while others enjoy a decorative ridge between squares. Experimenting with stitches will help you find your favorite style.
Third, plan your layout. Before you begin joining, lay out your squares on a flat surface to determine the pattern arrangement. This step helps you visualize the final result and avoid mismatched colors or designs. Planning ahead also ensures that the motif’s orientation is consistent throughout the project.
Fourth, practice your tension. One of the biggest challenges in the Joining Square Tutorial Crochet Pattern is maintaining an even tension across all joins. Uneven tension can cause your project to warp or pull, affecting the overall shape. Practicing on scrap squares first can help you master this skill.
Fifth, always weave in ends as you go. Many crocheters leave this step for last, but weaving in ends as you join squares saves time and creates a neater finish. Using a tapestry needle to secure loose yarn prevents unraveling and keeps your work durable.
Finally, don’t rush the process. Joining squares requires patience and attention to detail. Take your time with each seam, and your final piece will look polished and professional.
Step-by-Step Methods for Joining Square Tutorial Crochet Pattern
Once you understand the basics, you’re ready to explore specific joining methods. The Joining Square Tutorial pattern can be executed in multiple ways, each offering a unique texture and appearance. Here are some of the most popular techniques.
The slip stitch join is one of the simplest and cleanest ways to connect squares. By working through the back loops of each square, you create an almost invisible seam. This method is ideal for projects where you want the focus to remain on the squares themselves rather than the joins.
Another popular method is the single crochet join. This technique creates a visible ridge between squares, adding a decorative element to your project. It’s especially effective for blankets and throws where the join can serve as an accent line.
For a more seamless look, the whip stitch join is a go-to choice. Using a tapestry needle, you sew the squares together with yarn. This creates a flat seam with minimal bulk, making it perfect for wearables or delicate home décor.
Join-as-you-go (JAYGO) is a time-saving method favored by many crocheters. Instead of making all your squares first, you join each one to the previous square as you crochet the final round. This approach reduces finishing time and is great for projects with lots of motifs.
A decorative join, such as the flat braid join, adds both texture and beauty to your project. This technique involves chaining between squares to create a lacy effect. It’s ideal for table runners or lightweight blankets where you want an airy look.
Lastly, experiment with color in your joins. Using a contrasting yarn for the joins can highlight each square, while a matching yarn blends them together. The Joining Square Tutorial Crochet Pattern allows you to express your creativity with every choice you make.
Tips for a Professional Finish Using the Joining Square Tutorial Crochet Pattern
Even with the right method, the quality of your joins depends on attention to detail. These tips will help you achieve a professional finish when using the Joining Square Tutorial pattern in your projects.
Always block your squares before joining. Blocking ensures each piece is the same size and shape, making it easier to align edges perfectly. This step can make a huge difference in the final look of your project.
Choose high-quality yarn that won’t split or fray easily. Yarn quality affects how clean your joins appear and how long your finished piece will last. Durable, smooth yarns work best for joining squares.
Use consistent tension throughout the project. Even if your squares are perfect, uneven joins can distort the shape. Take frequent breaks to check your tension, and adjust your hook size if necessary.
Match up corners carefully. The corners of each square are crucial in maintaining the project’s structure. Misaligned corners can cause the piece to twist or bulge, so double-check your placement as you join.
Weave in ends neatly and securely. This prevents unraveling and gives your project a polished appearance. Using a sharp tapestry needle can help you weave yarn through stitches more easily.
Finally, practice patience. The Joining Square Tutorial Crochet Pattern can be time-consuming, but the effort you put in will show in the finished result. Slow, careful joining creates a piece you can be proud of.
Creative Ideas and Projects with the Joining Square Tutorial Crochet Pattern
Once you master the technique, you can use the Joining Square Tutorial Crochet Pattern to create countless projects. This is where your creativity can shine.
One classic project is the granny square blanket. By using different colors for each square and a neutral tone for the joins, you create a timeless piece that complements any home décor.
Cushion covers are another great option. Smaller squares joined together can make a stunning pillowcase. You can even mix textures by using different stitches in each square for a unique look.
Wearables like ponchos or shawls are also perfect for showcasing your joining skills. Lightweight yarns and decorative joins create elegant garments suitable for all seasons.
For a quick and practical project, try making a table runner or placemats. These items allow you to experiment with different joining methods without committing to a large piece.
Baby blankets are always popular, and the Joining Square Tutorial pattern ensures they’re both soft and durable. Use pastel colors for a delicate look or bold shades for a playful design.
Finally, don’t hesitate to design your own patterns. Once you’re comfortable with joining squares, you can create custom layouts, color schemes, and motifs for truly personalized crochet pieces.
FAQ About the Joining Square Tutorial Crochet Pattern
Q: What is the easiest way to join crochet squares for beginners?
A: The slip stitch join is often the easiest for beginners because it’s simple and creates a clean seam.
Q: Can I join squares made with different yarn weights?
A: It’s possible, but not recommended. Using the same yarn weight ensures even tension and a uniform look.
Q: How do I keep my joins from being too tight or too loose?
A: Practice maintaining consistent tension, and adjust your hook size if necessary. Working slowly also helps.
Q: Should I block squares before or after joining?
A: Blocking before joining is ideal because it evens out each square’s shape and size, making alignment easier.
Q: Can I change colors when joining squares?
A: Absolutely. Using a contrasting color for joins can add visual interest, while matching colors create a seamless appearance.
Q: How many squares do I need for a blanket?
A: This depends on the size of your squares and the blanket. Plan your layout in advance to determine how many motifs you’ll need.
Video Tutorial
Mastering the Joining Square Tutorial Crochet Pattern is a valuable skill for any crocheter, whether you’re a beginner or experienced crafter. By learning the basics, exploring different joining methods, applying professional tips, and experimenting with creative projects, you can elevate your crochet work to the next level. This article has provided a complete guide to help you succeed, from planning and preparation to execution and finishing.
We’d love to hear from you! Share your honest opinion about this tutorial in the comments and let us know your suggestions for future crochet guides. Your feedback helps us create even better resources for passionate crafters like you.