A crochet headband with FPDC & DC stitch is a stylish, practical, and beginner-friendly project that allows crafters to explore texture and creativity. This type of headband combines the elegance of the double crochet (DC) stitch with the depth and definition of the front post double crochet (FPDC) stitch. The result is a beautiful accessory that can be worn in all seasons, adding both warmth and charm to your outfits. Whether you are an experienced crocheter or just starting out, this project is a fantastic way to practice essential stitches while creating something you can actually use.
One of the reasons a crochet headband with FPDC & DC stitch is so popular is that it’s both functional and decorative. Headbands help keep your hair in place, protect your ears from the cold, and serve as a fashionable accessory. The FPDC stitch adds a raised, ribbed look, giving the headband structure and a touch of sophistication. When combined with DC stitches, the pattern becomes balanced, versatile, and comfortable to wear. The mix of texture makes it stand out compared to headbands made only with basic stitches.
If you are looking for a handmade project that is quick, cost-effective, and personalized, creating a crochet headband with FPDC & DC stitch is the perfect choice. You only need a skein of yarn, a crochet hook, and a bit of time to complete it. Unlike larger projects like blankets or sweaters, this headband can be finished in a few hours, making it an excellent option for last-minute gifts or personal use. By learning this pattern, you not only improve your crochet skills but also gain a new accessory that reflects your creativity and dedication.
Understanding the Stitches: FPDC and DC
The double crochet stitch (DC) is one of the most common stitches in crochet. It creates a fabric that is slightly looser and taller than single crochet, making it ideal for projects that require flexibility and drape. To make a DC, you yarn over, insert your hook into the stitch, pull through, and complete the sequence to build height. It’s quick to work up and provides a smooth, even look.
On the other hand, the front post double crochet (FPDC) is a variation that gives the fabric a raised texture. Instead of inserting the hook into the top of the stitch like in regular DC, you insert it around the post of the stitch from the front. This technique pushes the stitch forward, creating a ribbed or cable-like effect. FPDC is widely used in ribbing for cuffs, borders, and headbands because it offers elasticity and structure.
When you combine FPDC and DC stitches, the result is both practical and stylish. The DC stitch provides stability and speed to the project, while FPDC adds a touch of texture and character. This combination is particularly popular in headbands because it prevents the fabric from being too flat while ensuring comfort when worn.
Beginners often find the FPDC slightly challenging at first, but with a little practice, it becomes second nature. Since the stitch involves working around the post, it may feel unusual compared to standard stitches. However, once mastered, it opens the door to countless textured designs.
The key to a neat crochet headband with FPDC & DC stitch lies in maintaining consistent tension. Because FPDC pulls stitches forward, uneven tension may cause your fabric to ripple or tighten in unexpected places. Paying attention to your yarn hold and practicing a few sample rows can help ensure that your headband looks polished.
In addition to learning the stitches, selecting the right yarn plays a significant role. A medium-weight yarn works best for this type of headband because it provides both warmth and flexibility. Cotton yarns are perfect for summer versions, while acrylic or wool blends are excellent for colder months.
Why Make a Crochet Headband with FPDC & DC Stitch?
One of the main reasons to make a crochet headband with FPDC & DC stitch is its versatility. Unlike hats, which cover the entire head, headbands are lighter and can be worn in any season. They keep your hair neat, add flair to your outfit, and can even double as ear warmers during chilly days.
Another advantage is the speed of this project. Many crafters love that they can complete a headband in just one sitting. Whether you have only an hour in the evening or a free afternoon, this project delivers instant gratification compared to larger crochet items.
The FPDC stitch also adds elasticity, which makes the headband fit comfortably without being too tight. This flexibility means you don’t have to worry as much about exact measurements since the ribbed texture allows some stretch.
Personalization is another benefit. With endless yarn colors and thicknesses available, you can create a crochet headband with FPDC & DC stitch to match your wardrobe, seasonal trends, or even holiday themes. Adding embellishments like buttons, bows, or flowers can also elevate the design.
Crocheted headbands are also eco-friendly alternatives to mass-produced accessories. By using leftover yarn from previous projects, you reduce waste and turn scraps into something beautiful and functional. This makes them ideal for sustainable crafting.
Finally, headbands are excellent gifts. Handmade items always carry sentimental value, and a crochet headband with FPDC & DC stitch shows time, effort, and thoughtfulness. They are suitable for birthdays, holidays, or as simple tokens of appreciation.
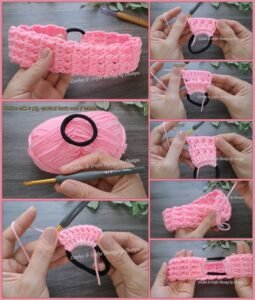
Step-by-Step Guide to Creating the Headband
The first step in making a crochet headband with FPDC & DC stitch is gathering your materials. You will need a crochet hook (commonly size H/5mm for worsted yarn), medium-weight yarn, scissors, and a yarn needle for weaving in ends. Choose a soft yarn that feels comfortable against the skin, especially if the headband will be worn for long periods.
Next, measure the circumference of your head or the recipient’s head. Typically, adult headbands measure between 18 to 22 inches. Remember that the FPDC adds elasticity, so you should make your chain slightly shorter than the actual measurement to ensure a snug fit.
Begin by chaining the foundation row. For most patterns, you will work in multiples that accommodate the alternating DC and FPDC stitches. Start with a chain that matches the desired width of your headband, keeping it between 3 to 6 inches depending on personal preference.
In the following rows, alternate between DC and FPDC stitches. For example, one row may consist of DC across, while the next row alternates FPDC and DC to build texture. Continue this pattern until the band reaches the correct length. The raised ridges from the FPDC will become more noticeable as the fabric grows.
Once you reach the desired length, join the ends together using slip stitches or whip stitch with a yarn needle. This forms a seamless loop. Make sure the join is secure but not bulky, as comfort is essential for a headband.
Finally, weave in all loose ends to give the project a clean finish. At this stage, you may also add decorations like crocheted flowers, wooden buttons, or bows if you wish to personalize your crochet headband with FPDC & DC stitch further.
Tips for Perfecting Your Crochet Headband
Consistency is the key to success when making a crochet headband with FPDC & DC stitch. Uneven tension can make the fabric either too tight or too loose, affecting the fit. Practicing on a small swatch before starting the headband can help refine your technique.
Another useful tip is blocking your headband. While not always necessary, gently steaming or wet-blocking your finished piece can help even out stitches and improve the overall appearance. This step makes your headband look more professional.
Experiment with colors to enhance the design. Striped patterns or color blocks can make your headband unique. For example, alternating colors every two rows highlights the raised FPDC ridges beautifully.
If you are making headbands for children, consider using softer yarns that are gentle on sensitive skin. Cotton blends are breathable and comfortable, ensuring kids enjoy wearing their handmade accessories.
For those interested in selling their creations, pricing headbands is important. Since they are quick projects, they can be sold affordably while still providing a profit margin. The unique texture from FPDC makes them more attractive than plain crochet designs.
Lastly, don’t hesitate to adjust patterns. Crochet is flexible, and the beauty of a crochet headband with FPDC & DC stitch is that you can customize its width, length, and details to suit your style. Creativity is at the heart of every handmade project.
FAQ about Crochet Headband with FPDC & DC Stitch
1. Is a crochet headband with FPDC & DC stitch suitable for beginners?
Yes, it is beginner-friendly. As long as you know the basics of chain stitches and double crochet, you can learn FPDC with a little practice.
2. How long does it take to make a crochet headband?
On average, it takes between 2 to 4 hours, depending on your skill level and the width of the headband.
3. What yarn is best for crochet headbands?
Medium-weight yarn works best. Cotton for summer wear and acrylic or wool blends for colder weather are the most popular choices.
4. How do I make sure my headband fits well?
Measure the head circumference and create the band slightly smaller to allow stretch. The FPDC stitch adds natural elasticity.
5. Can I wash my crochet headband?
Yes, most yarns are machine washable, but it is always best to check the yarn label for care instructions. Handwashing helps preserve the shape.
6. Can I add decorations to my headband?
Absolutely! Buttons, crocheted flowers, or bows can make your crochet headband with FPDC & DC stitch more personalized and stylish.
Video Tutorial
Creating a crochet headband with FPDC & DC stitch is an enjoyable and rewarding project that blends functionality with fashion. By combining the smoothness of DC with the textured ridges of FPDC, you achieve a balanced and stylish accessory suitable for any season. This article has covered the importance of the stitches, reasons to make this project, a step-by-step guide, and tips for perfecting your headband.
Now that you know how to make your own, why not try it today? Share your results, leave a sincere opinion, and suggest ideas for future crochet tutorials. Your feedback helps improve the crafting journey for everyone!