The Easy crochet rose Flower decorated pen is a charming and creative project perfect for those who enjoy handmade crafts. Whether you’re a beginner in crochet or a seasoned crafter looking for a quick and delightful idea, this DIY is a beautiful way to personalize everyday items. With just a few materials and some time, you can turn a regular pen into a romantic and cheerful flower pen that makes writing feel extra special.
This tutorial will guide you through how to make your own Easy crochet rose Flower decorated pen using step-by-step instructions. You’ll learn how to crochet a small rose, attach it securely to a pen, and add decorative elements that make your project truly stand out. It’s perfect for gifts, desk décor, party favors, or just adding a touch of creativity to your workspace.
Using simple crochet techniques and inexpensive supplies, you’ll transform a basic item into a beautiful handmade gift. In this tutorial, we will explore the entire process in detail while focusing on the keyword Easy crochet rose Flower decorated pen and offering helpful tips to ensure your project is a success.
1. Gathering Your Materials
Before starting your Easy crochet rose Flower decorated pen, it’s important to prepare all the necessary supplies. Having everything at hand will make your crafting experience smoother and more enjoyable.
You will need a standard ballpoint pen, ideally one with a removable cap or a solid body. Pens with a flat surface work better for attaching your rose flower securely. Choose a pen in a matching or neutral color to coordinate with your flower yarn.
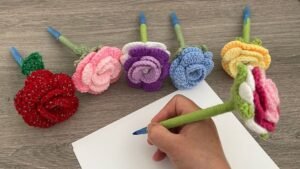
The most important component is the yarn. For your crochet rose, choose cotton or acrylic yarn in rose colors—think red, pink, yellow, or even blue for a unique touch. You will also need a small amount of green yarn for the leaves. Stick to lightweight yarn for better shape and comfort.
Other essential items include a crochet hook suited for your yarn thickness (usually 2.5 mm to 3.5 mm), a hot glue gun or strong craft glue, a yarn needle for weaving in ends, and a pair of scissors. Optional decorations include ribbons, mini pearls, or glitter glue.
Make sure you have good lighting and a comfortable workspace. Keep your materials organized, and consider placing a small box or tray to hold your yarn and hooks as you work. Preparation sets the tone for success in every Easy crochet rose Flower decorated pen project.
Don’t forget to test your pen before you decorate it to ensure it writes smoothly. Once your pen is covered and sealed with the rose and glue, it can’t be easily replaced.
2. Crocheting the Rose Flower
To begin crafting your Easy crochet rose Flower decorated pen, start by crocheting the rose. This is the most delicate and eye-catching part of your project, so take your time with this step.
First, create a foundation chain of around 35 stitches. This will form the base of your rose petals. After chaining, begin working single crochets into each stitch across to provide a stable base row.
In the next row, you will create the petal structure. Start by making 3 double crochets in each stitch for the first 10 stitches, then alternate between 4 and 5 double crochets in each stitch for a fuller rose effect. The more stitches per space, the more ruffled the rose looks.
Once you’ve finished the petal row, begin rolling the strip from one end, shaping it into a spiral flower as you go. As you roll, secure each turn with small dabs of hot glue or stitch it at the base with a yarn needle. This will form the classic rose shape.
You can adjust the size of the rose by making a longer or shorter chain, or by using thicker yarn. If you prefer a smaller rose, reduce the number of stitches and rows proportionally.
After forming the rose, weave in any loose ends using a yarn needle. Make sure everything is tightly secured to avoid unraveling over time. A neat finish adds a professional touch to your Easy crochet rose Flower decorated pen.
3. Attaching the Rose to the Pen
Now that your rose is complete, it’s time to attach it to the pen and bring your Easy crochet rose Flower decorated pen to life. This step combines crafting and a little creativity.
Begin by placing a generous amount of hot glue at the top of the pen. Press the bottom of your rose firmly against the glue and hold for about 30 seconds to allow it to adhere securely. Be cautious with hot glue—it dries fast, so place the flower quickly but accurately.
To enhance the stability, wrap green yarn or floral tape around the top portion of the pen where the rose connects. This not only strengthens the bond but also gives a nice leafy base effect to your rose.
For a clean and polished look, continue wrapping the green yarn all the way down the pen barrel. You can apply a line of glue as you go to keep the yarn in place. Make sure the yarn is smooth and tight to prevent shifting during use.
Optionally, you can crochet small green leaves and glue them around the base of the rose. This adds a beautiful detail and makes your Easy crochet rose Flower decorated pen look even more realistic and charming.
If you want to add ribbon or embellishments, now is the time. Tie a small satin bow below the rose, or glue a pearl bead in the flower center for extra flair.
Let the pen dry completely for at least 30 minutes before using or gifting. Ensure that all decorations are firmly secured to avoid any detachment over time.
4. Creative Uses and Gift Ideas
The Easy crochet rose Flower decorated pen isn’t just a fun craft—it’s also a practical and heartfelt gift idea. Whether you’re crafting for yourself or others, there are endless ways to use and share this beautiful creation.
One of the most popular uses is for teacher appreciation gifts. A bouquet of rose pens in a decorated jar makes a thoughtful and affordable handmade present. Personalize each rose with different yarn colors for a cheerful touch.
Another great idea is to use them as party favors for weddings, bridal showers, or baby showers. Pair the pen with a notepad or tag, and you have a functional yet elegant keepsake your guests will appreciate.
These pens are also lovely for home or office decor. Place a few in a vintage-style vase on your desk or nightstand to add a handmade touch to your space. They’ll brighten your day every time you write.
Kids love crafting too, so this can become a fun family activity. Just make sure an adult handles the glue. Let children choose their yarn colors and help roll the rose, promoting creativity and bonding.
If you sell crafts online or at markets, the Easy crochet rose Flower decorated pen is an excellent product to offer. They are quick to make, lightweight to ship, and universally loved.
Don’t underestimate their power as motivational tools. A pretty pen can actually make writing more enjoyable, especially for journaling or gratitude lists. You’ll find yourself using it just because it brings joy.
FAQ: Easy Crochet Rose Flower Decorated Pen
Q: Can beginners make the Easy crochet rose Flower decorated pen?
Yes! This project is beginner-friendly and uses basic crochet stitches like chain, single crochet, and double crochet. It’s a great way to practice and still create something beautiful.
Q: What kind of yarn should I use for the rose flower?
Lightweight cotton or acrylic yarn works best. Cotton provides structure and holds the rose shape well. Avoid chunky yarns as they may be too bulky for a pen.
Q: How do I clean the rose pen if it gets dusty?
Use a soft brush or a dry cloth to gently clean the flower. Avoid getting it wet, especially if glue was used. A quick blow with a hairdryer on cool mode can also remove dust.
Q: Can I make the flower removable?
Yes, you can use a detachable clip or Velcro to make the rose removable. However, it may not be as secure as a glued version, so handle it gently.
Q: Are there alternative methods to attach the rose if I don’t have a glue gun?
You can use strong craft glue or even sew the flower onto a yarn-wrapped pen base. Just make sure the materials are securely fastened.
Q: How long does it take to make one rose pen?
On average, it takes 20–30 minutes from start to finish, depending on your experience level and desired details.
The Easy crochet rose Flower decorated pen is a delightful project that combines practicality with creative expression. From crocheting the delicate rose to wrapping the pen and adding details, each step lets you pour a bit of love into your work. It’s ideal for gifts, crafts fairs, desk décor, or simply brightening your everyday life.
If you enjoyed this guide, we’d love to hear from you! Please leave a sincere opinion or suggestion below—your feedback helps us grow and bring even more inspiring projects your way. Happy crocheting!


