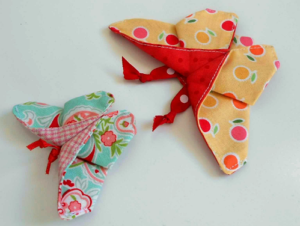
If you’ve ever wanted to create beautiful butterflies from fabric, you’re in for a treat! This charming craft is not only easy and affordable, but it’s also a delightful way to repurpose fabric scraps into something magical. Whether you’re a beginner or a seasoned sewist, fabric butterflies are perfect for embellishing pillows, hair clips, wreaths, wall hangings, or even as gift toppers. In this tutorial, we’ll explore how to make these delicate decorations step by step using simple techniques and materials.
The beauty of this project lies in its versatility. You can create beautiful butterflies from fabric in any size, pattern, or texture you like. From soft pastels for nursery décor to bold prints for party decorations, the possibilities are endless. These fabric butterflies can bring life and joy to your home, crafting projects, or even clothing.
Throughout this guide, we’ll use the phrase create beautiful butterflies from fabric as our central theme, showing you how to turn your creative energy into something truly stunning. So grab your favorite fabric scraps, thread, needle or sewing machine, and let’s start crafting joy together!
1. Choosing the Right Fabric and Materials
When you set out to create beautiful butterflies from fabric, the first step is selecting the right fabric. The choice of fabric affects how your butterfly looks and behaves.
Cotton is a favorite because it’s easy to work with, holds its shape well, and comes in endless patterns. Lightweight cotton, especially quilting cotton, allows you to create clean, crisp butterfly wings.
Another option is using silk, satin, or organza. These fabrics give the butterfly a soft, elegant, and delicate feel—perfect for formal occasions or elegant home decor accents.
It’s also helpful to gather additional materials: a thin wire for shaping the wings and antennae, scissors, fabric glue, and optional embellishments like beads, sequins, or glitter.
Interfacing can be used to give your wings structure. Fusible interfacing, ironed onto the back of the fabric, stiffens it just enough to hold a 3D shape while still being lightweight and flexible.
Using double-sided fusible webbing (like HeatnBond) can help bond two layers of fabric together. This gives your butterflies a reversible, polished look with added stability.
Don’t forget your sewing tools! A sewing machine is helpful for precise edges and decorative stitching, but hand stitching also works beautifully, especially for smaller or more delicate butterflies.
2. Cutting and Shaping the Butterfly Wings
Now comes the fun part—cutting and shaping the wings to create beautiful butterflies from fabric. This step allows your creativity to shine, and no two butterflies will be exactly alike.
Begin by drawing or tracing a butterfly wing shape onto paper. You can fold the paper in half and draw half a wing so both sides are symmetrical when opened.
Cut out your paper template and trace it onto your fabric. If you’re using interfacing, fuse it onto the back of the fabric first before cutting to help maintain the shape.
Carefully cut the fabric using sharp scissors, making sure your lines are clean and smooth. You can use pinking shears if you want a textured or zig-zag edge for extra visual interest.
Once cut, consider layering two or three different fabrics to create dimension. This layered look mimics the natural detail of real butterfly wings and adds richness to your design.
If you want a puffy or quilted look, try adding a thin layer of batting between two pieces of fabric before sewing. This gives your butterfly a soft, cushiony appearance that’s great for children’s décor.
Use a fabric marker or embroidery to add wing details like veins or dots. These small touches elevate your butterfly and give it character, texture, and charm.
3. Assembling the Butterfly Body and Antennae
Once your wings are ready, it’s time to assemble the body and antennae to fully create beautiful butterflies from fabric. This step brings your creation to life and ties all the parts together.
For the body, you can use a small roll of felt, a strip of fabric stuffed with fiberfill, or even a wooden bead painted to match your butterfly design.
Wrap your body fabric tightly around your filling and secure it with a few hand stitches or a dab of hot glue. This forms the butterfly’s thorax and adds structure to the piece.
Place your wings on either side of the body and stitch or glue them in place. Ensure they’re balanced and evenly spaced for a symmetrical final look.
To make antennae, cut two short pieces of thin craft wire or jewelry wire. Twist the ends into little spirals or curls using pliers for a whimsical finish.
Insert the antennae into the top of the body. Secure them by wrapping the base with thread or adding a dab of fabric glue for extra hold.
If you want to make your butterfly a clip-on accessory, now is the time to glue or sew a hair clip or brooch pin to the back. This turns your project into a wearable or giftable piece.
4. Ideas to Use Your Fabric Butterflies
After you create beautiful butterflies from fabric, the possibilities for use are endless. These cheerful creations are not just crafts—they’re tools for decorating, gifting, and celebrating creativity.
Decorate a child’s room by attaching fabric butterflies to the wall or hanging them from the ceiling with invisible thread. They’ll look like they’re floating mid-air!
Use your butterflies to embellish throw pillows, quilts, or curtains. Just stitch them on or use fabric glue for a no-sew option that adds color and charm instantly.
Transform your butterflies into wearable art by turning them into brooches, headbands, or shoe clips. They make lovely additions to spring and summer outfits.
Make greeting cards and scrapbooks extra special by attaching a small butterfly to the front cover. Use a flat version of your fabric butterfly for easy placement.
Weddings, baby showers, and garden parties are all perfect opportunities to showcase these handmade butterflies. Attach them to napkin rings, centerpieces, or gift bags for a magical touch.
For a unique seasonal wreath, glue fabric butterflies onto a grapevine or foam wreath form. Mix them with flowers, leaves, or lights for a statement piece to hang on your front door.
FAQ – Frequently Asked Questions
How do I make sure the fabric butterflies hold their shape?
Use fusible interfacing or double layers of fabric. For extra firmness, consider using fabric stiffener spray.
Can I make fabric butterflies without sewing?
Yes! Fabric glue and fusible webbing can help you assemble butterflies without using a needle or thread.
What fabrics are best for making butterflies?
Cotton is the most beginner-friendly, but you can also use felt, satin, silk, or tulle depending on the look and texture you want.
Can children make fabric butterflies?
Absolutely! With supervision and safe tools, kids can enjoy making simpler versions using pre-cut shapes and glue.
How long does it take to make one fabric butterfly?
Depending on size and complexity, most butterflies take 20–45 minutes to complete.
What are some creative ways to use these fabric butterflies?
Try them on hair clips, gift boxes, wall art, party décor, scrapbooks, or as part of a mobile or hanging display.
Learning to create beautiful butterflies from fabric is a delightful and rewarding craft. It allows you to use your creativity, upcycle fabric scraps, and produce something that adds beauty and whimsy to your space. Throughout this tutorial, we’ve covered fabric selection, wing shaping, body assembly, and endless ideas for display.
Now it’s your turn to take this knowledge and bring your own fluttering creations to life. Don’t forget to experiment with colors, textures, and embellishments as you go. The best part of crafting is putting your personal touch on every piece!
We’d love to hear from you—have you tried making fabric butterflies? What fabrics or styles worked best for you? Leave your honest opinion and suggestions below. Your feedback inspires new ideas and helps others along their creative journey!


