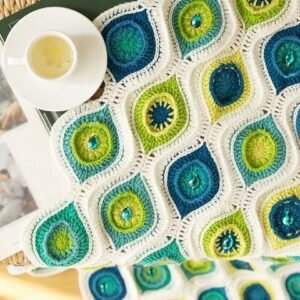
If you’ve ever wondered how to master Het “joinen” van de oogjes deken, you’ve just found the perfect step-by-step guide. Whether you’re an experienced crocheter or just beginning, understanding the art of joining the oogjes deken (which translates to “eyelet blanket”) is a beautiful skill to add to your crochet journey.
The process of Het “joinen” van de oogjes deken refers to connecting the delicate eyelet crochet motifs into a complete blanket. This process transforms simple crochet motifs into an elegant and cohesive piece. Many crocheters find joy in not only creating the motifs but also in the creative freedom that comes with joining them in unique patterns and layouts.
In this article, you’ll learn how to prepare your motifs, choose the best joining method, and execute Het “joinen” van de oogjes deken with confidence. We will explore different joining techniques, tips for a neat finish, and how to troubleshoot common mistakes.
1. Preparing Your Crochet Motifs for Het “joinen” van de oogjes deken
Before diving into Het “joinen” van de oogjes deken, the first crucial step is preparing your motifs correctly. Proper preparation ensures that your blanket comes together smoothly and looks professionally finished.
Start by blocking each motif. Blocking is the process of shaping your crochet pieces to ensure uniformity. When each motif is the same size and shape, Het “joinen” van de oogjes deken becomes much easier.
Lay your motifs flat and check for consistency in tension. Sometimes, differences in tension occur naturally, especially if the project was made over several days. Take a moment to steam or pin them as needed.
It’s important to choose whether you want a visible or invisible join. Some crocheters love the decorative effect of visible joins, while others prefer the seamless look.
Check the yarn tails on each motif. For Het “joinen” van de oogjes deken, it’s often best to leave a longer tail if you intend to use it for sewing the motifs together.
Arrange your motifs in the desired pattern. Whether you prefer random placement or a more structured layout, laying them out first helps visualize the final blanket.
Lastly, take a picture of your layout. This step will guide you during the process of Het “joinen” van de oogjes deken, ensuring you don’t lose track of your design.
2. Choosing the Right Joining Method for Het “joinen” van de oogjes deken
There are several techniques for Het “joinen” van de oogjes deken, each offering a different aesthetic and level of difficulty. Choosing the right one depends on the look you want for your finished blanket.
The slip stitch join is a popular method for Het “joinen” van de oogjes deken. It creates a slightly raised seam, adding texture without being bulky.
If you prefer a seamless appearance, the invisible join using a yarn needle is ideal. This method makes the motifs appear as one continuous piece.
The join-as-you-go method is another favorite. This technique allows you to connect motifs during the final round of each motif, saving time and producing a flexible, drapey blanket.
Single crochet join is both sturdy and decorative. It creates a ridge between motifs that highlights the eyelet design in Het “joinen” van de oogjes deken.
Flat braid join is an elegant choice. This decorative lacy method complements the airy feel of the eyelet motifs beautifully.
Finally, whip stitch join is the simplest sewing method. It’s quick and clean, perfect for beginners trying Het “joinen” van de oogjes deken for the first time.
3. Step-by-Step Process of Het “joinen” van de oogjes deken
Let’s now walk through the step-by-step process of Het “joinen” van de oogjes deken to ensure a perfect finish for your crochet blanket.
Begin by placing two motifs right sides together. This positioning helps you align the stitches perfectly for most joining methods.
If you’re using a slip stitch or single crochet join, insert your hook through both motifs’ corner stitches and secure with a slip knot.
Continue working along the sides, stitch by stitch. Keep your tension consistent to avoid puckering or overly tight seams in your Het “joinen” van de oogjes deken.
When you reach the corner, pivot and connect the next motif in the same way. Work in rows or columns, depending on your layout.
Check periodically to ensure motifs are not twisting. Straight edges are key to a polished result in Het “joinen” van de oogjes deken.
Weave in ends as you go. This prevents an overwhelming number of yarn tails to deal with at the end and keeps your work neat.
4. Tips for a Neat and Professional Het “joinen” van de oogjes deken
A flawless Het “joinen” van de oogjes deken isn’t just about the technique—it’s also about the details that elevate your work.
Use a hook size that matches or is slightly smaller than your motif hook to ensure firm joins without stretching the fabric.
Keep your workspace organized. Having motifs stacked in order reduces confusion while performing Het “joinen” van de oogjes deken.
Test your join on two sample motifs before committing to the full blanket. This allows you to check how it looks and feels.
If using join-as-you-go, memorize the connection points within the eyelets. This method requires paying attention to where loops connect.
Don’t rush the process. Taking your time during Het “joinen” van de oogjes deken guarantees better alignment and overall appearance.
Lightly block the finished blanket after joining. This final step smooths out any tension irregularities and gives your work a crisp, beautiful finish.
FAQ About Het “joinen” van de oogjes deken
What is Het “joinen” van de oogjes deken?
It’s the process of connecting individual crochet eyelet motifs to form a complete blanket, typically using various joining techniques.
Which is the easiest method for beginners?
The whip stitch join is often considered the easiest for beginners trying Het “joinen” van de oogjes deken, as it requires only a yarn needle and simple sewing skills.
Can I use the join-as-you-go method for any motif?
Yes, but it works best with motifs that have clearly defined corner and side loops, which are common in eyelet patterns.
Do I need to block my motifs before joining?
While not mandatory, blocking greatly improves the alignment and overall look when doing Het “joinen” van de oogjes deken.
What yarn is best for an oogjes deken?
Lightweight cotton or acrylic yarns are ideal, as they hold shape well and showcase the openwork pattern beautifully.
How do I prevent my blanket from curling at the joins?
Ensure consistent tension, avoid overly tight stitches while joining, and always block your finished project.
In this comprehensive guide about Het “joinen” van de oogjes deken, we explored how to prepare your motifs, select the best joining method, and execute each step with precision. With the right preparation and technique, your eyelet blanket will come together beautifully.
Now it’s your turn! Have you tried Het “joinen” van de oogjes deken before? Share your honest opinions, tips, or questions in the comments. Your feedback inspires this community to grow and learn together.


