If you are looking for a fun, practical, and creative project, this CROCHET MINI BASKET tutorial is exactly what you need. A crochet mini basket is not only an adorable handmade item but also a functional piece to help organize your space. Whether you are storing keys, jewelry, office supplies, or small crochet tools, this project is quick, beginner-friendly, and rewarding.
In this guide, you will learn how to create your own CROCHET MINI BASKET step by step. This is a perfect project for using leftover yarns, making small gifts, or even starting your own crochet product line. The best part is that it requires simple stitches and basic materials.
Throughout this article, I will guide you with easy instructions, practical tips, and ideas to customize your CROCHET MINI BASKET. This tutorial is designed with beginners in mind, but even experienced crocheters will enjoy how quickly it comes together.
1. Materials Needed for Your CROCHET MINI BASKET
To start your CROCHET MINI BASKET, you will need just a few simple materials that are easy to find. This makes it a budget-friendly project as well.
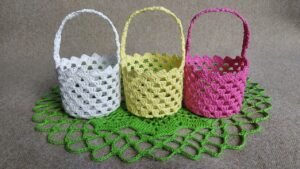
First, choose a sturdy yarn. Cotton yarn is highly recommended because it holds the shape well and gives a clean, polished look to the basket. You can use single colors or mix different shades for a vibrant effect.
A crochet hook is essential. The size of the hook should match your yarn. Typically, for baskets, a slightly smaller hook than the yarn recommends is better to create tighter stitches that hold the basket’s form.
You will also need a pair of scissors for cutting the yarn and a tapestry needle to weave in the ends neatly once your CROCHET MINI BASKET is complete.
Optional but helpful items include stitch markers to keep track of rounds, especially if you are new to working in spirals or rounds.
Some crocheters like to add a cardboard or plastic base inside the basket for extra stability. This step is completely optional but can make your mini basket even sturdier.
Finally, keep a measuring tape handy. While it’s a mini basket, you might want to adjust the size depending on your needs.
2. Step-by-Step Instructions to Crochet Your MINI BASKET
Starting your CROCHET MINI BASKET is easier than you think. This project typically begins with a magic circle or a chain loop that forms the base.
Begin by making a magic ring and working six single crochets into the ring. Pull the ring tight and join with a slip stitch if preferred, or continue working in a spiral.
For the next few rounds, you’ll increase evenly to create a flat circle. This circle forms the bottom of your CROCHET MINI BASKET. A typical increase pattern is doubling every stitch in the second round, then gradually spacing increases in the following rounds.
Once you’ve achieved the desired size for the base, it’s time to stop increasing and start building the sides. This is done by working single crochet stitches around without any increases.
To create crisp edges between the base and the sides, some crocheters prefer doing one round of back loop-only single crochet. This creates a natural fold line.
Continue crocheting in rounds until your CROCHET MINI BASKET reaches the desired height. The sides should be stiff enough to stand on their own.
When satisfied with the height, finish with a slip stitch, cut the yarn, and weave in the ends with a tapestry needle. Your basic mini basket is now complete.
3. Creative Ideas to Customize Your CROCHET MINI BASKET
The beauty of a CROCHET MINI BASKET is that it’s highly customizable. You can adjust colors, sizes, textures, and decorations to fit your style.
One idea is to use two or more colors of yarn to create stripes or color-block effects. This instantly adds personality to your basket.
You can also add handles. Small loop handles on each side are practical and cute. Simply chain a few stitches and skip the corresponding number of stitches in the round to create the handle space.
Another option is to add embellishments such as crochet flowers, buttons, wooden tags, or ribbons. These little touches make your CROCHET MINI BASKET unique and more decorative.
Experimenting with different yarn types can also change the look. Jute or T-shirt yarn gives a rustic, chunky appearance, while mercerized cotton offers a sleek, modern finish.
For gifting, consider filling the basket with goodies like candies, bath bombs, or stationery. It becomes an instant handmade gift that everyone appreciates.
You can also stiffen your basket further with fabric stiffener spray if you want it to be extra firm, especially if you plan to sell or display it.
4. Uses and Benefits of a CROCHET MINI BASKET
A CROCHET MINI BASKET is not just adorable; it’s incredibly practical and functional in daily life. Its uses are nearly endless.
Use it on your desk to store paper clips, pens, or small office supplies. It adds a touch of charm to your workspace while keeping things organized.
In the bathroom, the basket can hold makeup, cotton pads, or hair accessories. Its compact size makes it ideal for small spaces.
In the kitchen, a mini crochet basket works perfectly for holding tea bags, spices, or little utensils, adding a cozy handmade vibe to your decor.
Use it in your craft area to store buttons, stitch markers, or other small tools. Having multiple CROCHET MINI BASKET items in different colors can help sort supplies by category.
For kids’ rooms, these baskets are fantastic for organizing small toys, Legos, or art supplies while adding a soft and safe storage option.
They are also great for gifts. Whether it’s for birthdays, baby showers, or holidays, a CROCHET MINI BASKET filled with thoughtful items becomes a treasured present.
FAQ About CROCHET MINI BASKET
Q: What type of yarn is best for a crochet mini basket?
A: Cotton yarn is the best choice for a CROCHET MINI BASKET because it holds shape well and is durable.
Q: Can I make the mini basket larger?
A: Absolutely. Simply add more rounds of increases at the base to make it wider and continue the sides for a taller basket.
Q: How long does it take to make a crochet mini basket?
A: Most CROCHET MINI BASKET projects take between 1 to 2 hours, depending on the size and your crochet speed.
Q: Is this project beginner-friendly?
A: Yes, it’s perfect for beginners. It mainly uses single crochet stitches and basic increases.
Q: Can I wash my crochet mini basket?
A: Yes, if made with cotton yarn, it’s machine washable on a gentle cycle. Hand washing is recommended to maintain shape.
Q: Do I need a pattern to make it?
A: No strict pattern is necessary. Once you understand the basic increase and sides construction, you can freestyle the size and shape.
Creating your own CROCHET MINI BASKET is a fun, relaxing, and rewarding experience. You’ve learned how to select the right materials, follow the step-by-step process, and even customize your mini basket to suit your needs or decor style. Whether for storage, decoration, or gifting, these little baskets are a wonderful addition to any home.
I hope this tutorial has inspired you to pick up your hook and start crocheting today. If you enjoyed this guide or have any questions, suggestions, or feedback, please leave your honest opinion in the comments. Your input helps improve and inspire future projects!


