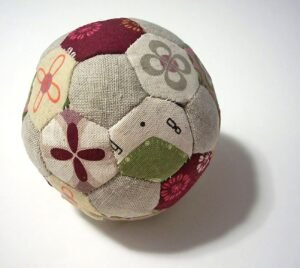
If you love sewing and are looking for a practical yet adorable project, this Round Pincushion Free Tutorial & Pattern is exactly what you need. This step-by-step guide will help you create a beautiful round pincushion that’s not only functional but also a delightful addition to your sewing room decor. Whether you’re an experienced crafter or a beginner, this tutorial is designed to be easy to follow and fun to make.
Using this Round Pincushion Free Tutorial & Pattern, you’ll learn how to sew a sturdy pincushion that holds your pins and needles securely. A pincushion is an essential tool for anyone who enjoys sewing, quilting, or embroidery. It helps keep your workspace organized and makes your creative process much more efficient.
In this comprehensive guide, you will find detailed instructions, materials needed, and sewing tips to ensure your pincushion turns out perfectly. The best part is that this Round Pincushion Free Tutorial & Pattern requires only basic sewing skills, simple materials, and a little bit of your time.
1. Materials Needed for Your Round Pincushion Free Tutorial & Pattern
Before starting your Round Pincushion Free Tutorial & Pattern, make sure you have all the materials ready. Having the right tools and fabrics will make the sewing process smoother and more enjoyable.
You will need two pieces of fabric of your choice. Cotton is highly recommended because it’s easy to work with and comes in a variety of fun patterns. Choosing colorful fabrics will give your pincushion a cheerful look.
You’ll also need some polyester fiberfill stuffing. This will give your round pincushion its soft, yet firm shape. Make sure to use enough stuffing to make it firm enough to hold pins securely.
A sewing needle and matching thread are essential. You can use a sewing machine for some parts, but hand sewing will be necessary for closing the pincushion.
Don’t forget a small piece of felt or thicker fabric to create a base for the pincushion. This will help stabilize it and prevent it from slipping on your table.
Finally, you can add decorative elements such as buttons, ribbons, or embroidery details to personalize your pincushion. This is completely optional but adds a lovely finishing touch.
Now that you have everything ready, let’s move on to the step-by-step process of creating this adorable pincushion using the Round Pincushion Free Tutorial & Pattern.
2. Cutting and Preparing Your Fabric
The first step in the Round Pincushion Free Tutorial & Pattern is cutting the fabric into the right shapes. For a round pincushion, you will need two circles of fabric.
Use a small plate or any round object as a template. Trace around it onto the fabric with a fabric marker or chalk, and cut out two circles of equal size.
If you’d like your pincushion to be larger or smaller, simply choose a bigger or smaller template. The size is entirely up to you.
After cutting your fabric, press both pieces with an iron to remove wrinkles. This step will help you sew more precisely and get a neat finish.
If you plan to add any embroidery or decorations, do this now before assembling the pincushion. It’s much easier to embellish the fabric when it’s flat.
Prepare the felt or thicker fabric for the base. Cut it into a circle slightly smaller than your main fabric circles. This will be attached later to give your pincushion stability.
With your fabric prepared, you are now ready to start sewing the main shape following the Round Pincushion Free Tutorial & Pattern.
3. Assembling the Round Pincushion
To begin assembling the Round Pincushion Free Tutorial & Pattern, place the two fabric circles right sides together. This means the sides with the print or color should face each other.
Pin around the edges to hold the fabric in place. This will help prevent shifting while you sew.
Using a sewing machine or hand stitching, sew around the circle with a ¼ inch seam allowance. Make sure to leave a small opening, about 2 inches, for turning and stuffing.
Carefully clip small notches around the seam allowance, especially along the curves. Be cautious not to cut through the stitches. This helps the fabric lay smoothly once turned.
Turn the pincushion right side out through the opening. Use a blunt tool, like a chopstick or the end of a pencil, to gently push out the edges and make the circle neat.
Start filling your pincushion with polyester fiberfill. Stuff it firmly but evenly to ensure the pincushion holds its shape and provides enough resistance for the pins.
Once fully stuffed, sew the opening closed using a ladder stitch or an invisible stitch for a clean finish. Congratulations, your Round Pincushion Free Tutorial & Pattern is almost complete!
4. Adding Finishing Touches to Your Round Pincushion
Now it’s time to add final touches to your Round Pincushion Free Tutorial & Pattern. This is the fun part where you can let your creativity shine.
First, attach the felt base to the bottom of your pincushion. This adds weight and stability. You can hand stitch it neatly around the edges or use fabric glue if preferred.
If you’d like to give your pincushion a tufted look, sew a button to the center of both the top and bottom. Pull the thread tightly to create a dimpled effect, which adds charm and character.
Decorate the sides with ribbon, lace, or any trim you like. This not only enhances the appearance but also covers any visible stitches from closing the opening.
You can personalize your pincushion further by adding small embroidered flowers, initials, or patterns that match your sewing room decor.
Some people like to add a loop or strap to the pincushion, making it easy to hang or carry around. This is particularly useful if you sew in different spaces.
Finally, give your pincushion a final check to ensure everything is secure and tidy. Your beautiful creation using this Round Pincushion Free Tutorial & Pattern is now ready for use!
FAQ About Round Pincushion Free Tutorial & Pattern
Q1: What is the best fabric to use for a round pincushion?
A: Cotton fabric is highly recommended for the Round Pincushion Free Tutorial & Pattern because it’s easy to sew, durable, and available in countless patterns.
Q2: How do I make my pincushion firm enough?
A: Use plenty of polyester fiberfill and stuff it firmly. The more stuffing, the firmer your pincushion will be, ensuring your pins stay in place.
Q3: Can I sew the entire pincushion by hand?
A: Yes, the Round Pincushion Free Tutorial & Pattern can be completed entirely by hand if you don’t have a sewing machine. It may take longer but works perfectly.
Q4: How big should the fabric circles be?
A: It depends on your preference. Most pincushions are made with circles ranging from 4 to 6 inches in diameter, but you can adjust according to your needs.
Q5: Can I wash the pincushion if it gets dirty?
A: If you use washable fabric and stuffing, your pincushion can be hand-washed gently. Avoid machine washing as it may distort the shape.
Q6: Is it necessary to add a felt base?
A: While optional, the felt base in the Round Pincushion Free Tutorial & Pattern helps prevent slipping and adds durability. It’s highly recommended for best results.
In this article, you learned how to create a lovely pincushion with this Round Pincushion Free Tutorial & Pattern. From selecting the right materials to sewing, stuffing, and adding beautiful finishing touches, this project is both simple and rewarding.
A handmade pincushion is not only a practical tool but also a wonderful way to add a personal touch to your sewing space. Plus, it makes an excellent gift for friends who love crafting.
I hope you enjoyed following this Round Pincushion Free Tutorial & Pattern. I would love to hear your honest opinion about this tutorial. Please leave a comment with your thoughts, suggestions, or even photos of your finished pincushion. Your feedback helps improve future tutorials!


