If you’ve been looking for a creative and relaxing DIY project, the amigurumi cuti cat crochet free pattern tutorial is the perfect place to start. This adorable project combines the joy of crocheting with the irresistible charm of tiny stuffed animals known as amigurumi. Whether you’re a seasoned crocheter or a curious beginner, this guide will walk you through the steps to bring your very own cuti cat to life.
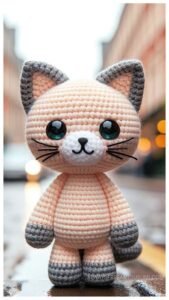
The term amigurumi comes from Japan and refers to the art of crocheting or knitting small, stuffed yarn creatures. It has become a popular hobby worldwide due to its cuteness, versatility, and the meditative nature of the craft. And when it comes to cuteness, the cuti cat certainly takes center stage. With its big eyes, tiny paws, and expressive face, this little feline is hard to resist.
In this comprehensive amigurumi cuti cat crochet free pattern tutorial, we’ll not only give you a free step-by-step pattern but also offer useful tips for customization, materials, and finishing touches. So grab your hook, choose your yarn, and let’s start crocheting your new favorite plushie friend!

1. What You Need to Start Your Amigurumi Cuti Cat
Before diving into the actual stitching, let’s take a look at the basic tools and materials needed for your amigurumi cuti cat crochet free pattern tutorial. Preparing everything in advance will make the process much smoother and more enjoyable.
First, you’ll need a good quality yarn. For amigurumi, cotton yarn is often preferred because it holds shape well and doesn’t pill. Choose soft pastel colors or go bold with vibrant hues—the cuti cat looks great in any palette.
Next, select the appropriate crochet hook. For most amigurumi projects, a 2.5 mm or 3.0 mm hook works well, especially when working with medium-weight yarn. A smaller hook helps keep the stitches tight and the stuffing secure.
You’ll also need safety eyes or black embroidery thread for the eyes. Safety eyes give a professional look and are easy to attach before you stuff the head. If you’re making this for a child under three, opt for embroidered eyes for safety.
Polyester fiberfill is used to stuff your amigurumi cuti cat. Make sure it’s evenly packed to keep the shape uniform. You can also use yarn scraps, but fiberfill tends to give a better finish.
Don’t forget some basic tools like stitch markers, a yarn needle, and scissors. Stitch markers are especially helpful for keeping track of rounds in this circular project.
Finally, print out or keep handy your amigurumi cuti cat crochet free pattern tutorial. Having clear, step-by-step instructions will save you a lot of time and confusion during the process.
2. Step-by-Step Crochet Instructions
Now that you have all your materials ready, let’s dive into the actual amigurumi cuti cat crochet free pattern tutorial. We’ll start from the head and work our way down to the body, limbs, and tail.
Begin by making a magic ring and working single crochets in the round. Increase evenly over the next few rounds to form the head. This spherical shape is the foundation of your cat’s cute look.
Once the head is formed, insert the safety eyes or embroider them securely. Place the eyes about 6 stitches apart for a balanced look. Now, stuff the head with fiberfill to your desired firmness.
Start crocheting the body in a similar circular fashion. The body should be slightly smaller than the head for a more adorable proportion. Continue decreasing stitches toward the bottom and stuff it before closing off.
For the ears, make two small triangular pieces. These are usually made with just a few rows and sewn securely to the top of the head. You can also add inner ear color with felt or contrasting yarn.
The limbs and tail are simple tubes. Crochet four short legs and a longer piece for the tail. After stuffing each, sew them to the body. Make sure they’re positioned symmetrically for the best appearance.
Finally, assemble all parts carefully and double-check for any loose threads. Your amigurumi cuti cat crochet free pattern tutorial masterpiece is now complete!
3. Customization Tips and Creative Ideas
One of the joys of working with the amigurumi cuti cat crochet free pattern tutorial is the ability to personalize your creation. Here are some creative ways to make your cuti cat one-of-a-kind.
Try using multi-colored yarn for a playful look. Gradient yarns or speckled patterns can create interesting textures and effects without any extra work.
Change the size of your cat by using thicker or thinner yarn and adjusting your hook size. This can result in a tiny keychain-size cat or a larger cuddle-sized plushie.
Add accessories like a tiny scarf, bow tie, or flower crown. These details can bring more personality and even seasonal flair to your project.
Embroider little features such as whiskers, a nose, or blush marks. Use fine thread and a delicate hand to add these charming touches.
Turn your cuti cat into a themed character. For example, make a Halloween version with a witch hat, or a Valentine’s edition with a tiny heart.
If you’re making multiple cats, consider creating a full “cat family” with varying colors and expressions. It’s a great gift idea and looks adorable as a display.
4. Sharing and Selling Your Amigurumi Cuti Cat
Once you’ve completed your amigurumi cuti cat crochet free pattern tutorial, it’s time to show off your work! Whether you want to share your project with friends or even sell it, there are a few tips to keep in mind.
Take good-quality photos with natural lighting. Use a neutral background and show different angles to highlight your craftsmanship.
If sharing online, use popular hashtags like #cuticat, #amigurumi, or #crochetpattern to increase visibility. Instagram, Pinterest, and TikTok are great platforms for crocheters.
You can also sell your handmade items at local craft fairs, on Etsy, or through your personal website. Be sure to mention that the pattern is based on the “amigurumi cuti cat crochet free pattern tutorial.”
Always give credit to the original pattern designer if you’re selling finished products. Check the pattern’s terms of use—some are for personal use only, while others allow commercial use with attribution.
Engage with the crochet community by sharing your progress, tips, and finished pieces. It’s a great way to learn, inspire, and connect with fellow makers.
If you’re passionate about this craft, consider creating your own variations or even writing patterns. You might inspire others just as you were inspired.
Frequently Asked Questions (FAQ)
Q1: Is the amigurumi cuti cat crochet free pattern suitable for beginners?
Yes! The pattern is designed with beginners in mind. As long as you know basic stitches like single crochet and how to work in the round, you’ll be able to complete this project.
Q2: How long does it take to make a cuti cat amigurumi?
Depending on your speed and experience, it typically takes 4–6 hours to complete one cuti cat. Beginners might take a bit longer, especially on their first try.
Q3: Can I use different types of yarn?
Absolutely. While cotton yarn is preferred, you can use acrylic, wool blends, or even velvet yarn for a different texture. Just remember to adjust the hook size accordingly.
Q4: Are safety eyes safe for all ages?
Safety eyes are great for decorative purposes but not recommended for children under 3 due to choking hazards. For young children, opt for embroidered eyes.
Q5: Can I sell the finished amigurumi cuti cat?
Yes, in most cases you can sell finished products as long as you credit the original pattern creator and the pattern allows commercial use. Always check the specific licensing terms.
Q6: Where can I find more free patterns like this?
You can find more free crochet patterns on craft blogs, Pinterest, and YouTube. Many designers also offer free patterns through their newsletters or social media.
Creating your very own amigurumi cuti cat crochet free pattern tutorial project is not only rewarding but also a fantastic way to explore creativity and mindfulness. From preparing materials to stitching every detail, this tutorial guides you through the entire process, ensuring your success whether you’re a beginner or experienced crocheter.
We hope this tutorial inspires you to dive into the charming world of amigurumi. If you found this guide helpful, please leave your honest feedback and share any suggestions or improvements you’d like to see in future tutorials. Happy crocheting!


