Looking for a Super Easy & Cute Easter Bunny Egg Crochet Tutorial – Free Tutorial that’s perfect for spring crafts, gift ideas, or seasonal décor? You’re in the right place! This beginner-friendly guide will walk you through every step in creating your very own Easter Bunny Egg Crochet masterpiece.
Crochet enthusiasts of all levels will love how simple and fun this project is. Whether you’re making these as decorations, Easter basket fillers, or handmade gifts, this Super Easy & Cute Easter Bunny Egg Crochet Tutorial delivers charm, creativity, and festive joy. Plus, it’s a budget-friendly and relaxing way to spend your weekend.
In this article, we’ll break down everything you need to know—from materials and tools to step-by-step instructions. You’ll also find helpful tips, a comprehensive FAQ section, and SEO-rich content that follows Google AdSense policies. Let’s dive right into the cuteness!
1. Gathering Materials for Your Easter Bunny Egg
Before starting this Super Easy & Cute Easter Bunny Egg Crochet Tutorial, it’s essential to gather the right materials. This will make the process smoother and more enjoyable. Choosing high-quality yet affordable materials ensures a better-looking finished product.
First, you’ll need a crochet hook, typically size 3.5mm (E) or 4.0mm (G) works best for this kind of project. This size allows you to keep your stitches tight enough so the stuffing doesn’t peek through.
Next up is cotton or acrylic yarn in pastel colors. Think white, light pink, baby blue, and soft yellow. You’ll want a main color for the bunny’s body and accent shades for details like ears and cheeks.
You’ll also need stuffing, which could be fiberfill or any soft filling material. It gives the egg its plump shape, making the bunny cuddly and cute.
For details like eyes and nose, you can use safety eyes, embroidery thread, or even small felt pieces. This is where you can get creative and personalize your bunny eggs.
Lastly, make sure you have stitch markers, scissors, and a yarn needle. These tools help with precision and clean finishing touches.
Once everything is ready, clear a comfy space, play some chill music, and prepare for crochet magic to begin!
2. Step-by-Step Instructions to Crochet Your Bunny Egg
Now let’s get into the core of the Super Easy & Cute Easter Bunny Egg Crochet Tutorial – Free Tutorial. This section provides clear and digestible steps that even beginners can follow with ease.
Start by creating a magic ring and crocheting six single crochets (sc) into the loop. Pull tight to close the ring. This will be the base of your egg.
In the next few rounds, increase evenly. Typically, you’ll do 2 sc in each stitch in the second round, then alternate between single and increases in the following rounds to create the egg’s round shape.
Once you reach the desired width, continue with single crochets around without increasing. This forms the middle part of the egg. Make sure the shape remains smooth and egg-like.
To start tapering off the egg’s top, begin decreasing—single crochet two stitches together at equal intervals. Keep checking the symmetry as you go.
Before closing the top entirely, insert the stuffing. Add enough to make the egg firm, but not too tight that it stretches the stitches.
Finally, close off the top and weave in the yarn end using a yarn needle. You now have a basic crochet egg ready to be transformed into an Easter bunny!
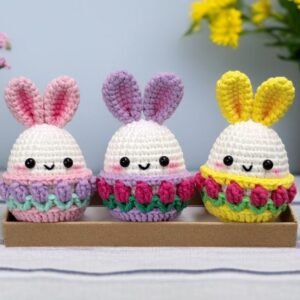
3. Adding Bunny Features to Your Egg
With the egg base complete, it’s time to add those signature bunny features that make this Super Easy & Cute Easter Bunny Egg Crochet Tutorial so adorable and popular.
Start with the ears: Crochet two small ovals using your chosen yarn color. Make them slightly longer than wide and use tight stitches so they stand up well. Stitch them to the top of the egg.
Add the eyes next. Safety eyes are the fastest option—just pop them in and secure them from inside. Alternatively, stitch small black ovals with embroidery thread for a softer handmade look.
For the nose and mouth, use pink embroidery thread. A tiny triangle for the nose and a simple curved “Y” shape for the mouth gives it that classic bunny smile.
You can also blush the cheeks with soft pink yarn or even a tiny dab of blush powder for an extra cute touch. Just make sure the powder is fabric-safe if you’re giving the bunny to a child.
Want a bow tie or flower crown? Add small crochet embellishments or tiny accessories from your local craft store. It’s a fun way to personalize each bunny.
Finish by sewing a tiny pom-pom tail on the back. This gives your bunny a playful backside and completes the full Easter aesthetic.

4. Creative Uses and Display Ideas
The possibilities are endless with this Super Easy & Cute Easter Bunny Egg Crochet Tutorial – Free Tutorial. These bunny eggs can be used in several adorable and creative ways.
First, they make excellent Easter basket stuffers. Instead of plastic toys or candy, gift a handmade crochet bunny that kids can treasure year after year.
They also double as seasonal home décor. Arrange them in a cute basket, hang them on an Easter tree, or use them as part of your table centerpiece.
For those with crafty businesses or Etsy shops, these bunnies are perfect for selling at spring craft fairs. People love seasonal handmade goods—especially those with charm and character.
You could also use them as party favors for Easter brunch or Sunday school activities. Add a name tag and they instantly become a keepsake.
Want to go the extra mile? Create a themed set, such as a bunny family or color-coded eggs. These collections are great for social media shares and festive photo ops.
Finally, consider giving them to local charities, hospitals, or children’s homes. Spreading joy with your hobby is always a beautiful gesture.
FAQ – Super Easy & Cute Easter Bunny Egg Crochet Tutorial
Q1: Is this tutorial suitable for complete beginners?
Yes! This Super Easy & Cute Easter Bunny Egg Crochet Tutorial is beginner-friendly and uses basic stitches like single crochet and simple increases/decreases.
Q2: What size crochet hook should I use?
We recommend using a 3.5mm to 4.0mm hook. This helps maintain tight, clean stitches that hold the egg shape well.
Q3: Can I use other yarn types besides cotton or acrylic?
Absolutely! You can experiment with plush or velvet yarns, though they may require hook size adjustments and may affect stitch visibility.
Q4: How long does it take to make one bunny egg?
On average, about 1 to 2 hours depending on your skill level and how detailed your embellishments are.
Q5: Are these safe for young children?
Yes, but be cautious with small parts like safety eyes. For younger children, consider embroidering eyes instead of using plastic ones.
Q6: Can I machine wash these bunny eggs?
If you use machine-washable yarn and avoid delicate embellishments, yes. Otherwise, it’s best to hand wash and air dry.
This Super Easy & Cute Easter Bunny Egg Crochet Tutorial – Free Tutorial has guided you through every step to create your own adorable Easter bunny egg. From preparing materials to adding delightful bunny details, you’ve learned how to bring a springtime smile to everyone’s face.
Whether you’re crafting for fun, gifting, or selling, this tutorial is a versatile and joyful project. We hope you enjoyed making your bunny egg as much as we enjoyed sharing this tutorial with you!
Please leave a sincere opinion in the comments below and share your bunny creations. We’d also love to hear your suggestions for future crochet tutorials. Happy crocheting and Happy Easter! 🐰💛


