Whether you’re new to quilting or looking to enhance your skills, this tutorial is designed to make the process easy and enjoyable. By the end of this article, you’ll have all the tools and knowledge to confidently create your own Dresden Plate quilt blocks. Let’s get started!
1. What is a Dresden Plate?
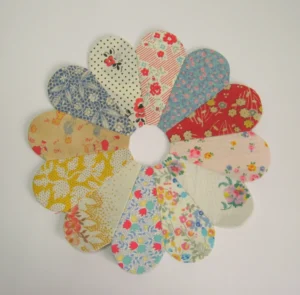
The Dresden Plate is a traditional quilt block pattern made up of fan-shaped “blades” arranged in a circular design. These blades typically converge at a central point and are often finished with a small circular applique in the center. Its name comes from Dresden, Germany, a city known for its ornate porcelain designs, which inspired the intricate look of this quilt block.
- Origins and History: The Dresden Plate gained popularity in the 1920s and 1930s during the quilting boom in the United States. Its design reflects the elegance of the Art Deco
period.
- Versatility: The Dresden Plate can be crafted in various sizes, making it suitable for quilts, table runners, pillows, and wall hangings.
- Design Variations: While traditionally circular, modern interpretations of the Dresden Plate allow for creative adjustments, such as petal shapes or asymmetrical arrangements.
- Tools Needed: Basic quilting supplies like fabric, a rotary cutter, sewing machine, and a Dresden ruler will simplify the process.
Understanding the foundation of the Dresden Plate pattern will give you the confidence to create this timeless design.
2. How to Make a Dresden Plate Quilt Block
Making a Dresden Plate quilt block involves several steps, from cutting the blades to assembling and finishing the design. Below, we’ll break down each part of the process.
- Step 1: Choose Your Fabrics: Select a mix of prints and solids to create a balanced, eye-catching design. Fat quarters or fabric scraps work well for this project.
- Step 2: Cut the Blades: Use a Dresden ruler to cut precise blades from your fabric. Most patterns require 12 to 20 blades for a full circle, depending on the design.
- Step 3: Sew the Blades: Fold each blade in half lengthwise and sew along the top edge. Turn it right-side-out to create a pointed tip, then press flat.
- Step 4: Assemble the Plate: Arrange the blades in a circle and sew them together along the edges. Press the seams flat to ensure a smooth finish.
- Step 5: Add the Center: Cut a small circle of fabric and applique it onto the center of the plate to cover the seam intersections.
- Step 6: Attach to Background Fabric: Sew or applique the completed Dresden Plate onto a square of background fabric, creating the foundation for your quilt block.
By following these steps, you’ll have a beautifully crafted Dresden Plate block ready to incorporate into your quilting projects.
3. Creative Dresden Plate Design Ideas
Once you’ve mastered the basics, you can experiment with different designs and techniques to make your Dresden Plate unique.
- Scrappy Dresden Plate: Use a variety of fabric scraps to create a playful, colorful design that adds character to your quilt.
- Layered Dresden Plate: Stack multiple Dresden Plates of different sizes to create a 3D effect. This technique adds depth and dimension to your quilt.
- Modern Dresden Plate: Experiment with bold, geometric fabrics or asymmetrical blade arrangements for a contemporary twist.
- Seasonal Themes: Use themed fabrics for holidays or seasons to create Dresden Plates that match the occasion.
- Mini Dresden Plates: Scale down the pattern to create small, intricate blocks perfect for smaller projects like coasters or mini quilts.
- Custom Center Designs: Instead of a plain fabric circle, consider embroidering or adding a fussy-cut motif to the center for a personal touch.
These variations showcase the endless possibilities of the Dresden Plate pattern and encourage creativity in your quilting journey.
4. Tips and Tricks for Perfect Dresden Plates
Creating a Dresden Plate may seem daunting at first, but with these tips, you’ll achieve professional results in no time.
- Use a Dresden Ruler: This tool ensures accurate cuts and consistent blade sizes, simplifying the process.
- Pressing is Key: Take the time to press seams and folds as you go. This ensures a crisp, polished finish.
- Starch Your Fabric: Lightly starching your fabric before cutting and sewing can prevent fraying and improve precision.
- Hand Applique for Precision: If you prefer hand sewing, use a needle-turn applique method for a delicate, finished look.
- Test Your Layout: Before sewing, lay out your blades on the background fabric to finalize your design and adjust the color arrangement.
- Practice Patience: Perfection takes time. Don’t rush through the process; instead, enjoy the journey of creating something beautiful.
By keeping these tips in mind, you’ll find the Dresden Plate pattern both rewarding and enjoyable to create.
The Dresden Plate is a versatile and timeless quilting pattern that allows for endless creativity. By following this free tutorial, you’ve learned how to select fabrics, cut and assemble blades, and explore unique design ideas. We hope this guide inspires you to incorporate the Dresden Plate into your next quilting project.
We’d love to hear from you! Share your thoughts, experiences, and suggestions in the comments. Your feedback helps us create even better content for the quilting community. Happy quiltin


