Quilting has evolved over centuries, yet certain patterns have maintained their allure and timelessness.
1. The History and Appeal of Whirligigs and Pinwheels Quilt Patterns
The Whirligigs and Pinwheels quilt block dates back to early quilting traditions, where quilters were inspired by the whimsical look of pinwheels turning in the breeze. The design’s movement and symmetry became a popular motif in American quilts during the 19th century and continued to evolve as quilting techniques advanced.
Quilters were drawn to this pattern because of its simplicity and adaptability. The block’s versatility means that, depending on the fabric selection and color scheme, it can take on entirely different aesthetics—ranging from playful and colorful to subtle and sophisticated. This adaptability, combined with the quilt block’s innate charm, has made it a staple in quilting communities worldwide.
The Whirligigs and Pinwheels quilt block is more than just a decorative piece; it tells a story. Each twist and turn of the fabric represents the intricate craftsmanship passed down through generations. This quilt block appeals to modern quilters, who value its blend of tradition and modern appeal, making it a cherished addition to any quilt.
2. Essential Fabric and Color Selection for Your Quilt Block
THE BEST QUILT PATTERNS
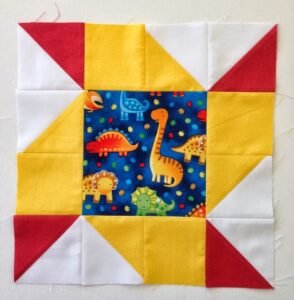
Choosing the right fabrics and colors for your Whirligigs and Pinwheels quilt block can make all the difference. With the right combination, you can bring out the quilt’s playful, dynamic nature or create a more subtle, refined look. A good place to start is with two contrasting colors to enhance the pinwheel effect—think bold colors like navy and white or vibrant red and yellow.
When selecting fabrics, cotton is a popular choice among quilters for its durability, ease of use, and smooth texture, which creates crisp lines in the final design. For a touch of whimsy, consider incorporating prints with small florals, polka dots, or gingham patterns to add depth and personality. Remember, fabric weight consistency is key to achieving a smooth, cohesive block.
Additionally, think about how your quilt will be used and where it will be displayed. If you want a more vintage or rustic feel, look for earthy tones like browns, greens, and soft yellows. Alternatively, for a modern look, select bold colors or monochrome schemes. Taking the time to plan your fabric selection will ensure your quilt block achieves the intended aesthetic.
3. Tools and Materials Needed for Making a Whirligigs and Pinwheels Quilt Block
To create a Whirligigs and Pinwheels quilt block, it’s essential to have the right tools and materials on hand. The basic tools include a rotary cutter, cutting mat, quilting ruler, and sewing machine. A rotary cutter allows for precise cuts, while a self-healing cutting mat ensures the longevity of your cutting surface.
Aside from these basics, fabric clips or pins, an iron, and a seam ripper are invaluable. Fabric clips keep your pieces together without damaging delicate fabrics, while an iron helps press seams for a crisp, polished look. A seam ripper is always useful for correcting any stitching errors, especially for beginners who may need to adjust as they go.
When choosing thread, opt for a high-quality cotton thread that matches your color scheme. Remember that different threads can affect the final look and durability of your quilt. High-quality tools and materials will make the process smoother and your finished product much more professional.
4. Step-by-Step Guide to Creating a Whirligigs and Pinwheels Quilt Block
Creating the Whirligigs and Pinwheels quilt block requires a few precise cuts and careful piecing. Below is a step-by-step guide, with fabric cutting measurements, to help you bring this pattern to life. Gather your materials and follow these steps to start:
Step 1: Cut Your Fabric
- Cut four 5-inch squares from Fabric A (this will be the pinwheel color).
- Cut four 5-inch squares from Fabric B (this will be the background color).
- Cut two 4.5-inch squares from Fabric A for the whirligig.
- Cut two 4.5-inch squares from Fabric B for the whirligig.
Step 2: Assemble the Pinwheel
- Take each 5-inch square of Fabric A and Fabric B, and draw a diagonal line on the back of each square in Fabric B.
- Pair each square of Fabric A with one from Fabric B, right sides together, aligning edges.
- Sew along both sides of the drawn line at a 1/4-inch seam allowance. Cut along the line to create two half-square triangles (HSTs) per pair.
Step 3: Arrange the Whirligig Pieces
- Place each HST in a 2×2 arrangement to form the pinwheel design.
- Sew the squares together in pairs, pressing seams open, then join the pairs to complete the pinwheel.
- Repeat these steps for each pinwheel block until you have four pinwheels.
Step 4: Assemble the Quilt Block
- Take each 4.5-inch square of Fabrics A and B, and position them around the pinwheel blocks to create the whirligig effect.
- Arrange the pinwheel and whirligig pieces in a 4×4 layout, alternating pinwheel and whirligig blocks.
- Sew each row, press the seams, then join the rows to complete the Whirligigs and Pinwheels quilt block.
5. Tips for Mastering the Whirligigs and Pinwheels Quilt Block
While the Whirligigs and Pinwheels block may seem straightforward, a few tips can help you achieve a polished result. Firstly, always use a 1/4-inch seam allowance, as this will ensure uniformity across your quilt block, making assembly easier. Consistent seams will also prevent distortion when sewing blocks together.
Pressing your seams as you go is crucial to creating a clean, flat quilt block. Ironing after each seam, rather than waiting until the end, allows the pieces to align better, giving you a smoother finish. Be careful not to stretch the fabric while ironing; gentle pressing with a bit of steam works best.
Lastly, be patient with yourself, especially if you’re a beginner. The Whirligigs and Pinwheels quilt block requires precision, but with practice, it becomes easier. Don’t be afraid to experiment with different fabric combinations or to try again if your first attempt isn’t perfect. Quilting is a journey, and each block is a step toward mastering your craft.
6. Ideas for Using Your Whirligigs and Pinwheels Quilt Block in Projects
Once you’ve completed a few Whirligigs and Pinwheels quilt blocks, you’ll have a range of options for incorporating them into your projects. These blocks work beautifully in traditional quilts, offering a touch of charm that makes the entire piece feel vibrant and playful. A full quilt made of Whirligigs and Pinwheels blocks creates a cohesive, visually dynamic blanket.
You might also consider using individual quilt blocks as statement pieces. For example, a single Whirligigs and Pinwheels block can be a unique pillow cover or framed as a piece of wall art. Experimenting with different block arrangements can create a new design, providing endless possibilities for unique, handmade projects.
If you’re a fan of practical items, the Whirligigs and Pinwheels quilt block can be sewn into tote bags, table runners, or even placemats. The versatility of this block makes it a great option for creating both functional and decorative pieces, adding a personal touch to everyday items.
7. Why the Whirligigs and Pinwheels Quilt Block Remains a Timeless Choice
There’s a reason why the Whirligigs and Pinwheels quilt block has stood the test of time. Its visual appeal, combined with the simplicity of the pattern, makes it a favorite for both novice and experienced quilters. As quilters continue to explore new materials and techniques, this classic quilt pattern remains a beloved option that adapts to various styles and preferences.
The charm of the Whirligigs and Pinwheels quilt block lies in its movement and balance. Each rotation of the pinwheel feels like a nostalgic reminder of simpler times, while its geometric precision offers a satisfying structure. This block serves as a versatile canvas where quilters can express their creativity, whether by choosing bold colors or intricate fabrics.
In a world of fast fashion and fleeting trends, the Whirligigs and Pinwheels quilt block represents something lasting. Each finished quilt is a testament to the quilter’s patience, creativity, and skill. Whether you’re creating an heirloom piece or simply a cozy blanket, this quilt block will bring joy to both its maker and those who get to enjoy its warmth and beauty.


